Introduction
Patients affected by dental wear often are treated only when their dentation becomes extremely compromised.
However, when pathologies such as dental erosion, and/or parafunctional habits are not intercepted at an early stage, full mouth rehabilitations, mostly implementing crowns, are often considered. Thanks to improved adhesive techniques, the indications for crowns have decreased and a more conservative approach can be nowadays proposed to protect the remaining tooth structure.
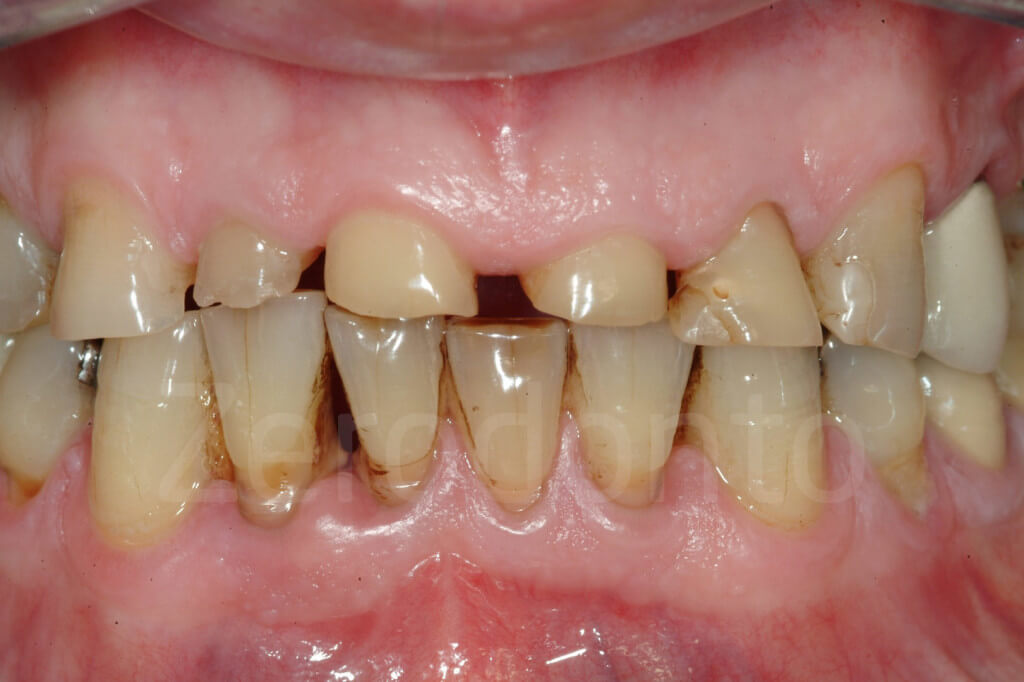
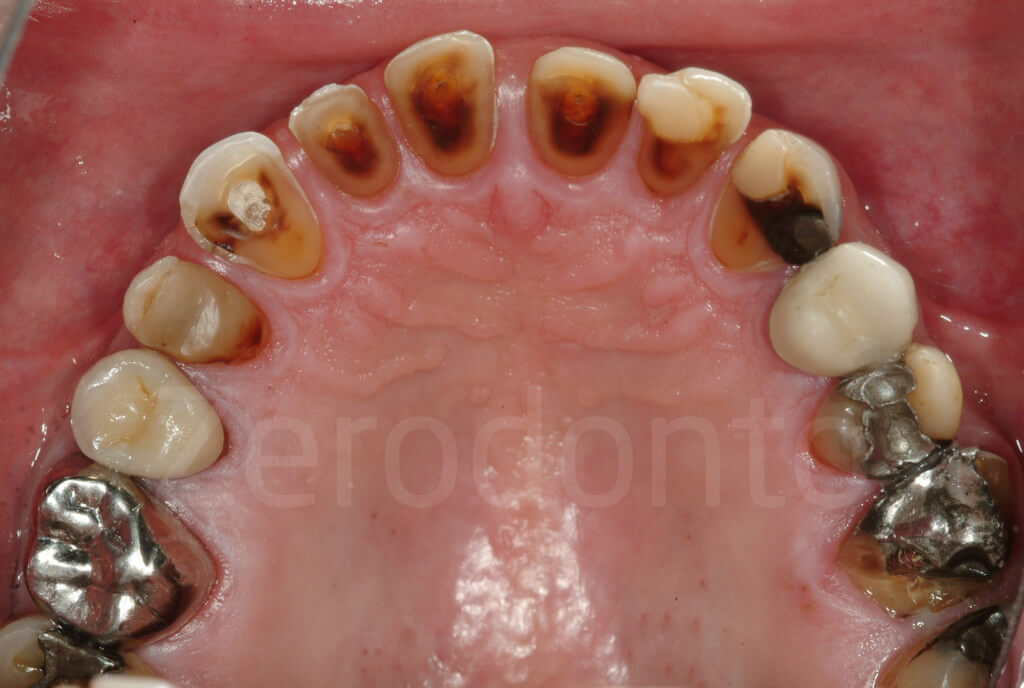
Fig 1-2: Patient affected by generalized severe dental wear. Ideally the patient should have been intercepted earlier and a more global treatment should have been proposed instead of “one tooth dentistry”.
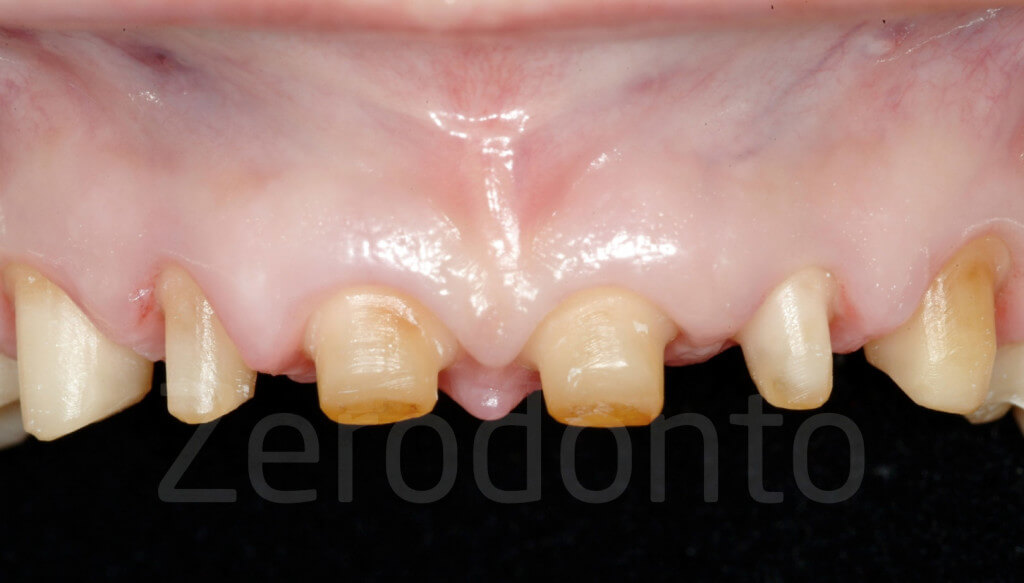
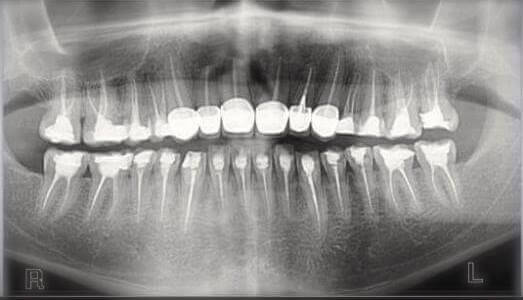
Fig. 3-4: Subtractive therapy for patients affected by dental wear. Elective endodontic therapy is often implemented.
Among the different causes of tooth wear, dental erosion is predominant one.
It is an insidious disease, which may go undetected for several years before being discovered and treated. When the diagnosis is finally made, a full-mouth rehabilitation is then necessary.
Consequently, planning a rehabilitation for patients affected by dental erosion often requires a global vision to restore multiple teeth at the same time.
Clinicians, who are not used to treat more than one tooth at the time, can find these treatments overwhelming.
In addition, clinical variability, such as the different tooth destruction patterns, makes complicate to provide precise guidelines on how to treat this population of patients.
Related to the extrinsic or intrinsic source of the acid, teeth may be affected differently. In some patients, the maxillary anterior teeth may be more compromised (anterior pattern), while in others, the posterior occlusal surfaces may be more involved (posterior pattern).
Clinicians are also intercepting and treating patients affected by dental erosion at different stages of the disease, consequently not only the location of the erosive damage, but also the severity of the tooth destruction may vary among patients.
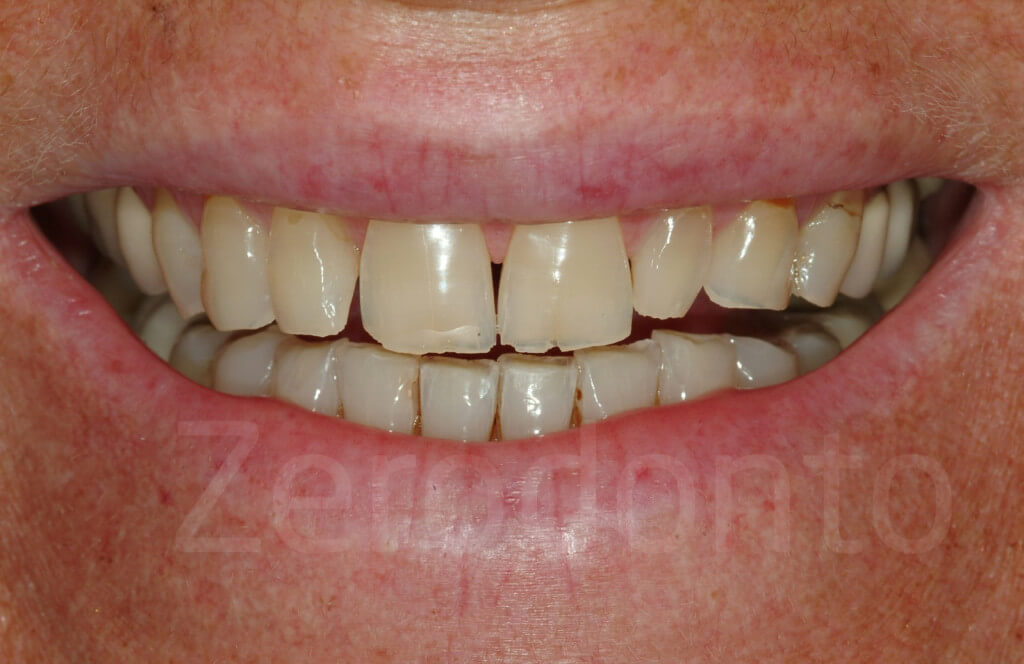
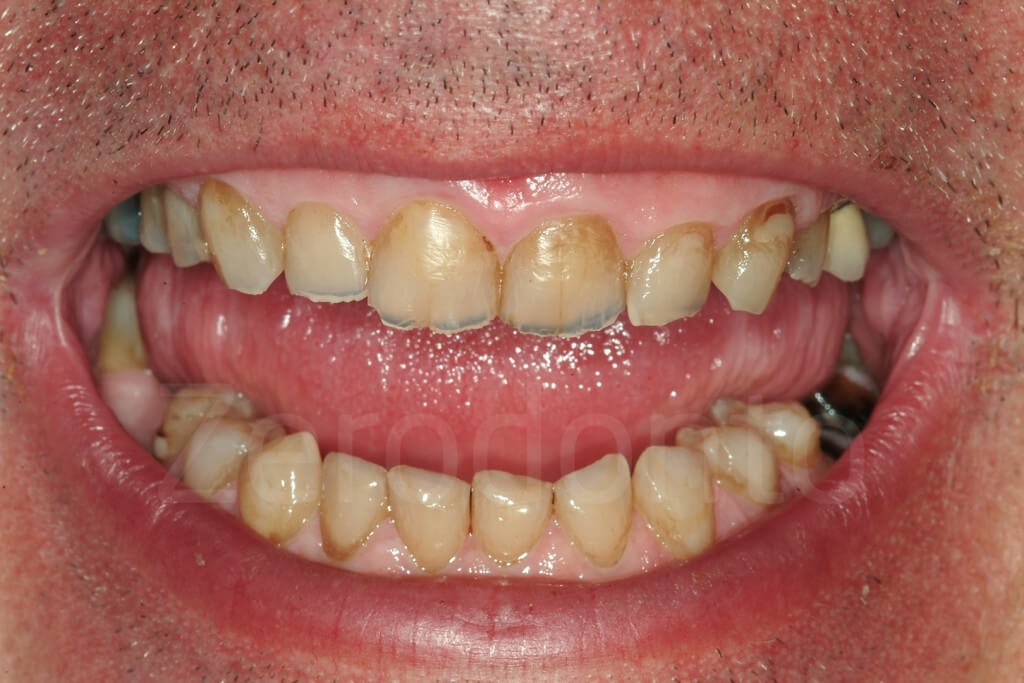
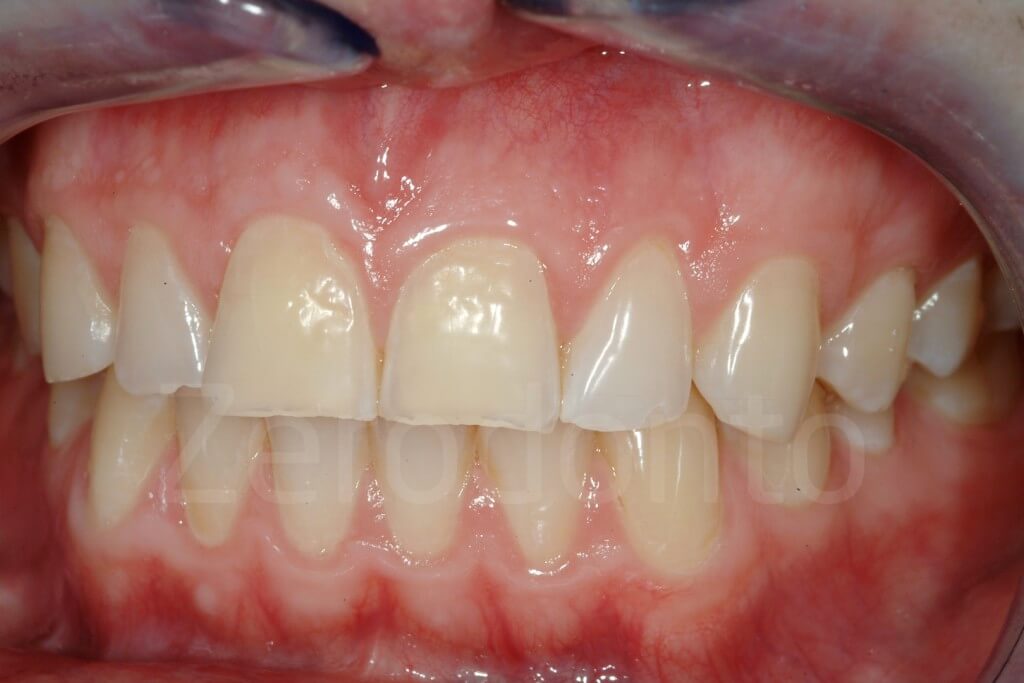
Fig. 5-6: Patients become aware about dental wear only when the esthetic of their smile start to be compromised at the level of the incisal edges.
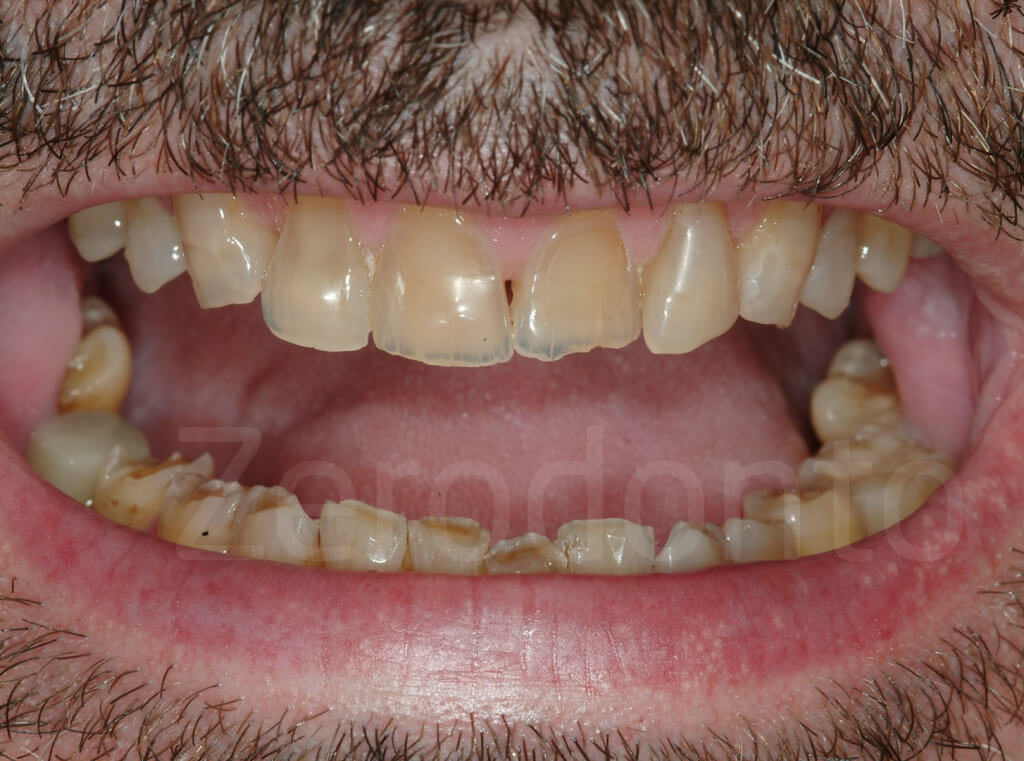
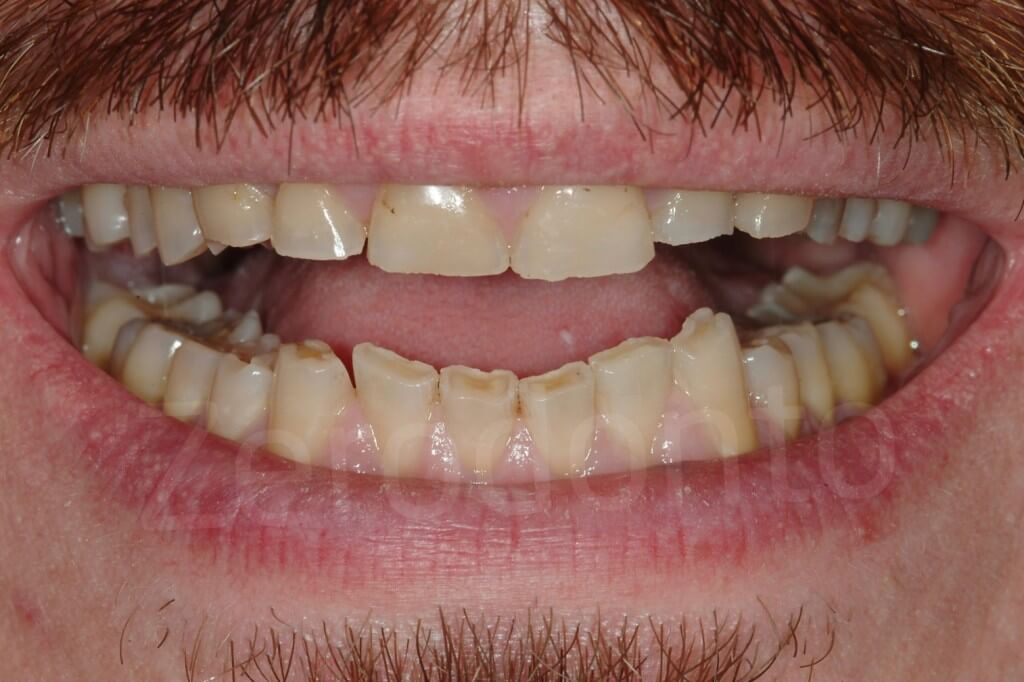
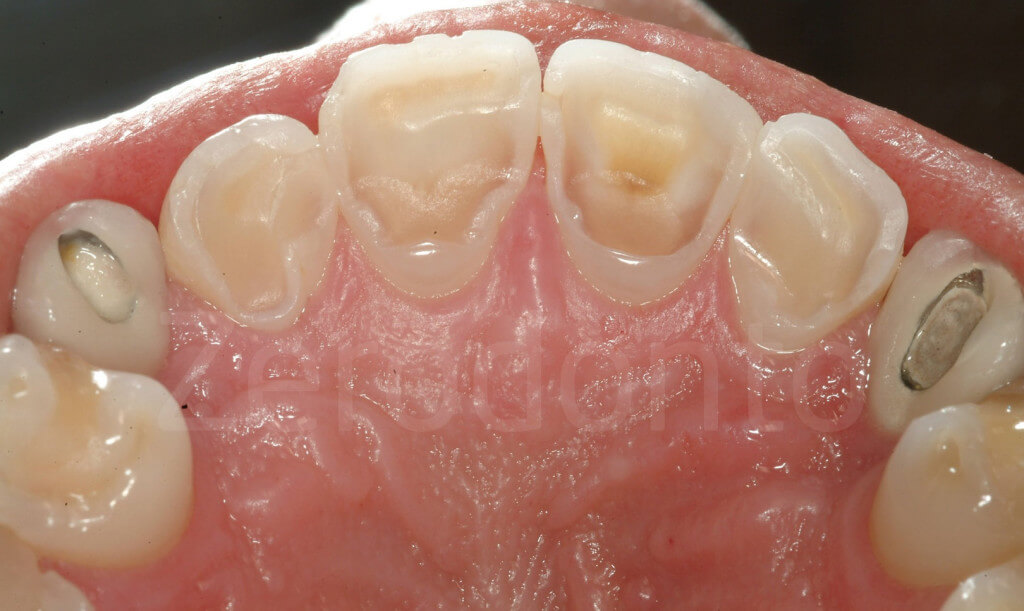
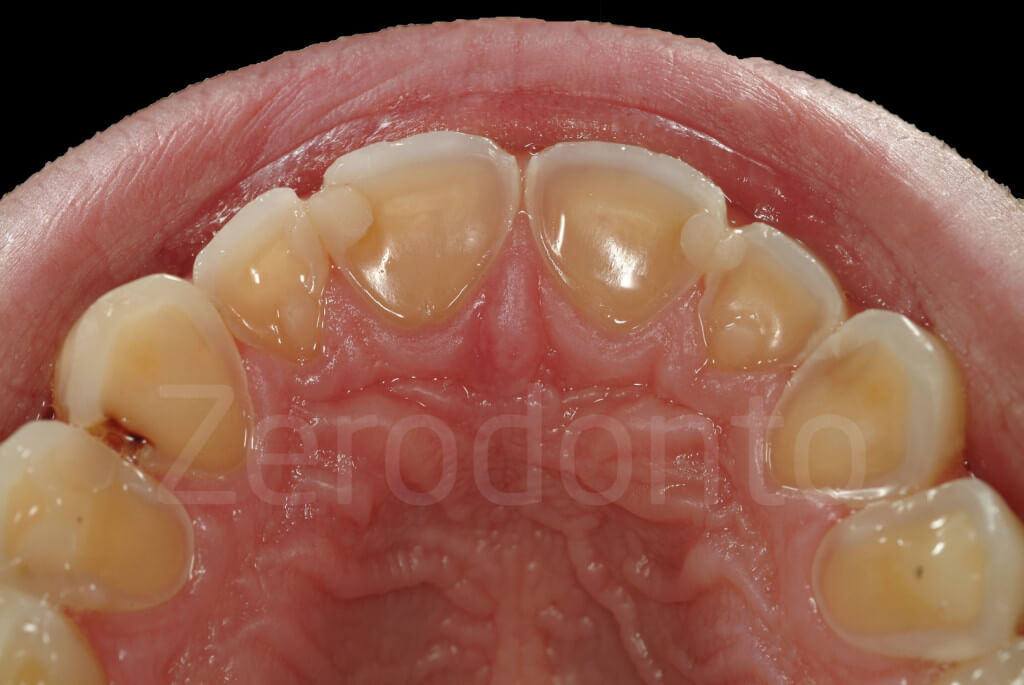
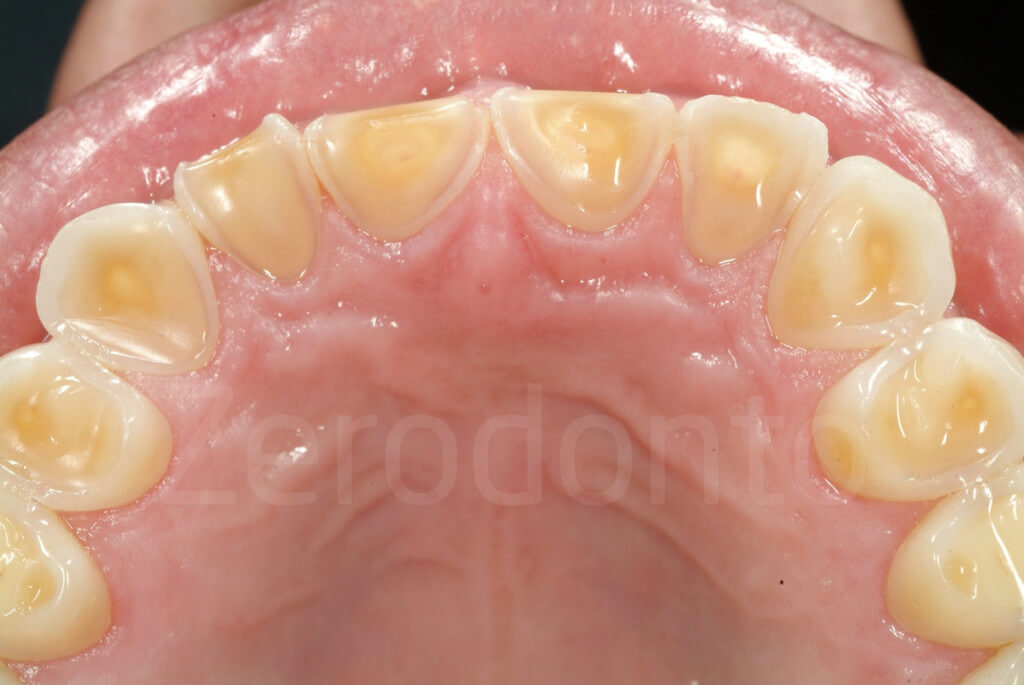
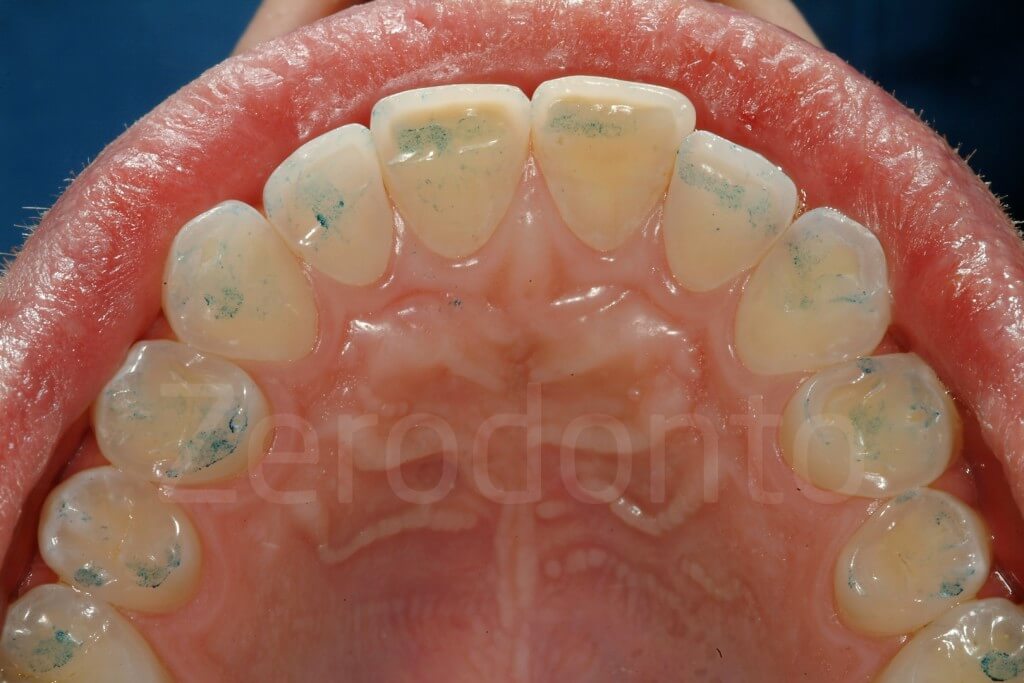
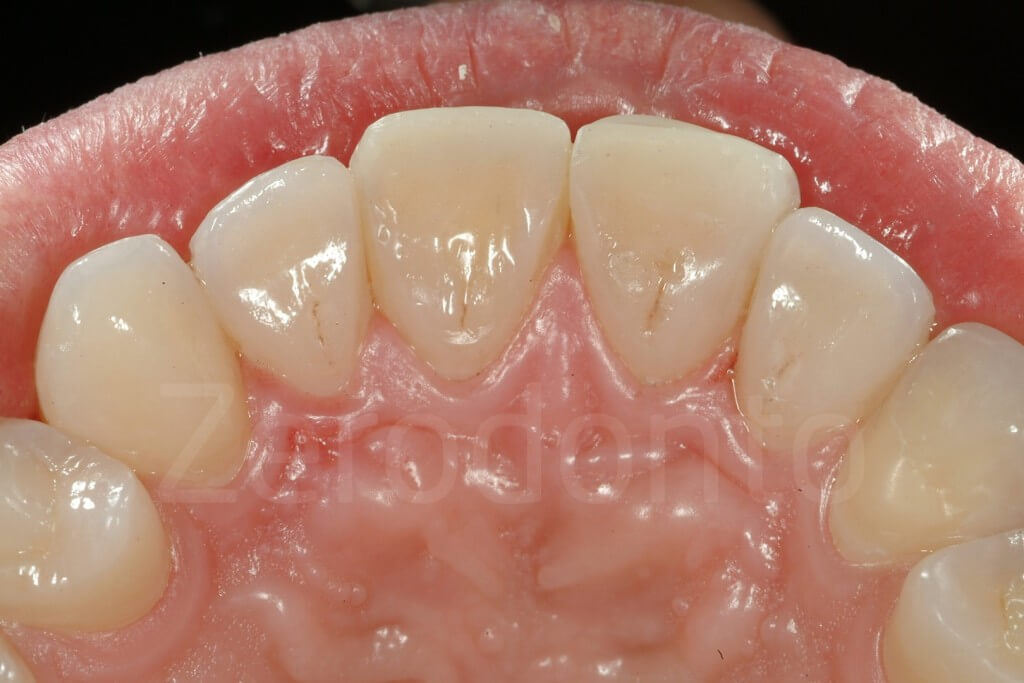
Fig 7-11: In cases of severe dental erosion, the palatal aspect of the maxillary teeth is often compromised; after the enamel is lost, the exposed dentin is subject to accelerated wear, which leads to a pronounced concave morphology and not infrequently to weakening and fracture of the incisal edges.
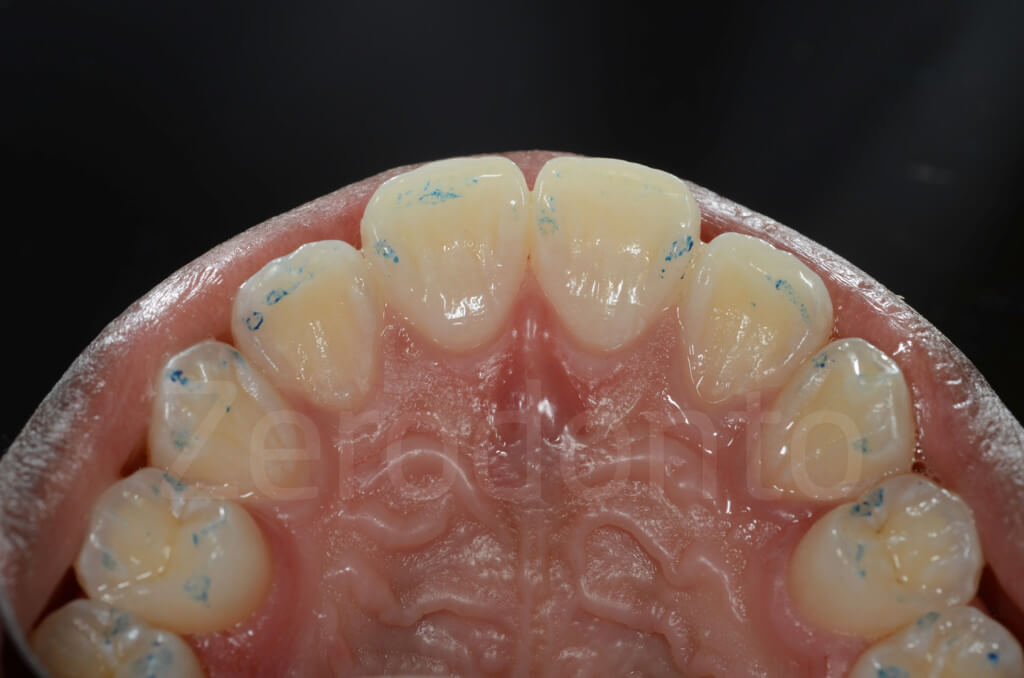
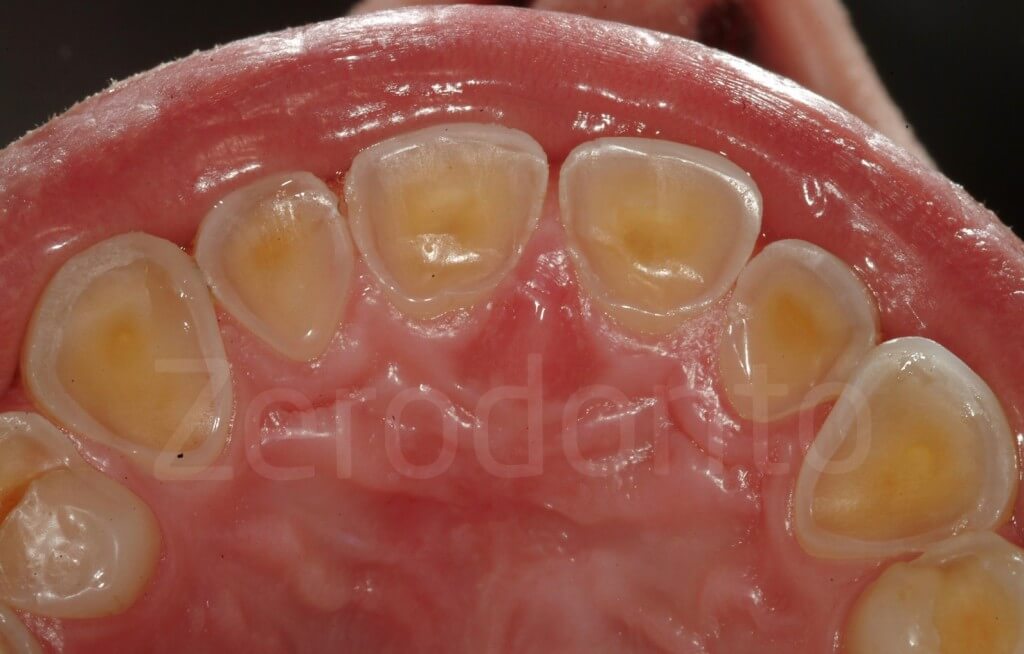
Fig. 12-13: Palatal aspect of both intact and eroded teeth.
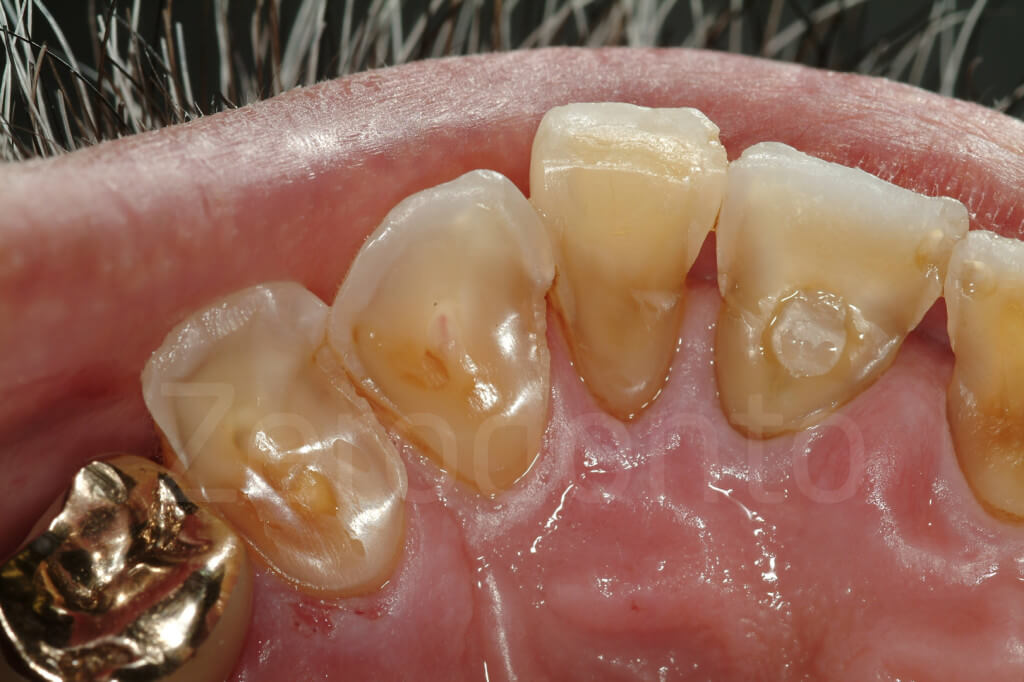
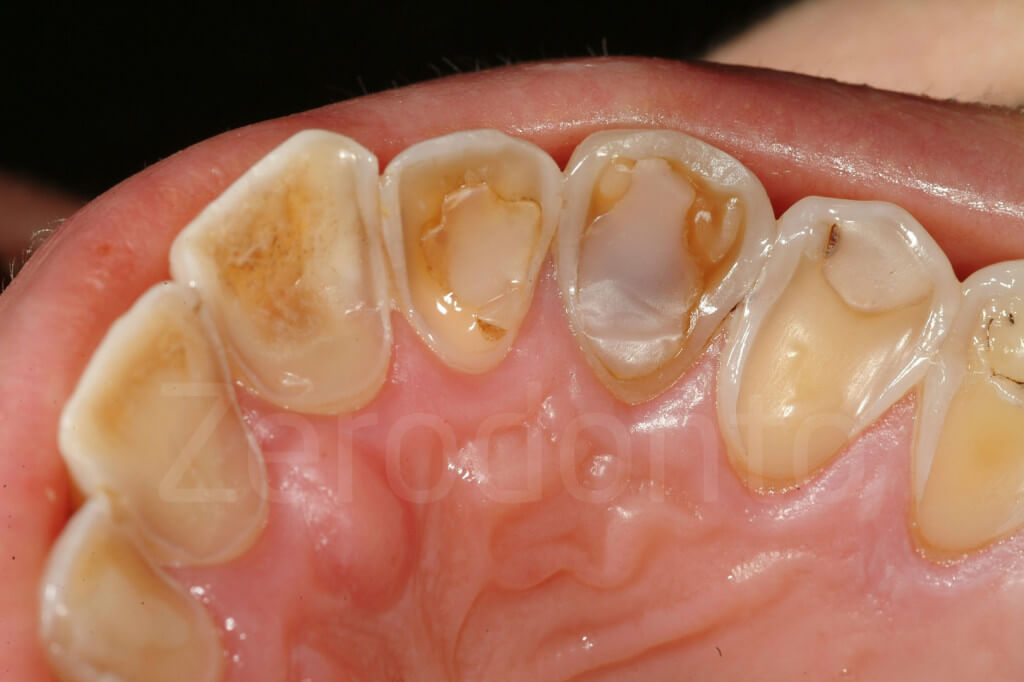
Fig. 14-15 When the palatal damage is severe, the risk of losing the pulp vitality becomes very high as in these patients
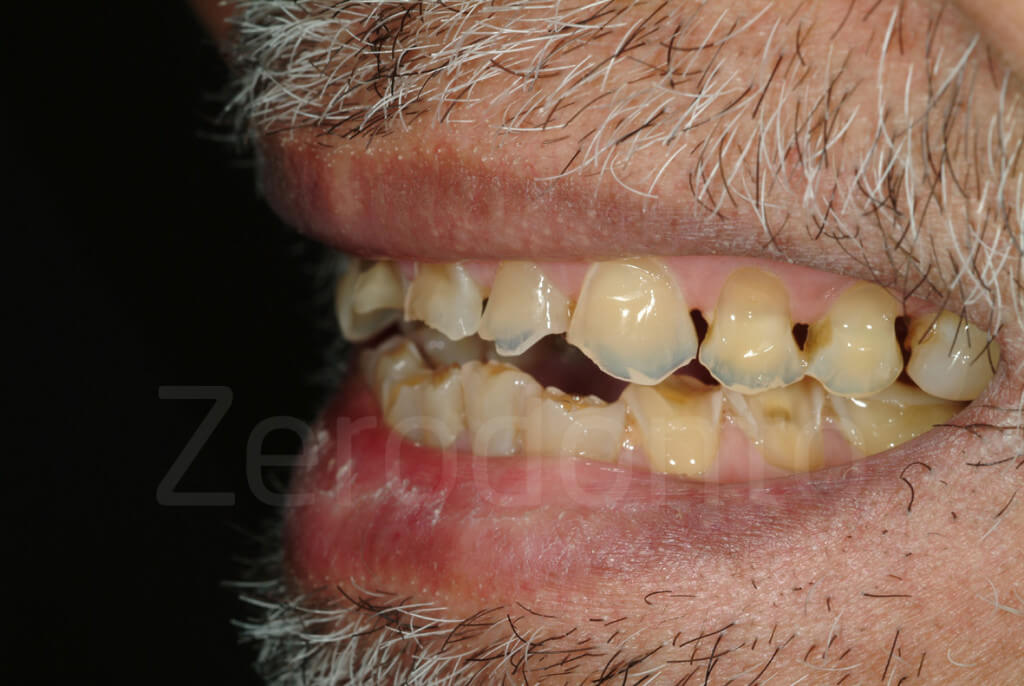
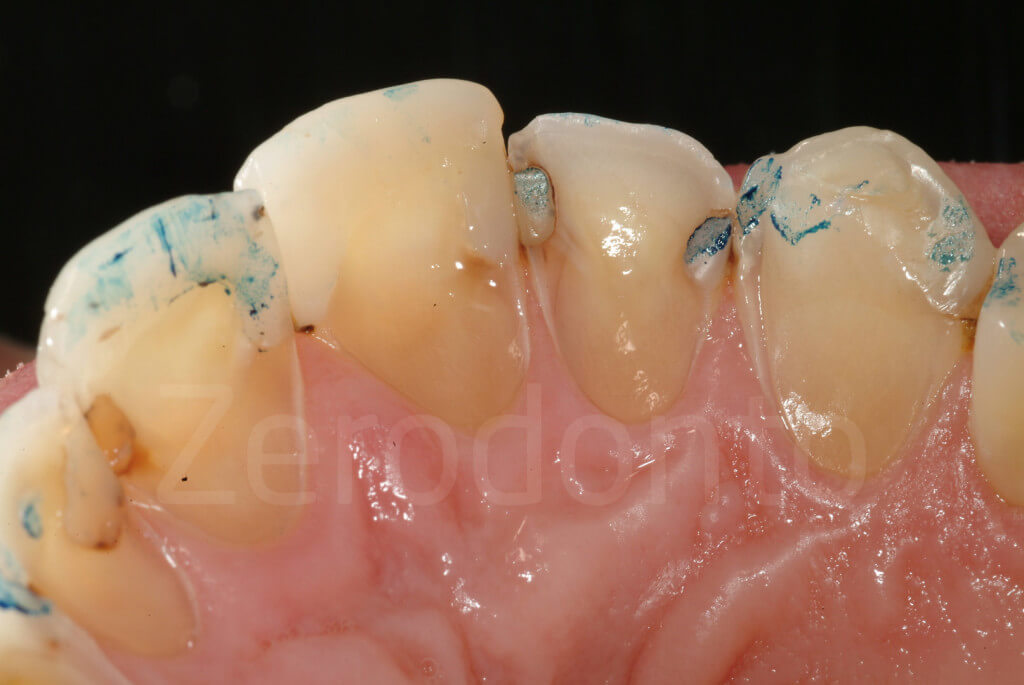
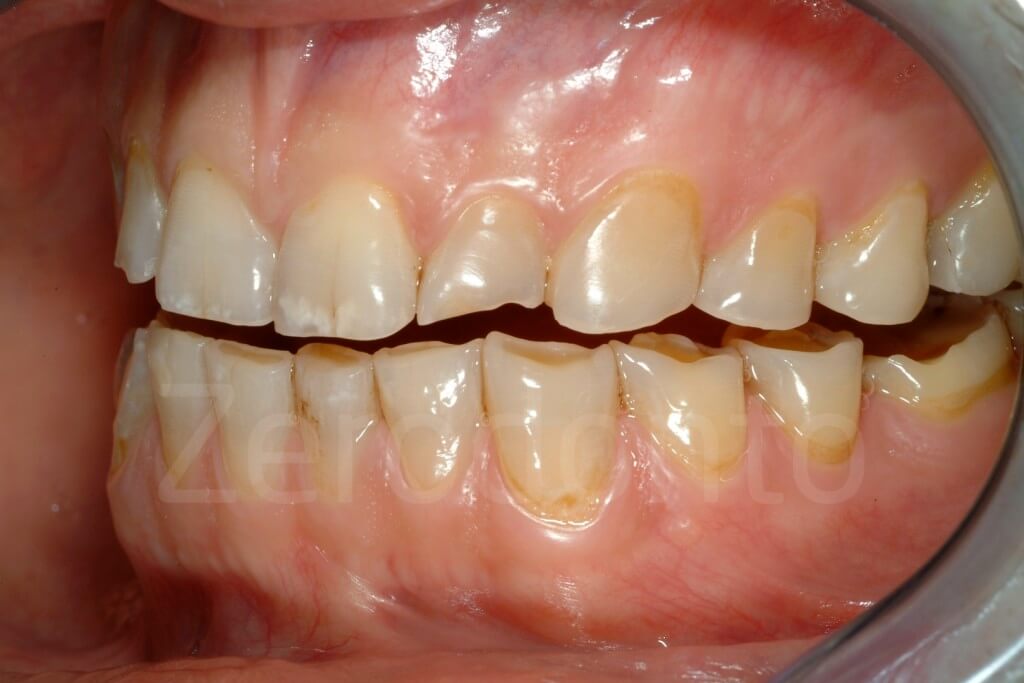
Fig. 16-17: In case of dental erosion the tooth damage has not correlation with the contact points of the antagonistic teeth at the level of the cervical aspect.
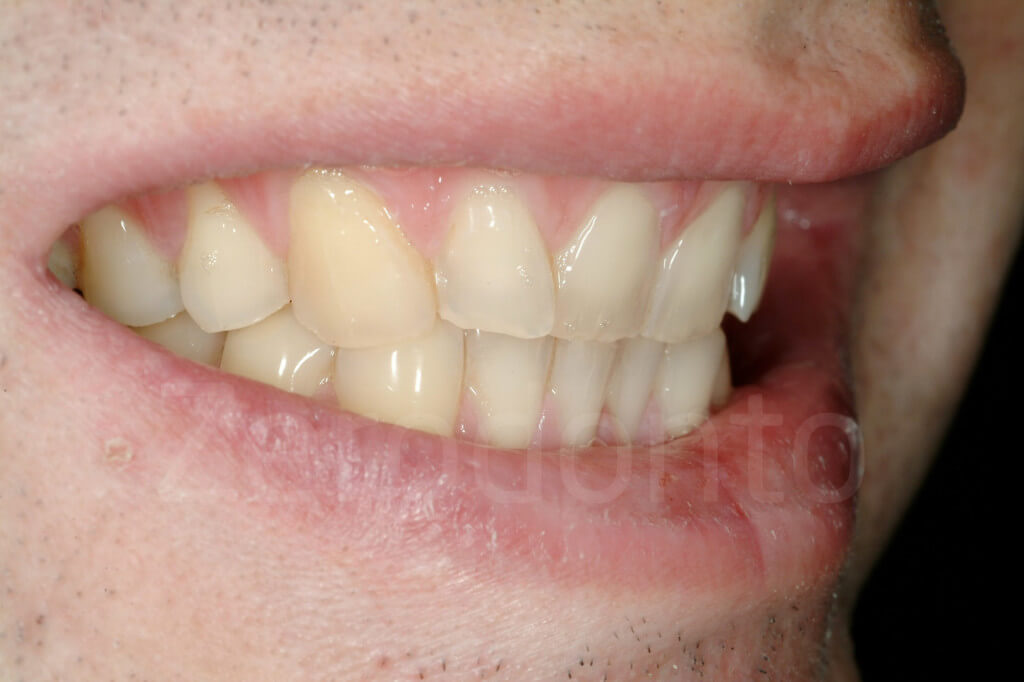
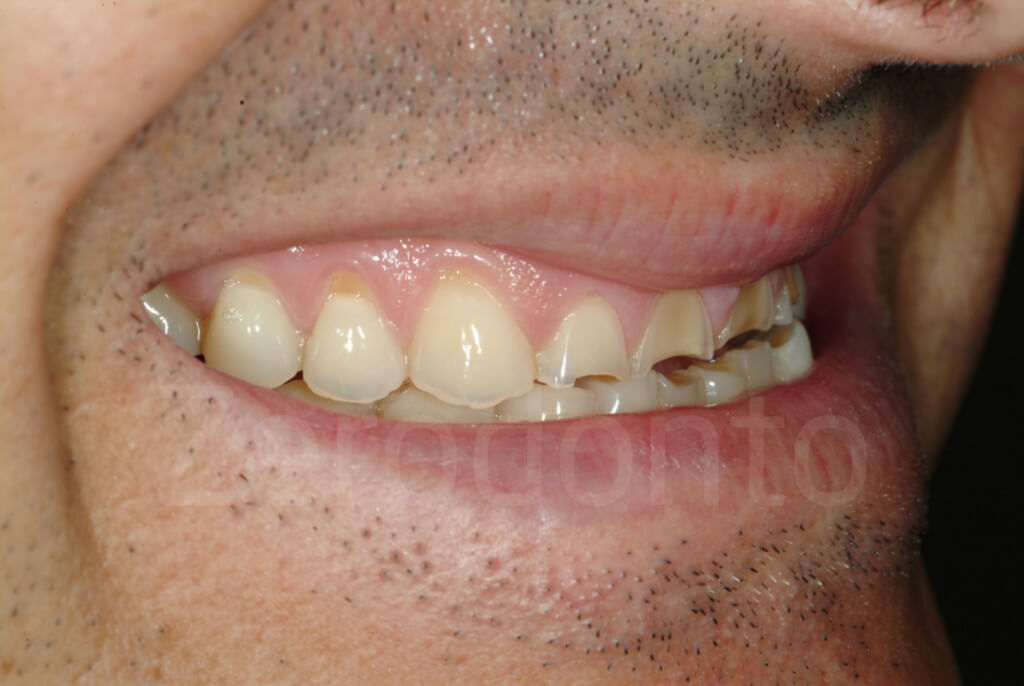
Fig. 18-19: Two patients affected by dental erosion, who can illustrate the progressive incisal edges’ damage, which happens once the incisal edges are weakened.
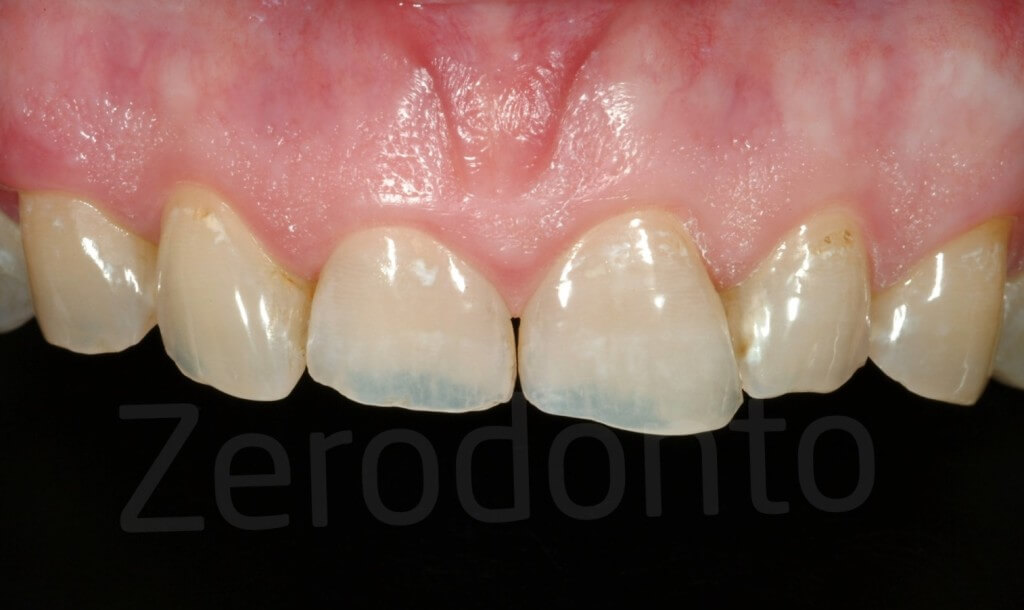
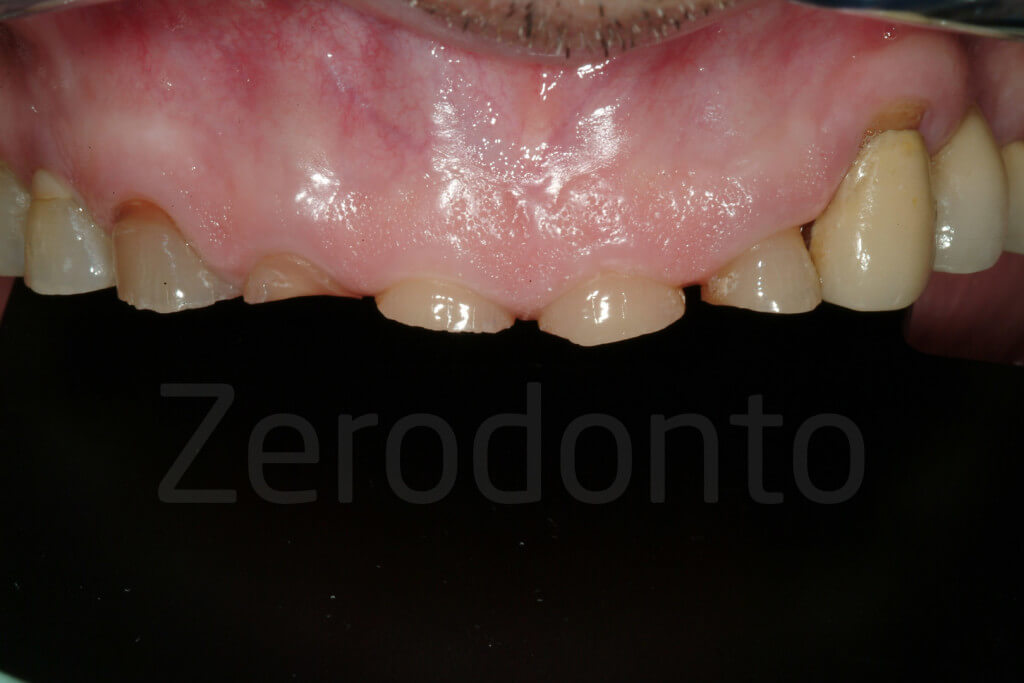
Fig 20-21: The left untreated, the damaged incisal edges will progresslvely breaking down.
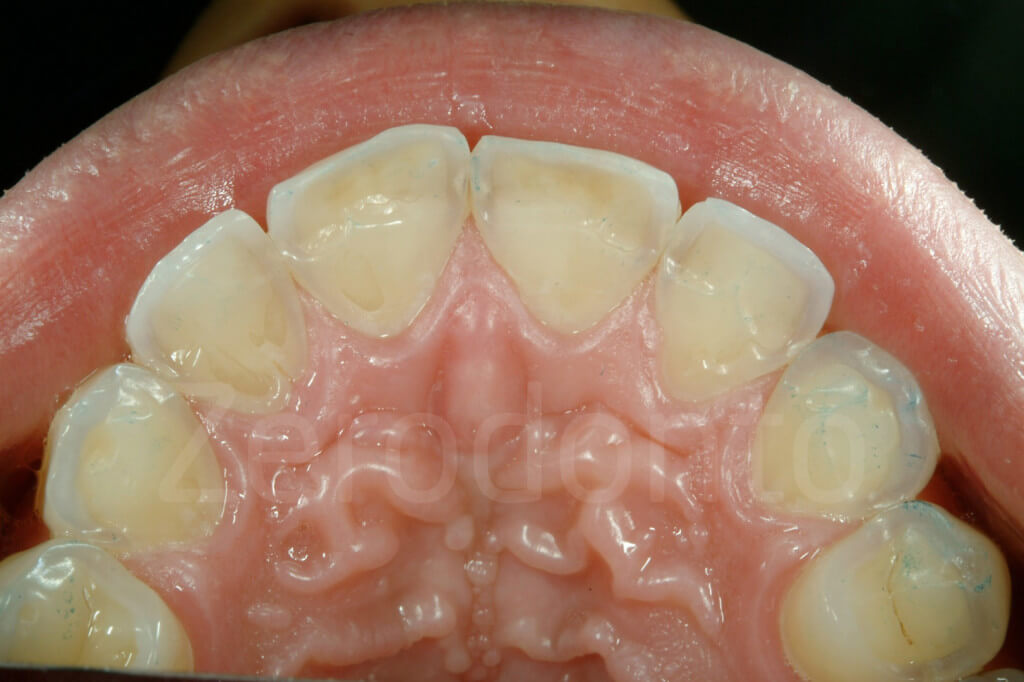
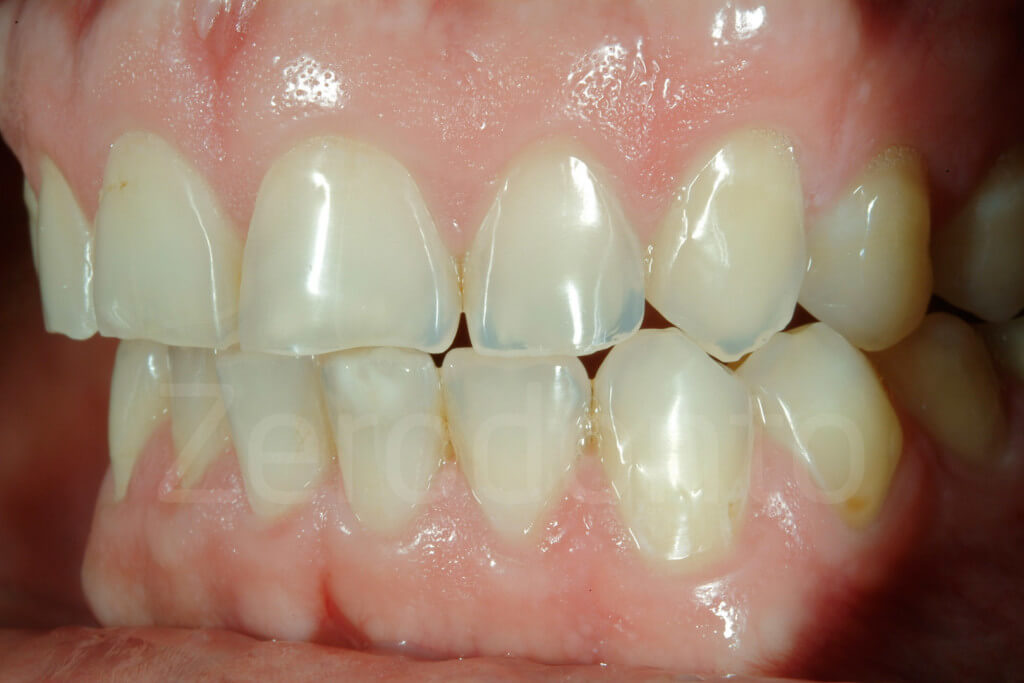
Fig 22-23: Early stage of dental erosion. The incisal edges are thinning and areas of dentin are exposed especially at the level of the contacts with the antagonistic teeth.
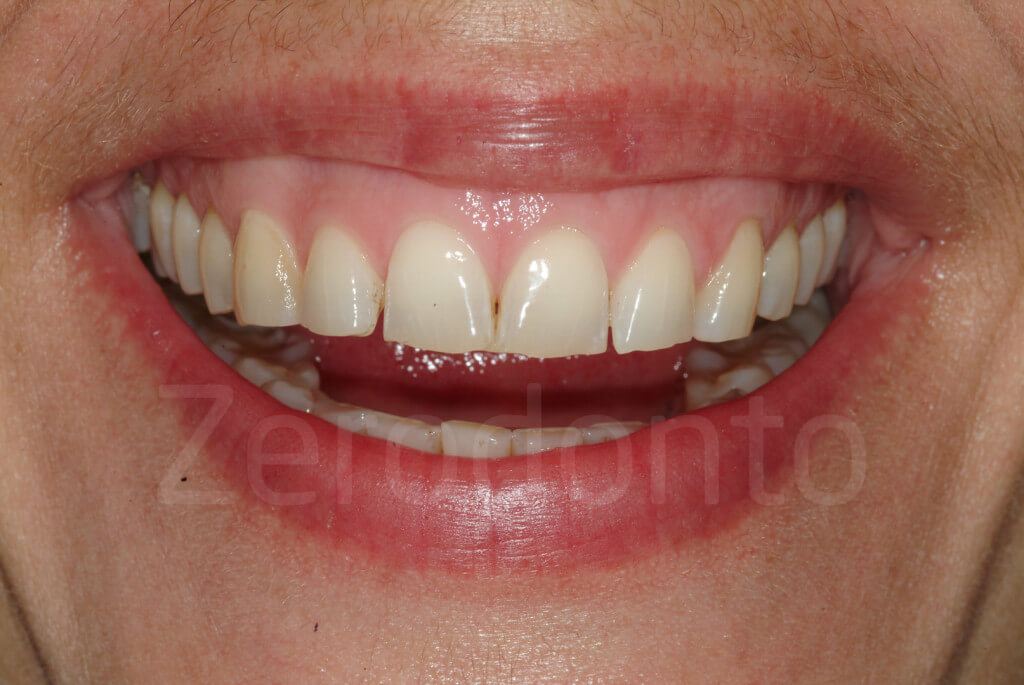
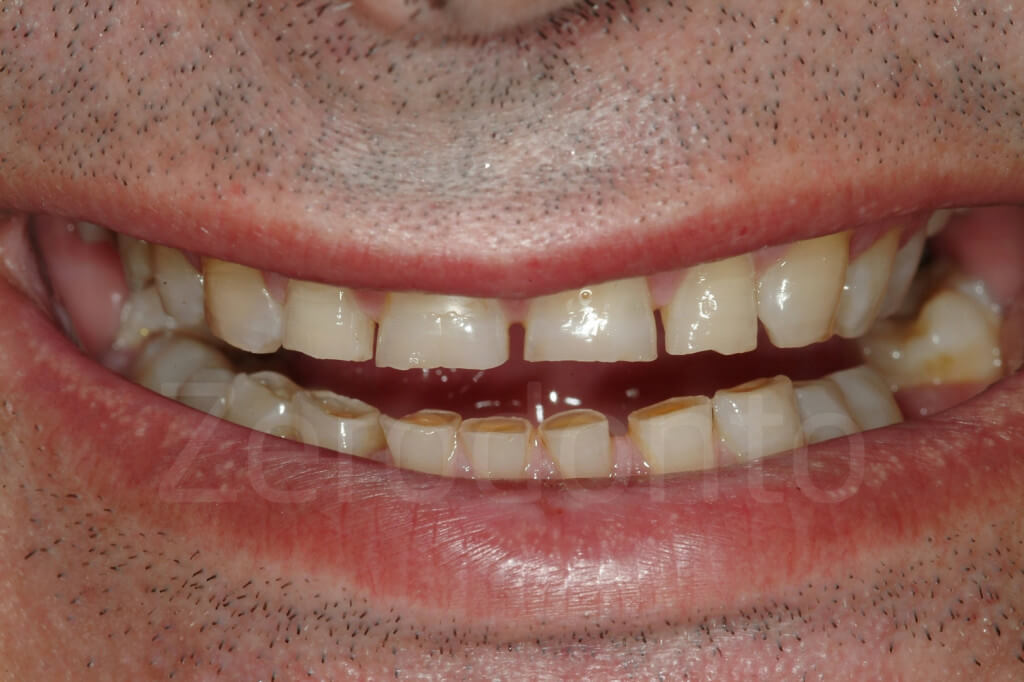
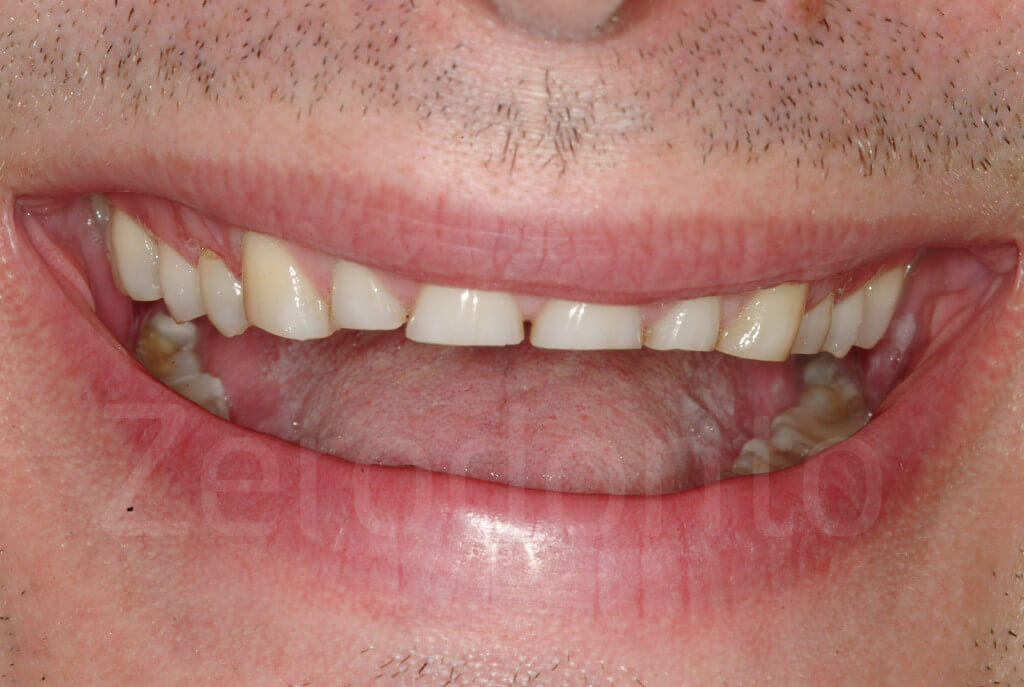
Fig 24-26: When the incisal edges are damaged but they present a flat aspect, attrition (tooth against tooth) should also be suspected, since the unsupported enamel prisms are removed by the tooth grinding
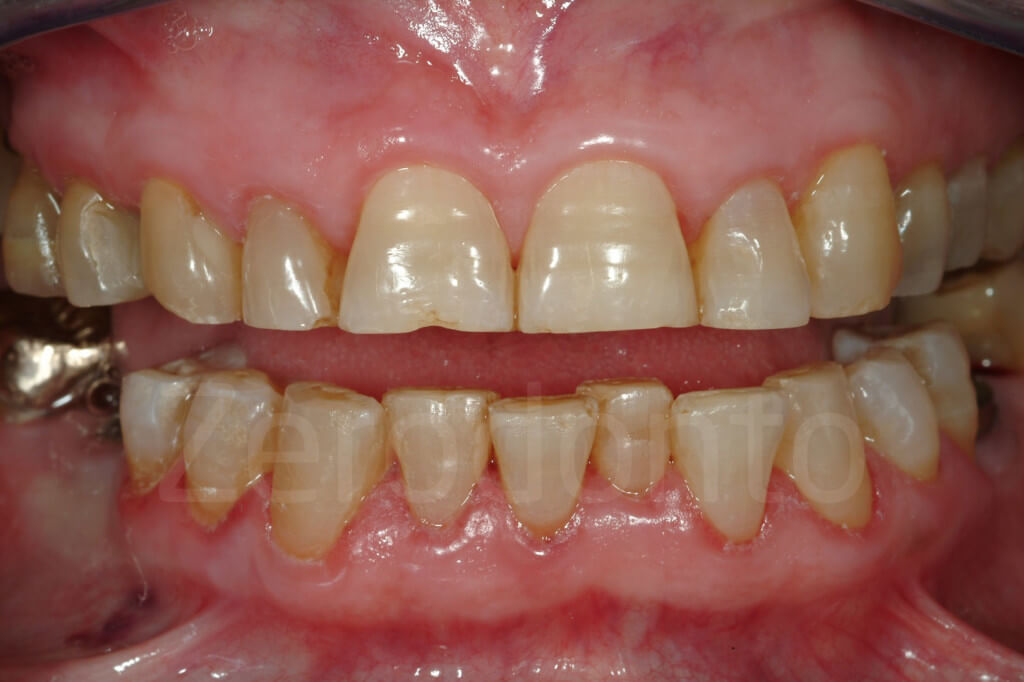
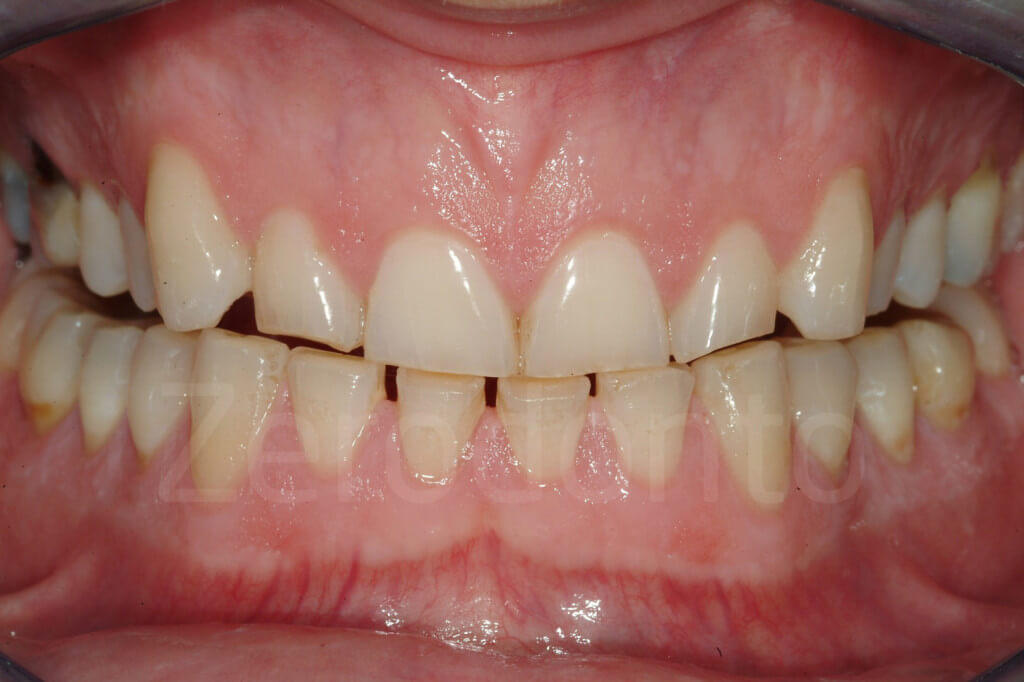
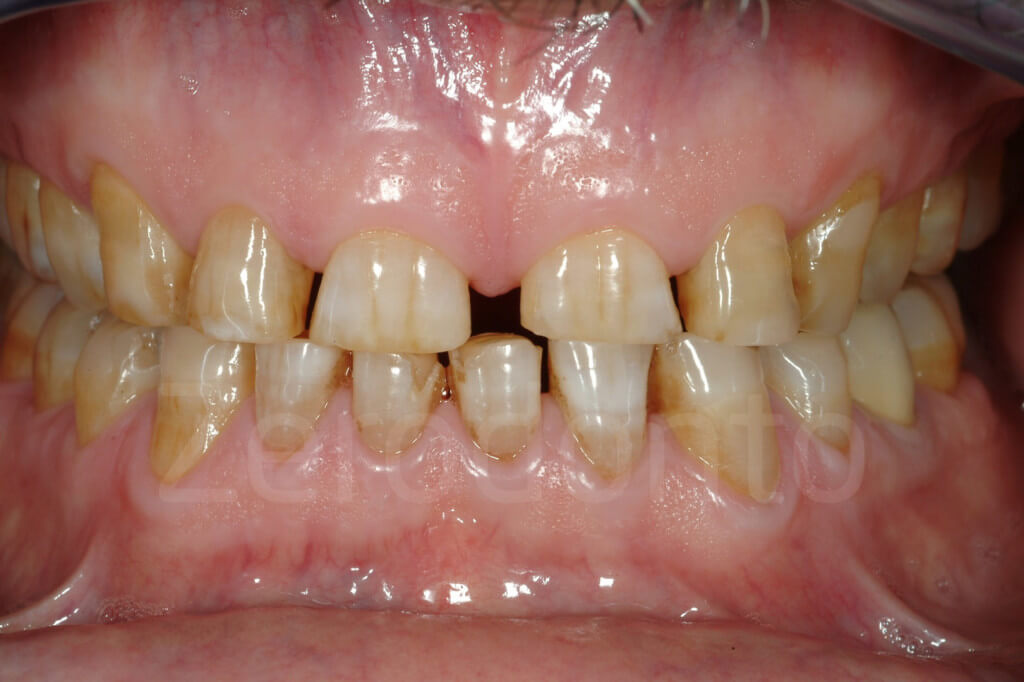
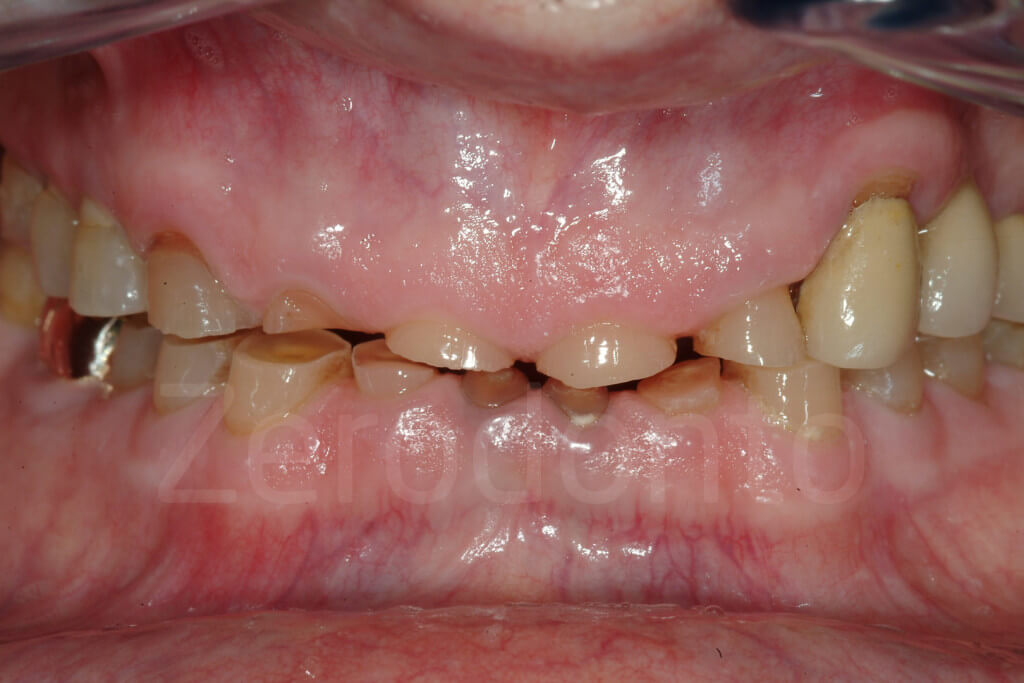
Fig 27- 30: Patients affected by parafunctional habits (bruxism)
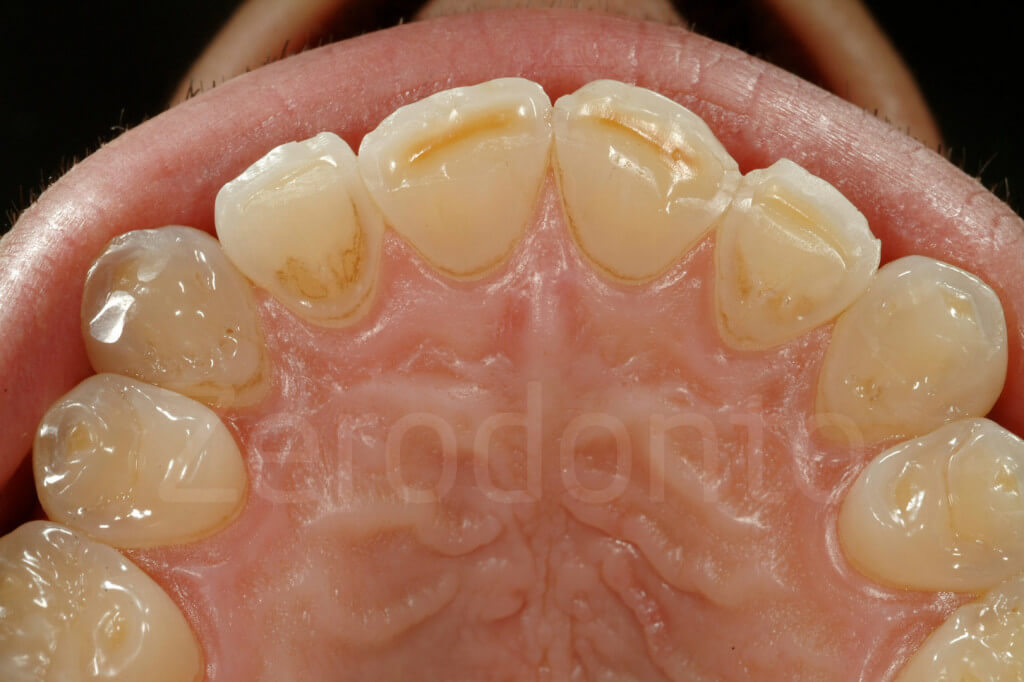
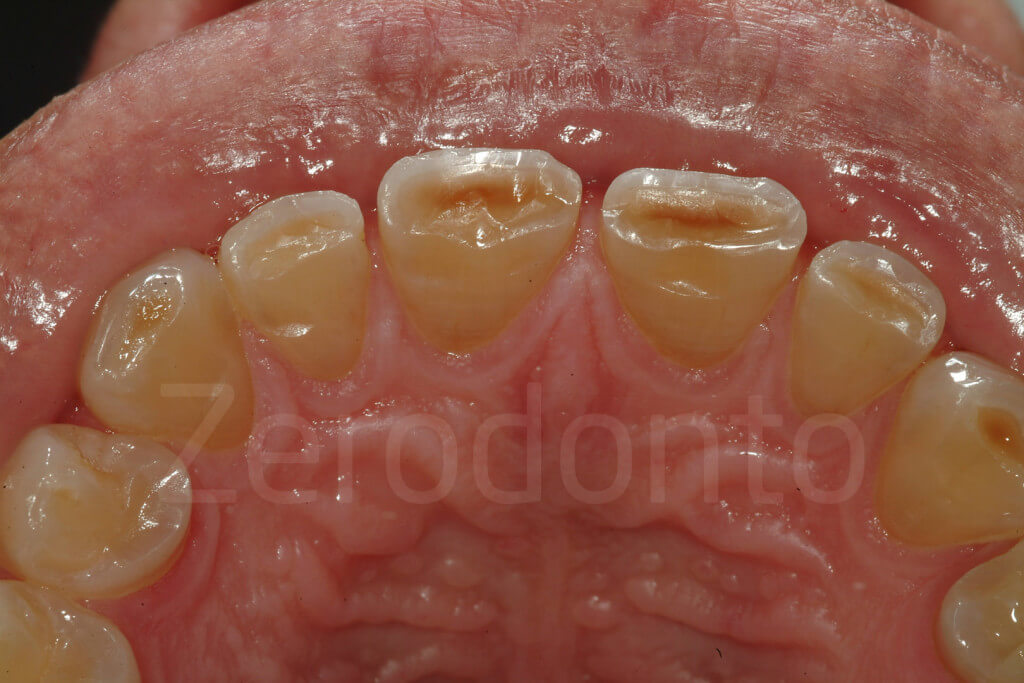
Fig 31-32: Palatal aspect of patients affected by bruxism. The damage is limited to the incisal edges. The cervical and middle thirds are intact.
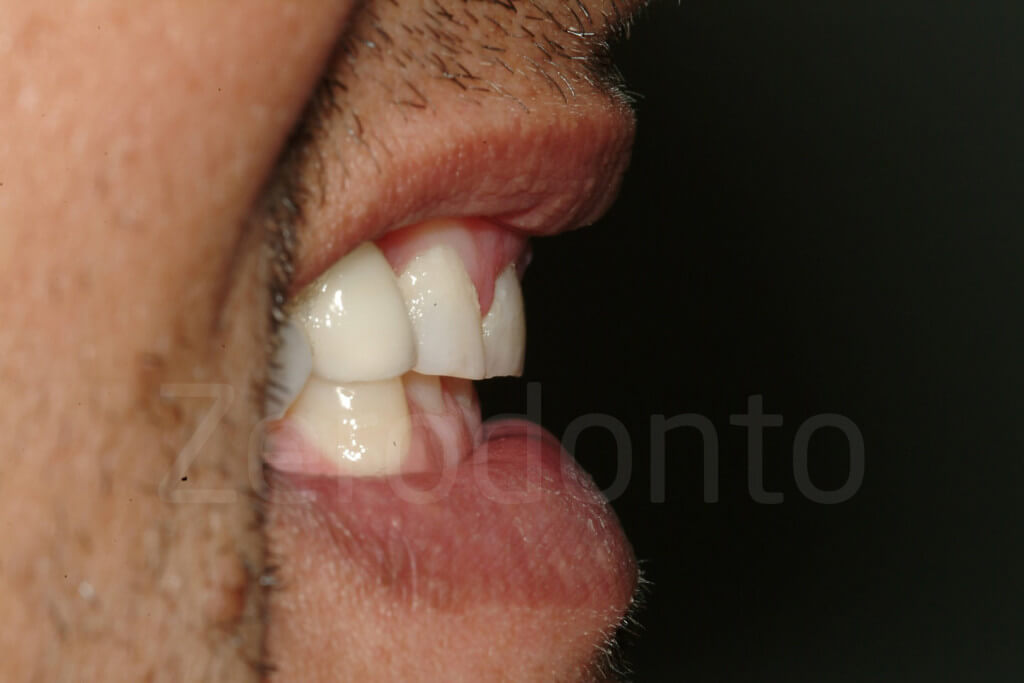
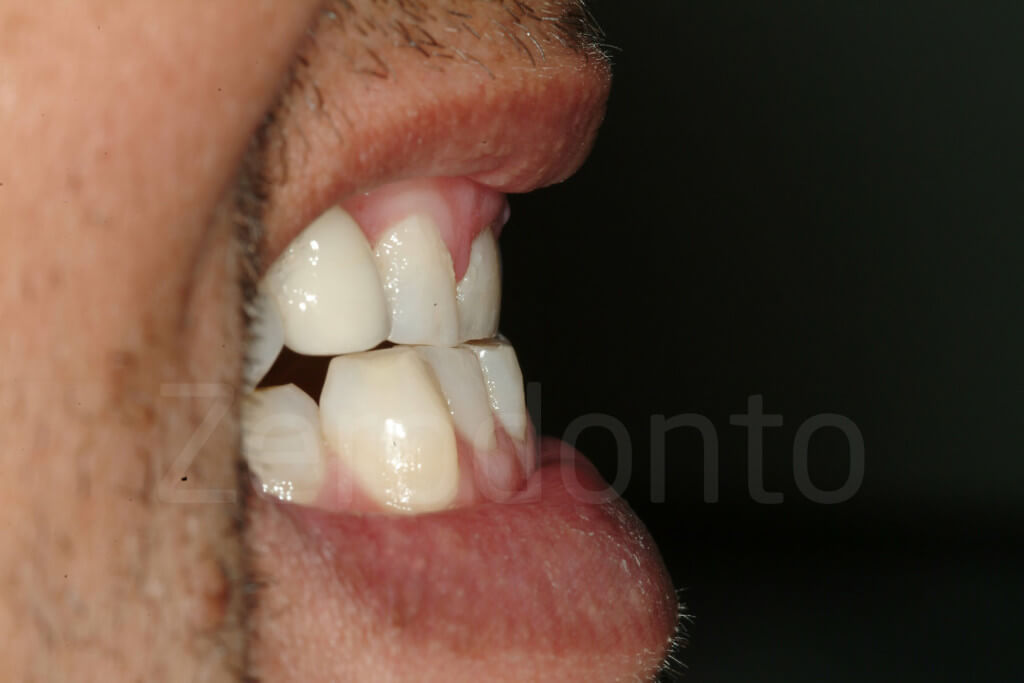
Fig 33-34: When attrition is suspected, clinician should ask the patient to touch the incisal edges of the antagonistic teeth, looking for matching wear facets.
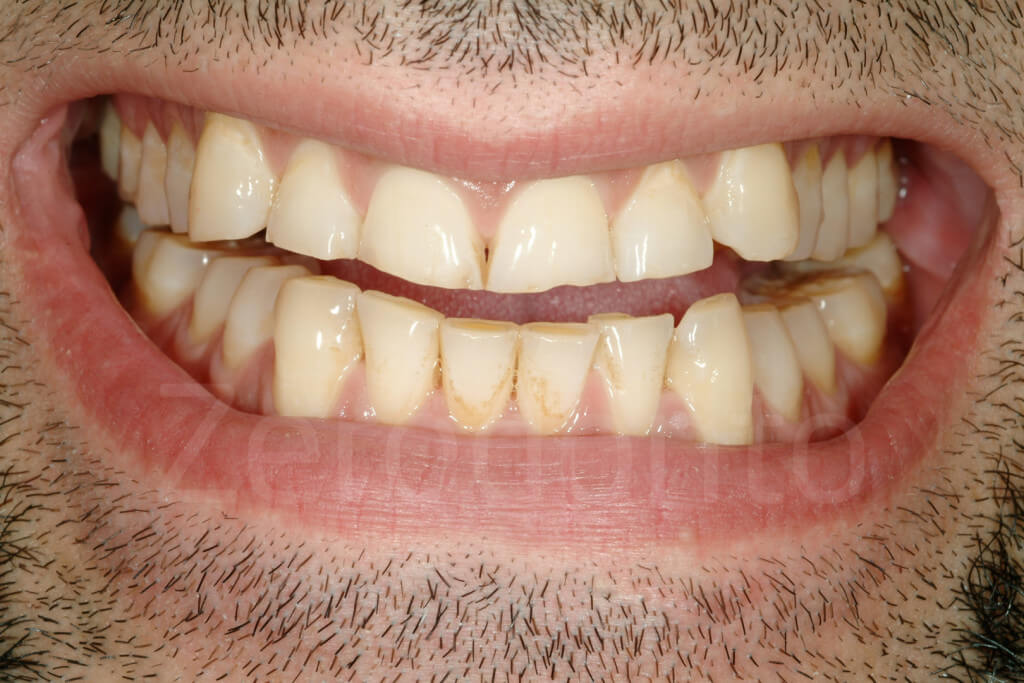
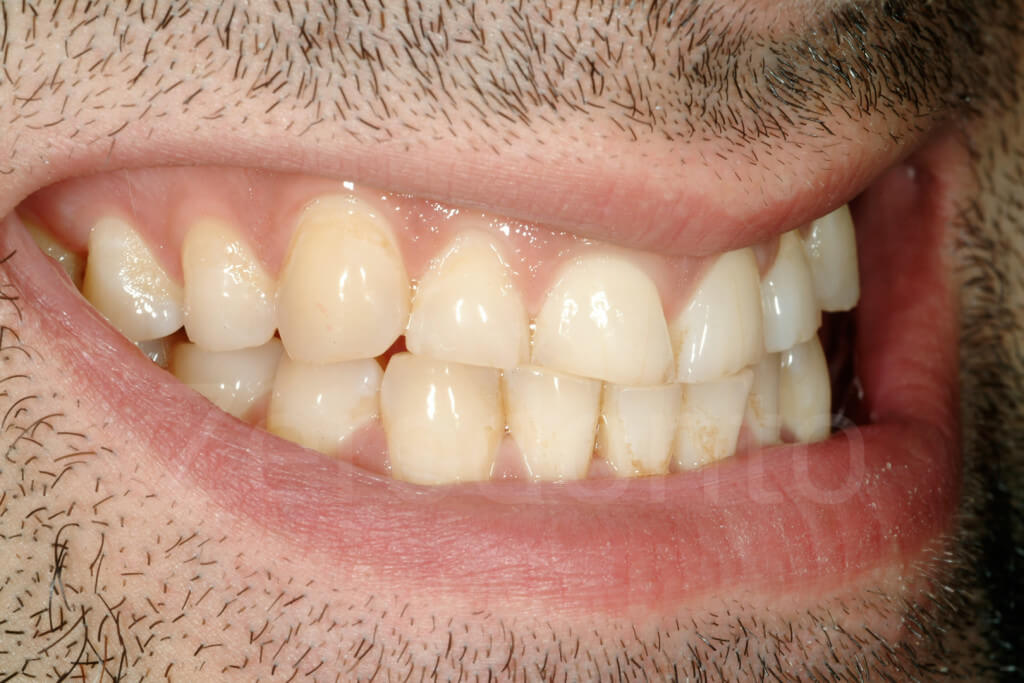
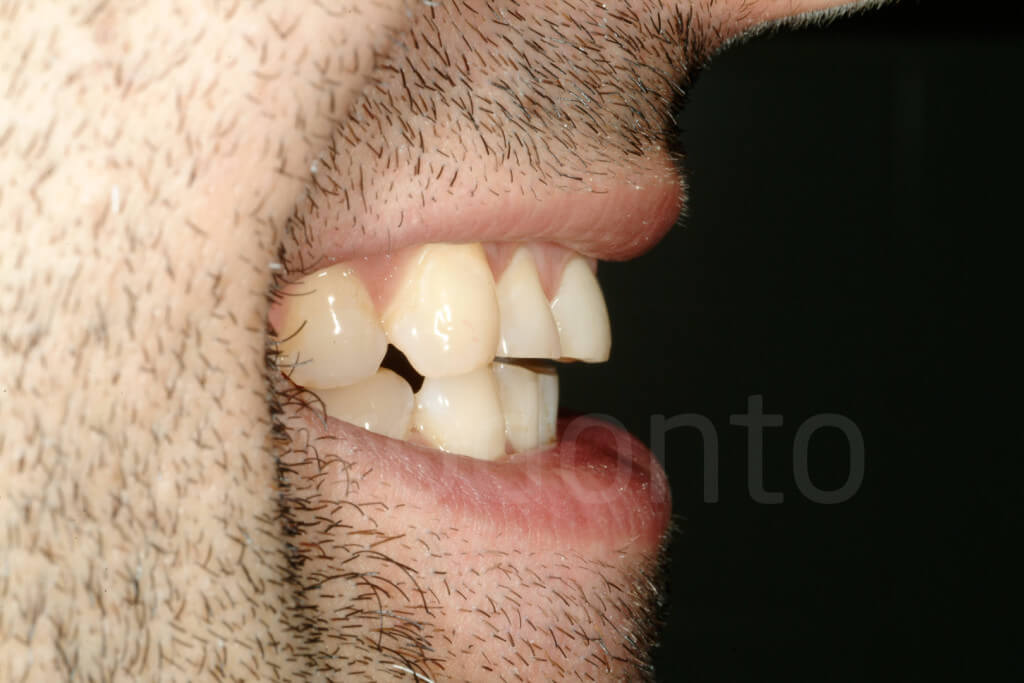
Fig 35-37: 25 year old patient affected by parafunctional habits (bruxism). His incisal edges were breaking down due to the habit of the patient of keeping the front teeth in contact (attrition).
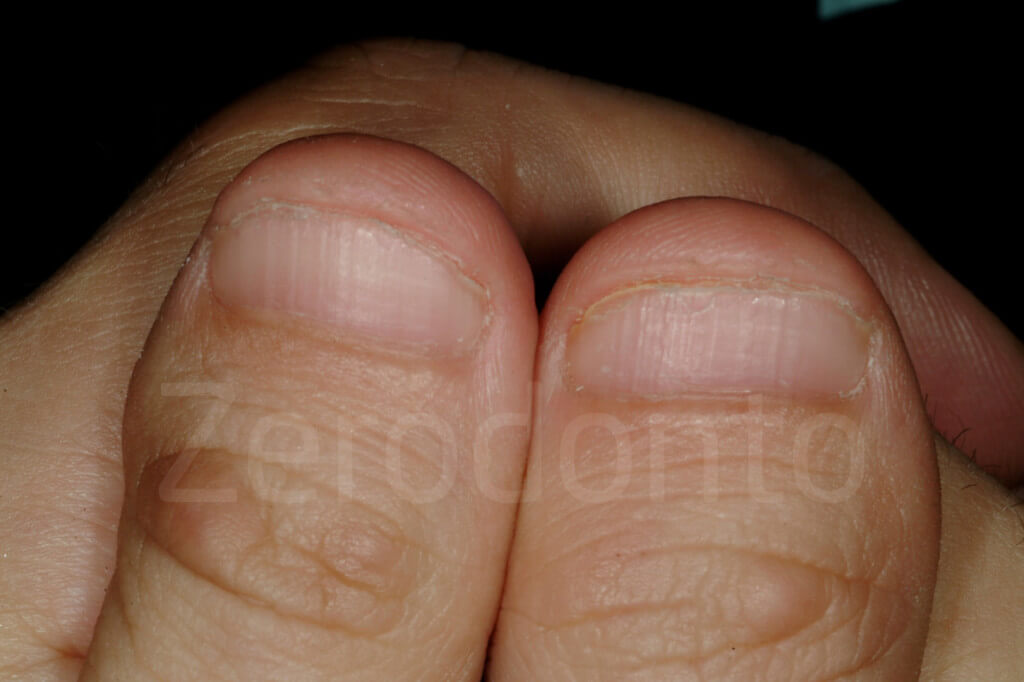
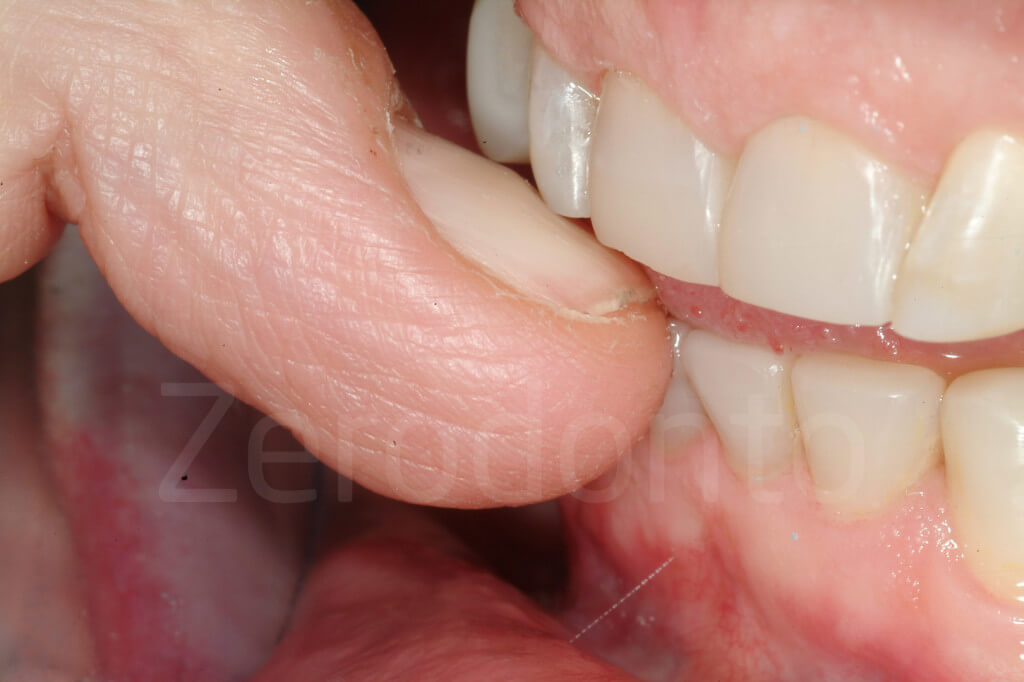
Fig 38-39: Nail biting is one of the parafunctional habit which can lead to failure of the intact and restored incisal edges.
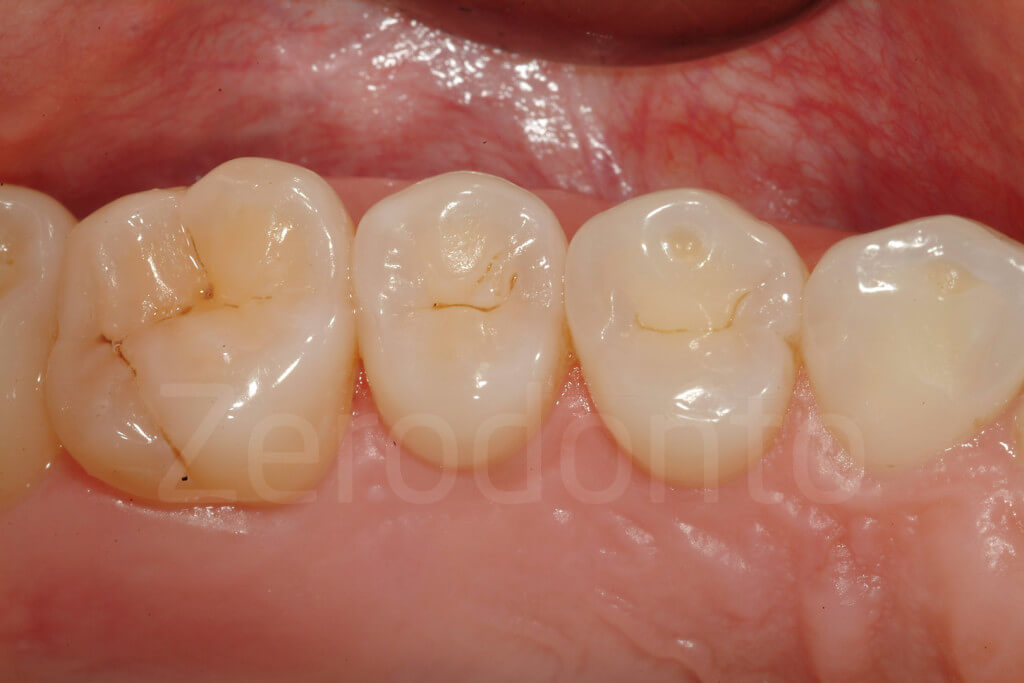
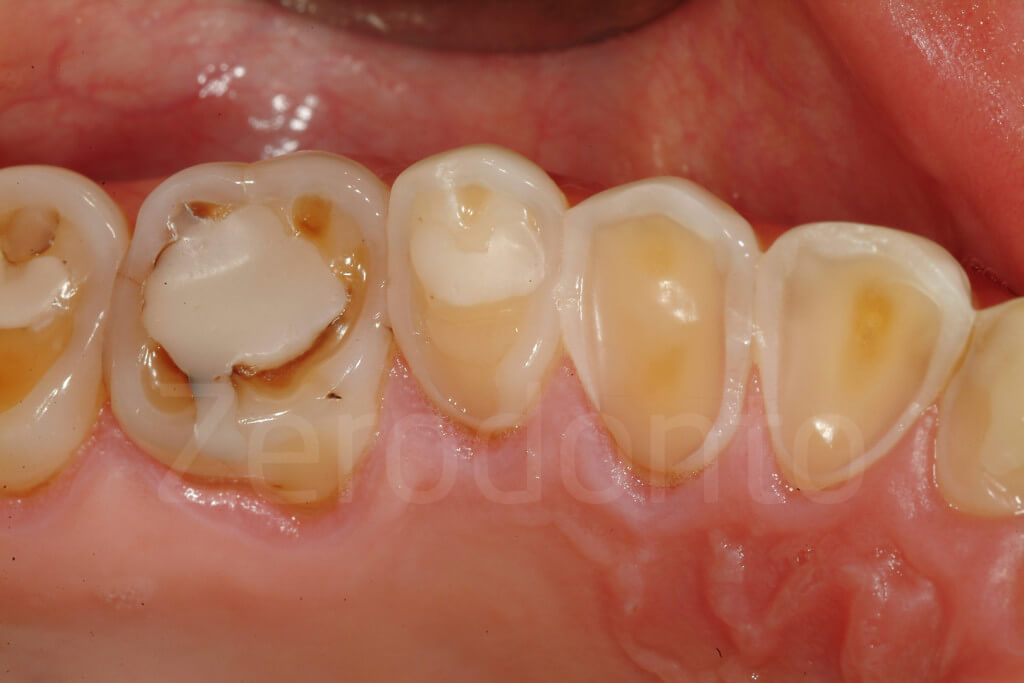
Fig 40-41: Both intact and eroded dentition in two patients of similar age
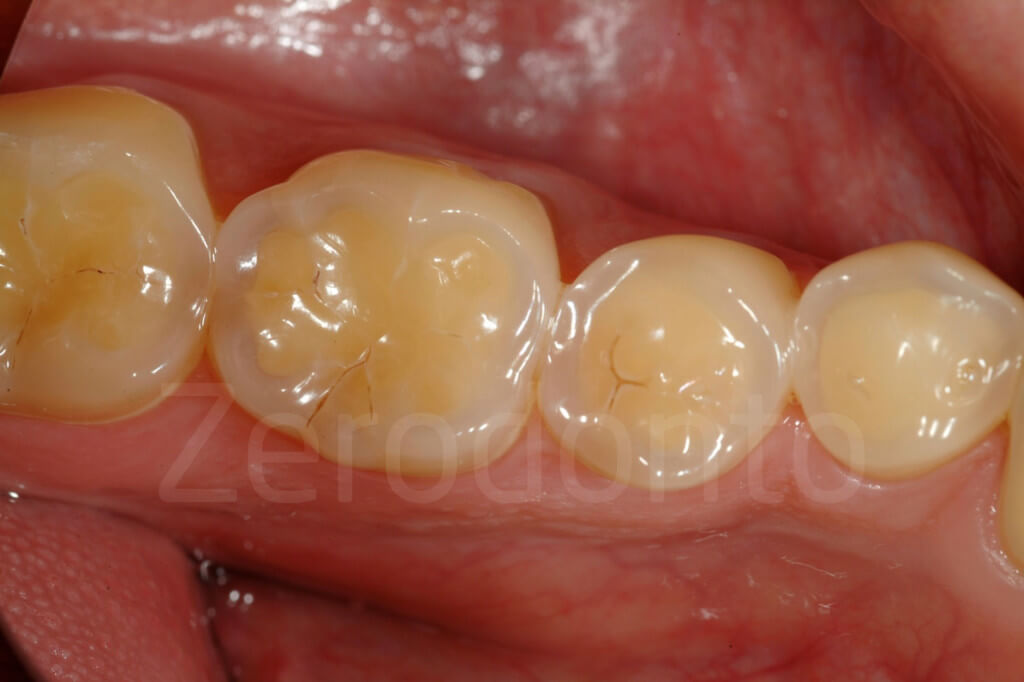
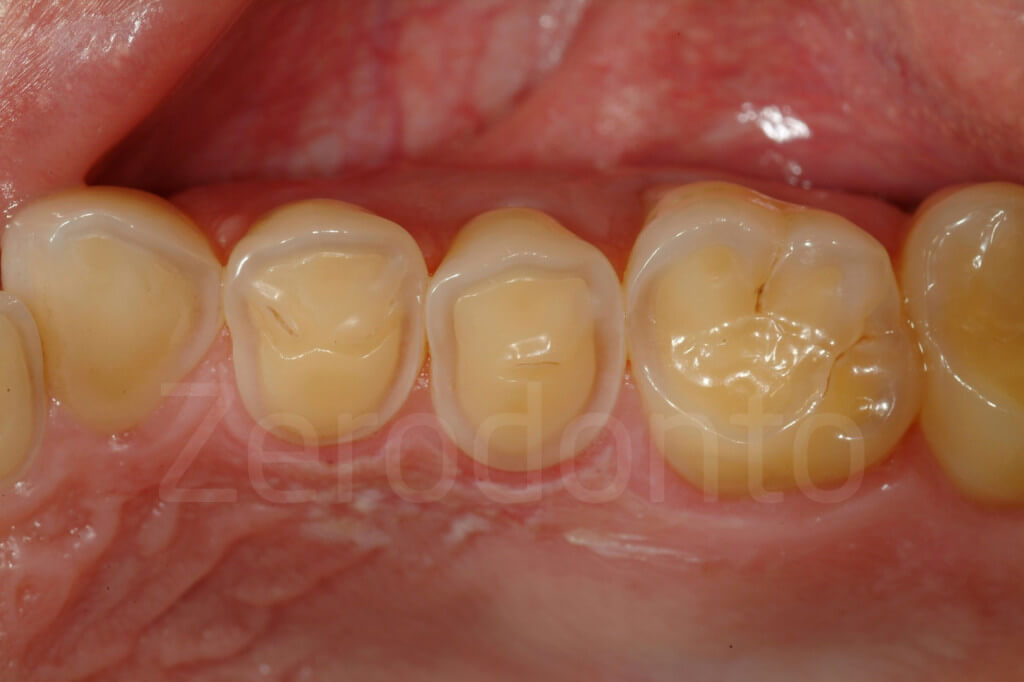
Fig 42-43: Typical aspect of the occlusal surfaces affected by dental erosion. Note the yellow color of the exposed dentine and the external ring of enamel.
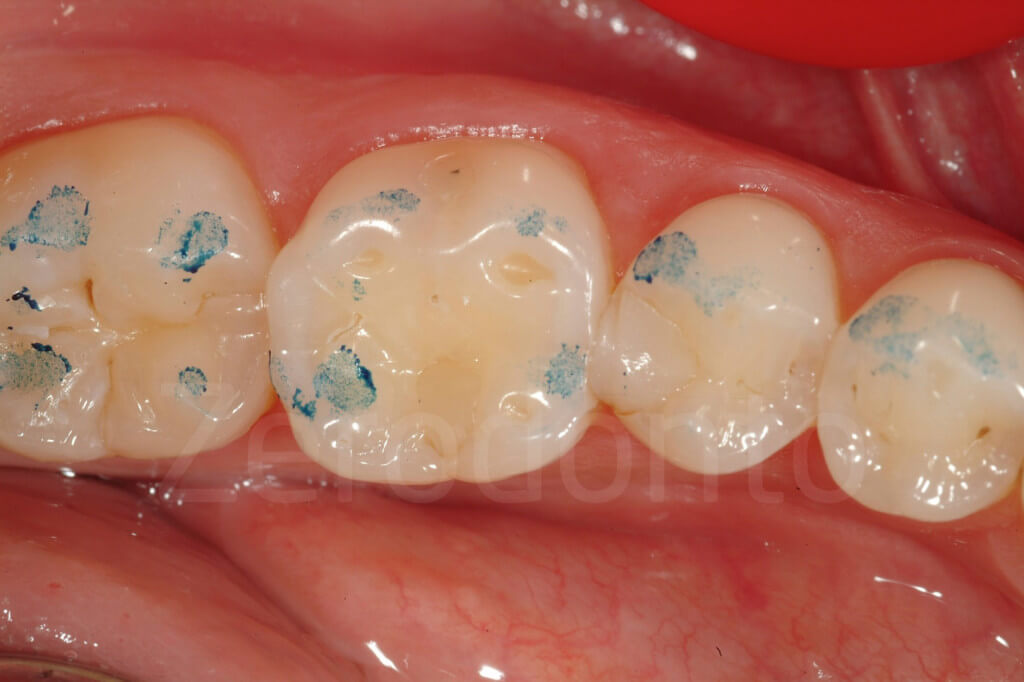
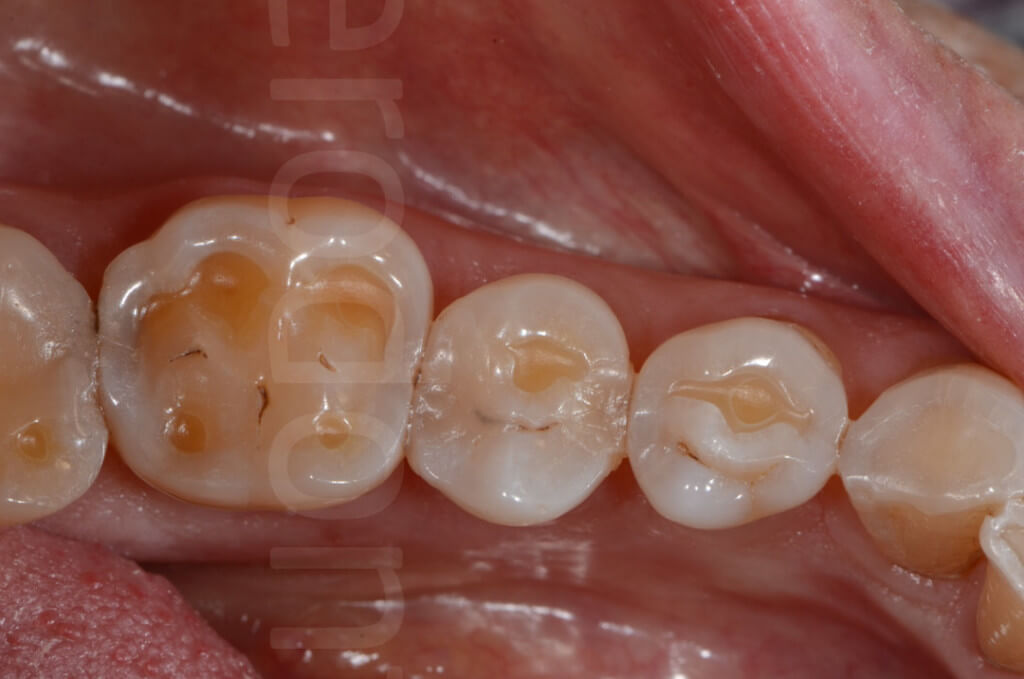
Fig 44-45: Occlusal aspect of teeth affected by different degree of wear.
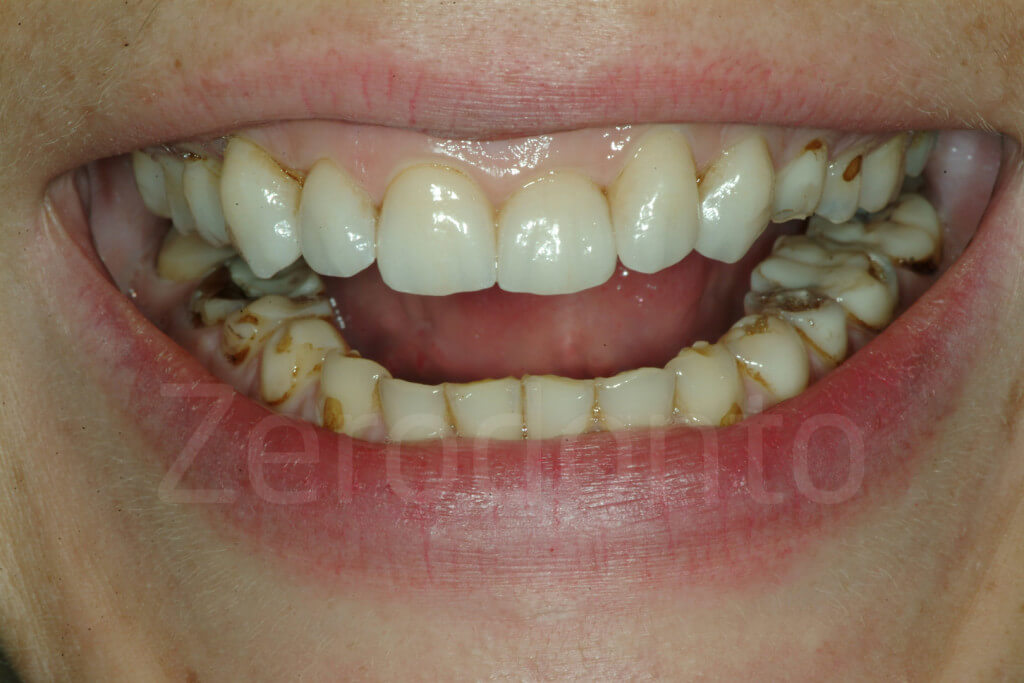
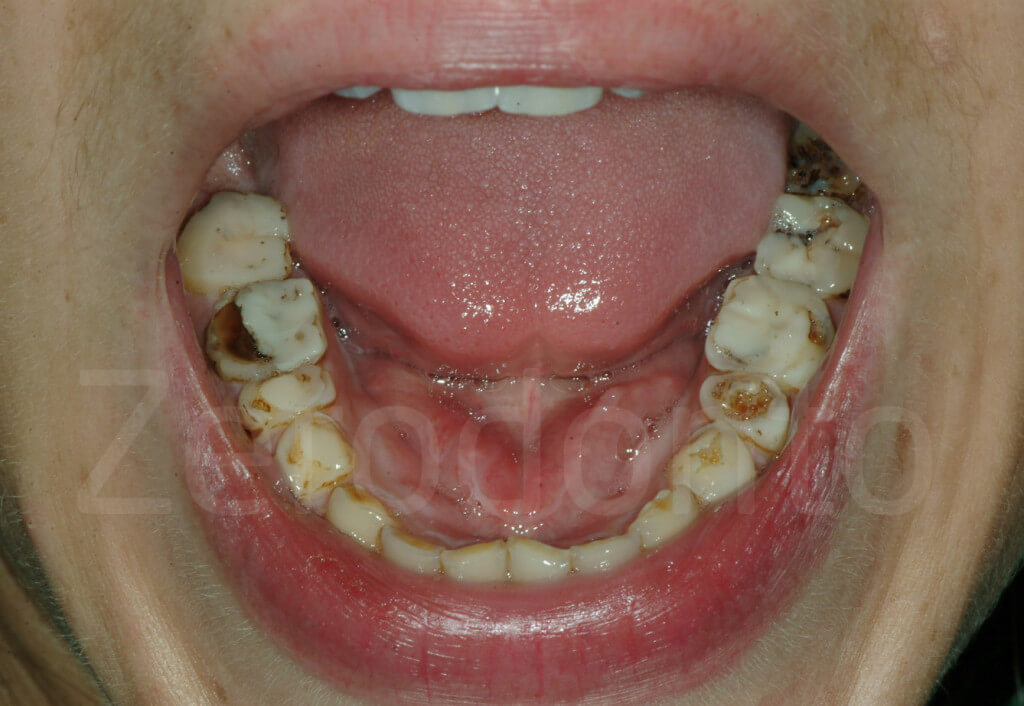
Fig 46-47: Partial rehabiliation. 25 year old patient affected by severe dental erosion. The six maxillary anterior teeth had been restored with crowns, without including the posterior teeth in the treatment. The esthetic request was satisfied, but there was an unstable posterior support, and an elevated risk of wear for the posterior teeth due to the exposed dentin.
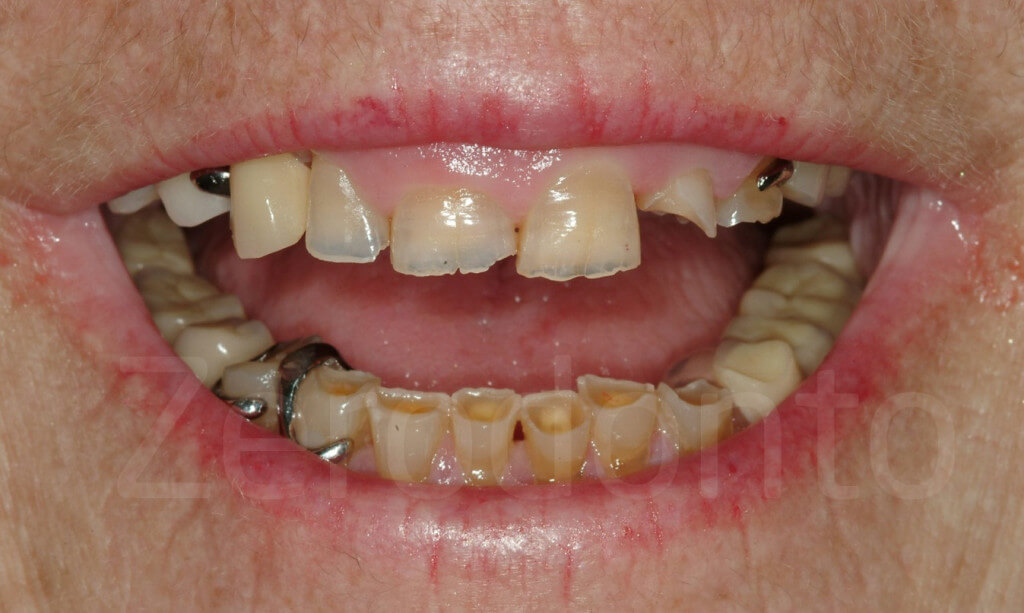
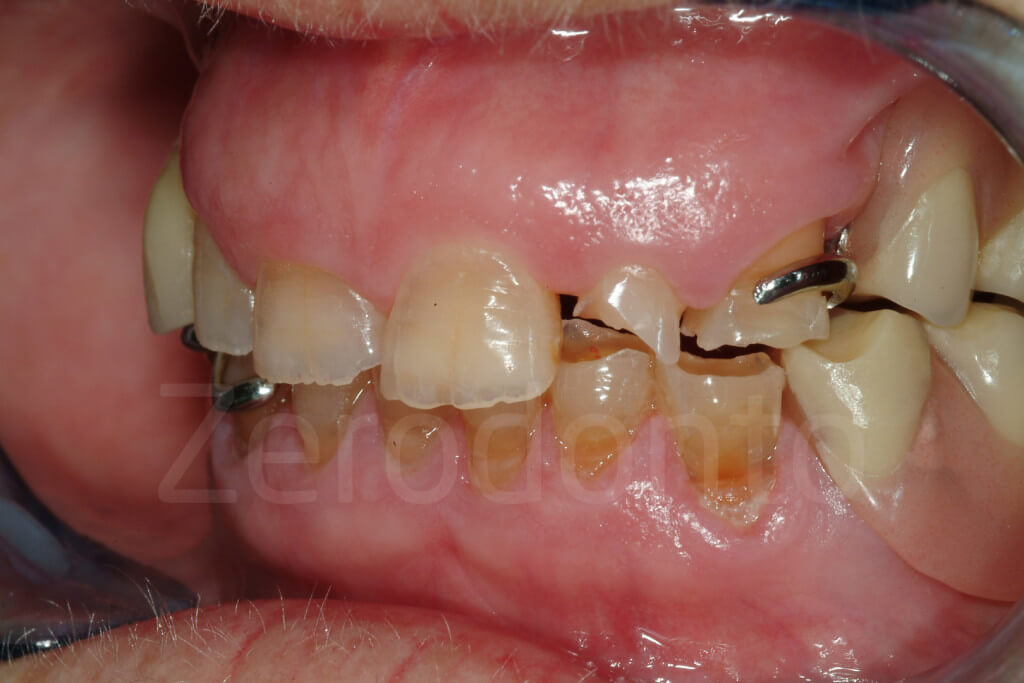
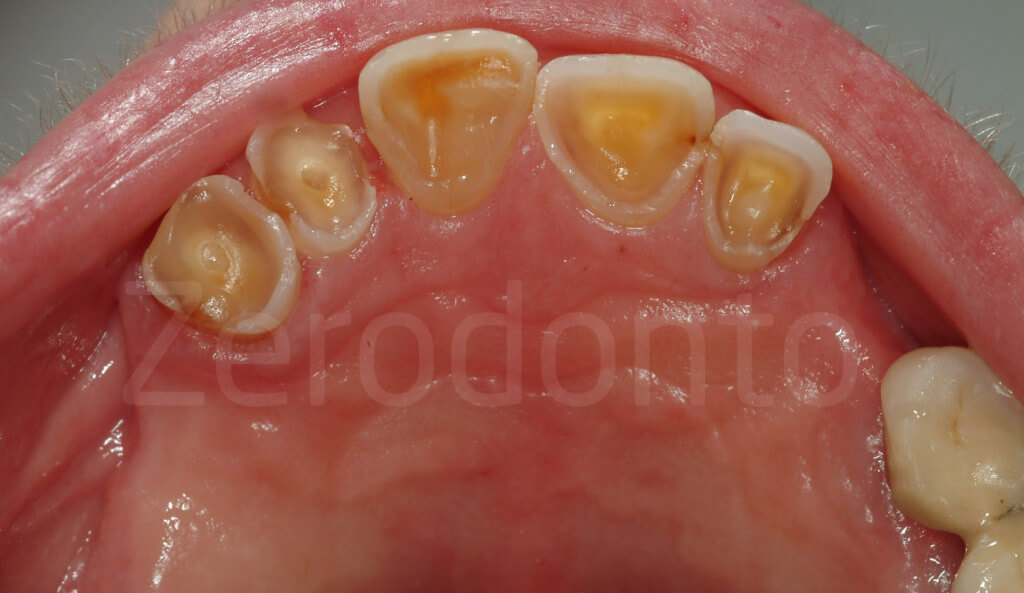
Fig 48-50: Partial rehabilitation. 70 year old patient with severe erosion of the maxillary anterior teeth. The partial dentures had been fabricated without restoring the damaged anterior teeth.
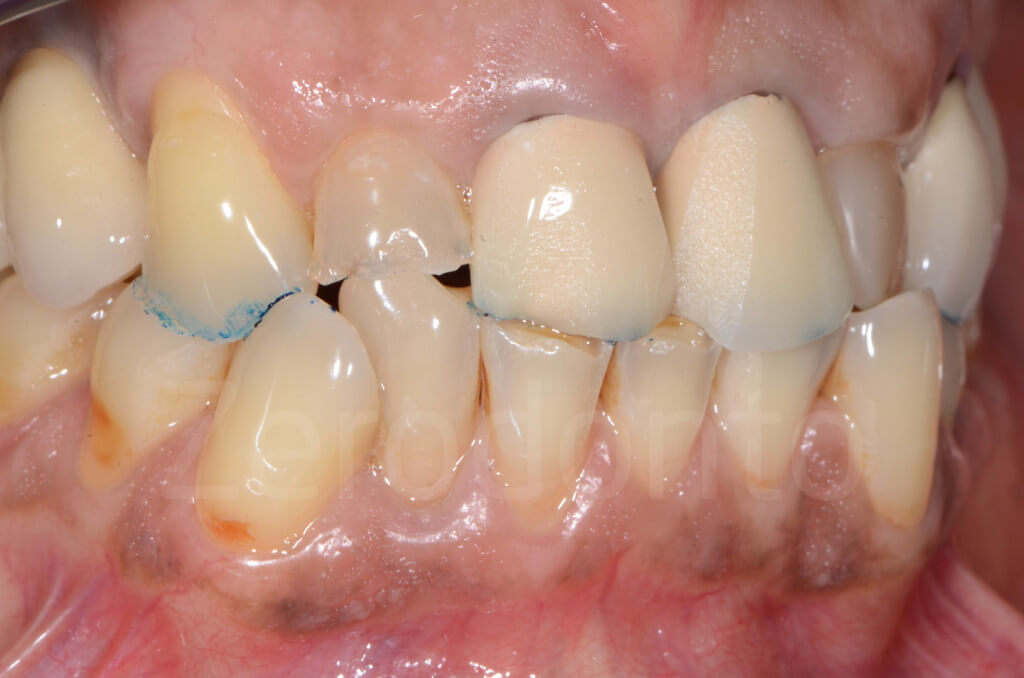
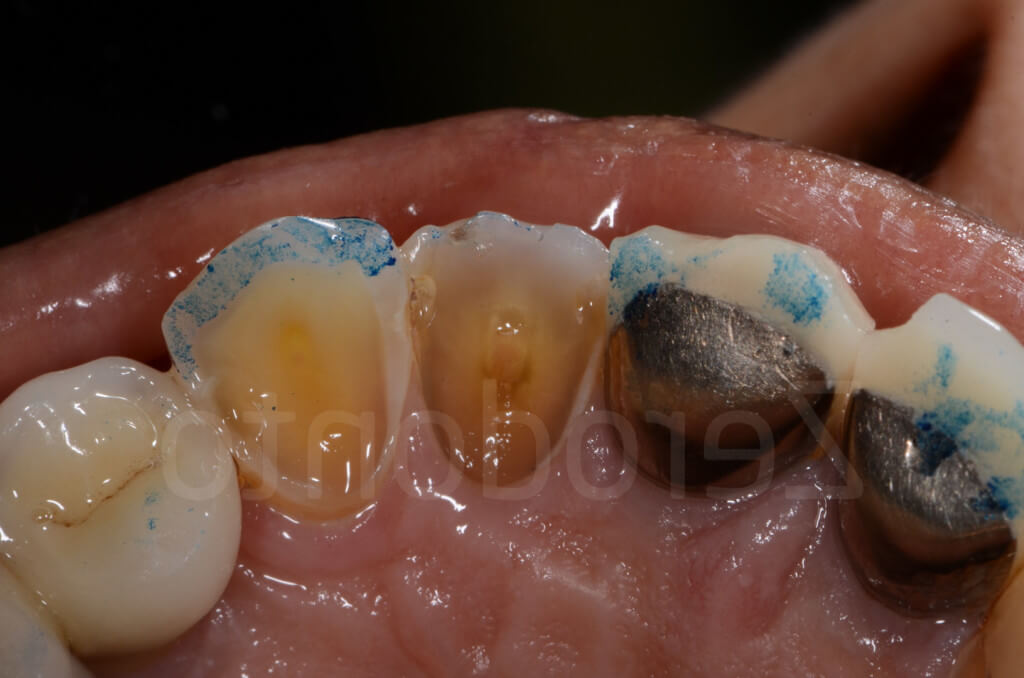
Fig 51-52: Partial rehablitiation. 65 year old patient affected by severe dental erosion. The two central incisors had been devitalized and restored by crowns, while the other maxillary anterior teeth were left untreated.
To achieve maximum preservation of tooth structure and the most predictable esthetic and functional outcomes, an innovative concept has been developed in 2005 at the University of Geneva: the 3-STEP technique. Three laboratory steps are alternated with three clinical steps, allowing the clinician and dental technician to constantly interact during the planning and execution of a full-mouth adhesive additive rehabilitation.

Fig 53: The three articles illustrated the technique were published by European Journal of Esthetic Dentistry in 2008
The 3-STEP technique is a structured approach to achieve a full-mouth ADDITIVE re-habilitation with the most predictable result, the minimal amount of tooth preparation, and the highest level of patient acceptance. The goal of this technique is to temporarily restore a compromised dentition at a new VDO, implementing directly bonded posterior composite restorations. With a stable posterior support, the anterior teeth can subsequently be restored easily, again using exclusively adhesive techniques. Once the anterior contacts are re-established, the replacement of the posterior provisional resin composites can begin. Owing to the presence of the provisional posterior composites, the full-mouth rehabilitation can be planned according to a quadrant-wise approach. Restoring a patient by quadrants has enormous practical advantages for both patient and clinician, since fewer appointments are necessary. Neither multiple anesthetic injections nor difficult full mouth impressions are required. Since the contralateral part of the mouth guarantees a stable occlusion, patients feel comfortable throughout the whole active treatment phase up to the delivery of the final restorations.
First step: maxillary vestibular waxup/mock-up and the assessment of the esthetic occlusal plane
Unrealistic patient expectations are often a contraindication to dental treatment. However, what seems to be an unrealistic expectation may in fact be a poorly expressed expectation or an expectation that is misunderstood by the clinician.
Even when there is seemingly perfect three-way communication (patient/clinician/technician), there is always potential for misunderstandings, especially when dealing with patients who are accustomed to viewing themselves with small, worn down teeth.
The importance of a predictable result that satisfies both the patient and clinician cannot be stressed enough in today’s world of esthetically demanding patients. Surprisingly, many clinicians still decide on the esthetic outcome for their patients, and thus the result seldom meets the patient’s expectations. A structured strategy to minimize such an esthetic “defeat” is to devote sufficient time to educate patients about the treatment options and expected results. The first step of this 3-STEP technique is conceived to guarantee that the clinician and technician’s vision for the planned restoration is a reflection of the patient’s true desires.
Generally, at the beginning of a full-mouth rehabilitation, the clinician provides the laboratory technician with the diagnostic casts and requests a full-mouth waxup. Since each parameter, such as incisal edges, teeth axes, teeth shapes and sizes, occlusal plane, etc, can be easily changed, waxing both the maxillary and mandibular arches at the same time could be misleading.
Clinicians should realize, in fact, that laboratory technicians will often arbitrarily decide on fundamental parameters without seeing the patients. Unfortunately, a decision based only on diagnostic casts is extremely risky, since a dental restoration that appears perfect on the cast may be clinically inadequate.
One method to ensure that everyone is on the same page is the use of a mock-up, a technique that makes it possible to anticipate the final shape of the teeth in the mouth. Several authors have already proposed the use of a mock-up for veneer restorations of anterior teeth.
In cases of severe generalized destruction of the dentition, a mock-up of only the six anterior teeth could be misleading, since the teeth will appear inharmonious with the unrestored posterior teeth.
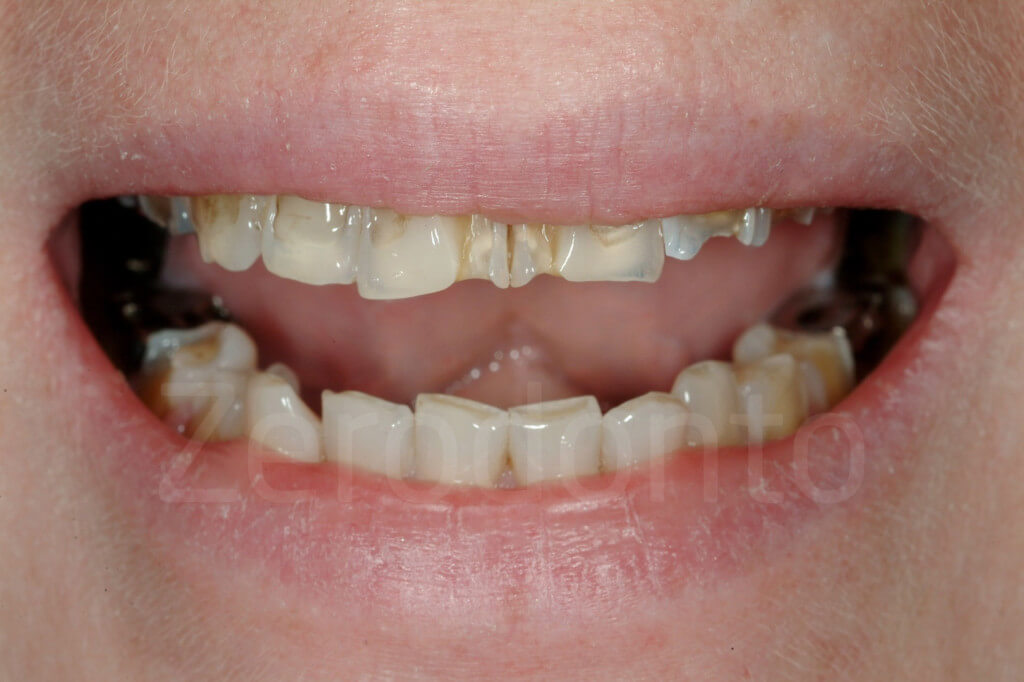

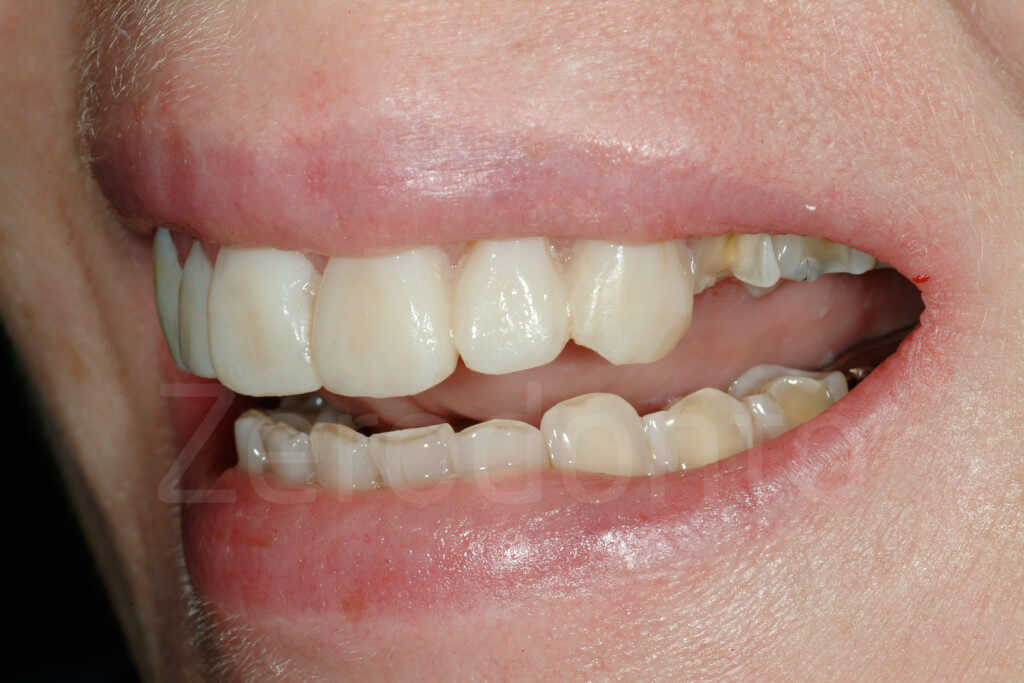
Fig 54-56: Mock-up of only 6 teeth does not allow the patient to appreciate the final outcome. At least the 4 maxillary premolars should be included in it.
Patients are becoming more attentive to the aesthetic of their smile, to the point that they will rarely accept any dental treatments if the aesthetic result is not satisfactory.
However, largely influenced by the media, only few patients are aware of their real tastes.
Dental erosion patients do not escape to the media influence, even though the very regular, large and bright dentitions promoted by these latter differ completely from their eroded dentition.
Particularly patients affected by severe dental erosion have been, in fact, subject to slow changes in their teeth, which appear irregular, small and yellowish.
Even though they claim to be unsatisfied with their smile, these patients are may be more accustomed to the look of their eroded teeth and drastic changes could be difficult to be accepted.
Trying to proceed directly with the final restorations for this population of patients is an highly risky procedure.
To avoid discussions and costly remakes, it is advisable to identify as soon as possible the shape (and colour) of the final restorations, which will please these patients, especially when severe tooth damage is present.
When aesthetic is a fundamental objective of the dental therapy, a Classic 3-STEP technique is indicated.
Before starting any treatment procedures, a Classic approach dedicates a visit to know better the patients’ wishes and define the aesthetic of the future restorations (e.g. the length of the final incisal edges and the position of the esthetic plane of occlusion).
A Classic approach is preferred especially when the dentition is very compromised and the clinician and the laboratory technician need to gather more clinical information about the patient’s esthetic preferences, before starting extensive full-mouth waxup.
Following the Classic 3-STEP, during the initial visit with the patient, two alginate impressions are taken.
The laboratory technician articulates the two diagnostic casts on a semi-adjustable articulator by mean of a face bow in the maximum intercuspation position (MIP).
Since without the clinical validation of the position of the occlusal plane a full-mouth waxup may be incorrect, the 3-STEP technique proposes that the technician initially waxes up only the vestibular surface of the maxillary teeth, and concentrate on the incisal edges and occlusal plane’s position.
At this time, neither the cingula of the anterior nor the palatal cusps of the posterior maxillary teeth should be included in the wax up.
Inspired by the pictures of the patient’s initial smile, the technician focus exclusively on the esthetic appearance of the facial surfaces of the maxillary teeth, with maximum freedom in creativity.
The duplication of the maxillary vestibular waxup by the means of a precisely fitting silicone key concludes the I laboratory STEP.
During the I clinical STEP, the silicone key is loaded with tooth-colored provisional resin composite and positioned in the patient’s mouth.
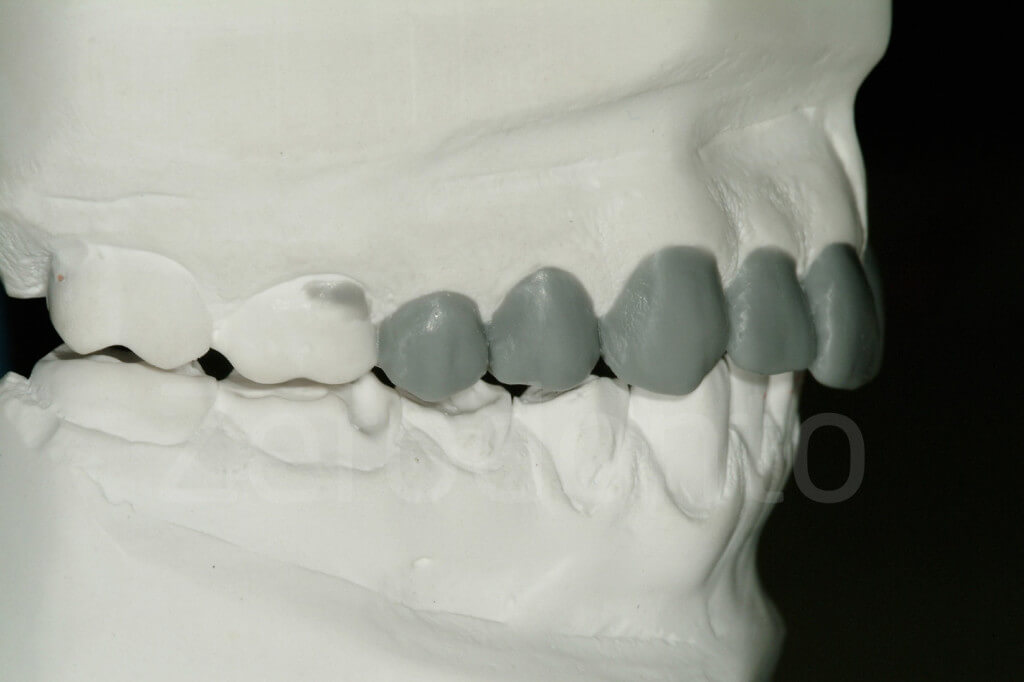
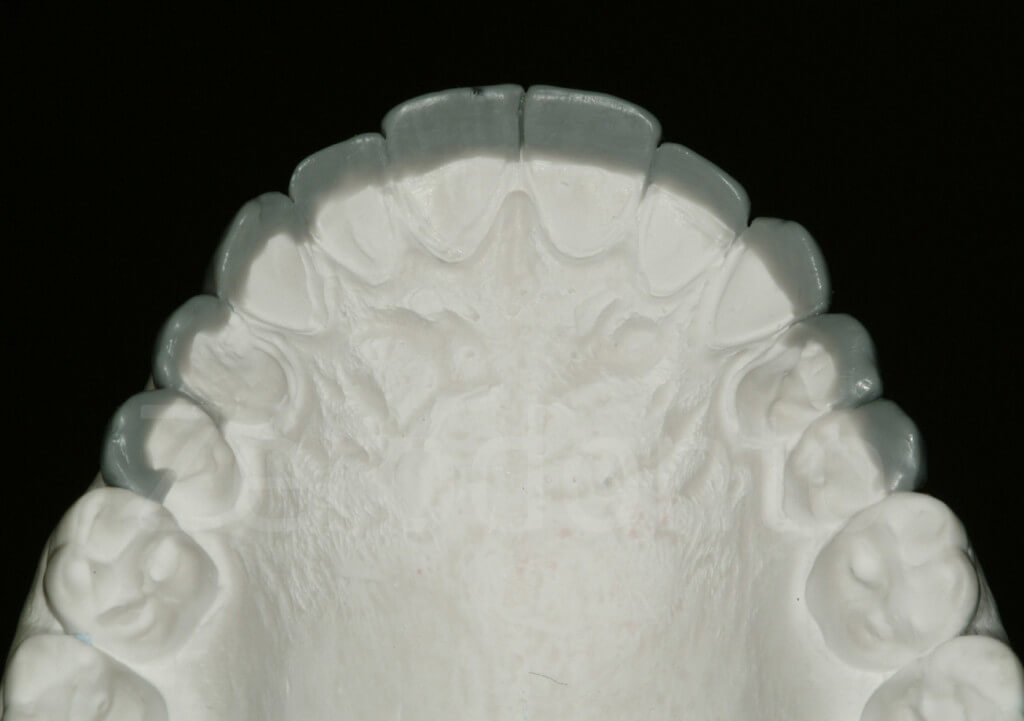
Fig 57-58: First laboratory step. Only the incisal edges and the vestibular cusps of the posterior maxillary teeth are waxed.
After its removal, the buccal surfaces of the maxillary teeth included in the waxup will be covered by a thin layer of resin composite that reproduces the shape of the future restorations (maxillary vestibular mock-up).
This fully reversible reconstruction of the maxillary vestibular cusps of the posterior teeth and the incisal edges of the anterior teeth allows a perfect visualization of both the esthetic plane of occlusion and the overall esthetic appearance of the future final restorations.
Thanks to this reduced, and less expensive waxup, the clinician can confirm clinically if the technician is on the right track.
In addition, delivering a mock-up at the beginning of the therapy, may favour the establishment of confidence in the clinician’s work, since with the mock-up in place, the patient can have a better idea of the final outcome of the treatment.
The mock-up helps also to communicate with the patient about the number of teeth to be treated.
Patients tend to consider aesthetically important only their six anterior teeth.
Thanks to the maxillary vestibular mock-up extended to the posterior teeth, the dentist can decide together with the patient on the final number of teeth involved in the rehabilitation.
Planning to execute a more global treatment from the beginning may speed up the therapy and eliminate the risk of remakes and misunderstandings.
Due to its very thin aspect, this mock-up could be left in place, and removed by the patient afterwards, allowing more time to adapt to the change.
While the patient express an opinion on the mock-up, mostly looking at the position of the incisal edges, the clinician gathers more information, especially for the restoration of the posterior teeth.
In fact, the major goal in this I STEP is to validate the position of the esthetic plane of occlusion, which is in the authors’ opinion the most frequently neglected parameter in a full-mouth rehabilitation.
Once the occlusal plane position is clinically accepted (e.g. harmony with the incisal edges), the laboratory technician has the information on how sharing the interocclusal space obtained at the level of the posterior teeth with the increase of VDO.
Only then the waxup of the posterior teeth could be made correctly.
With the mock-up in place, new photographs are taken, and the technician can subsequently progress to the II laboratory STEP.
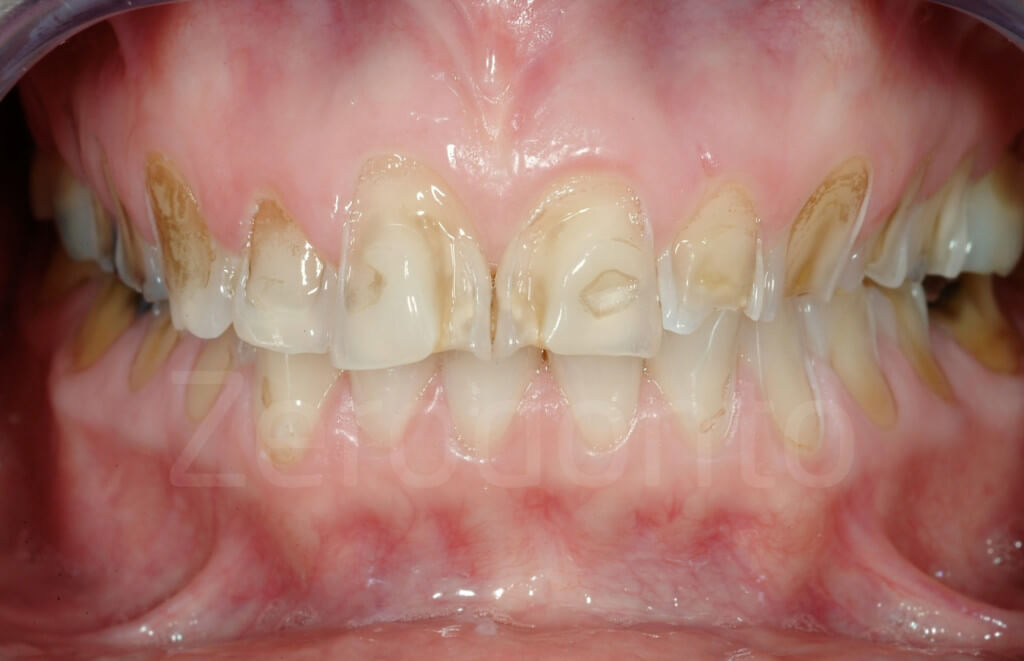
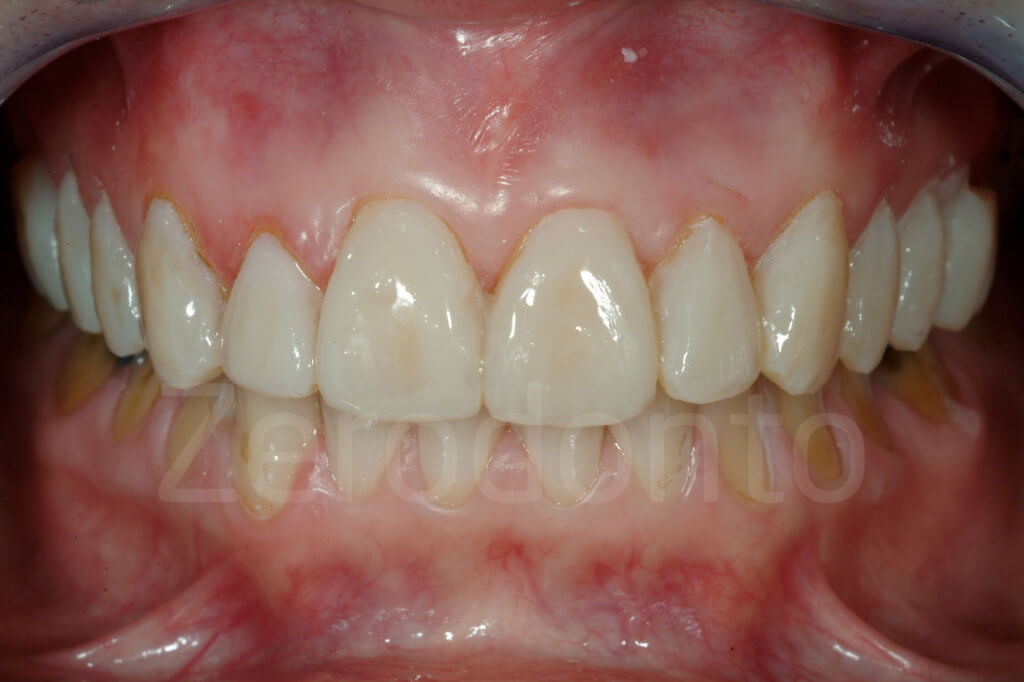
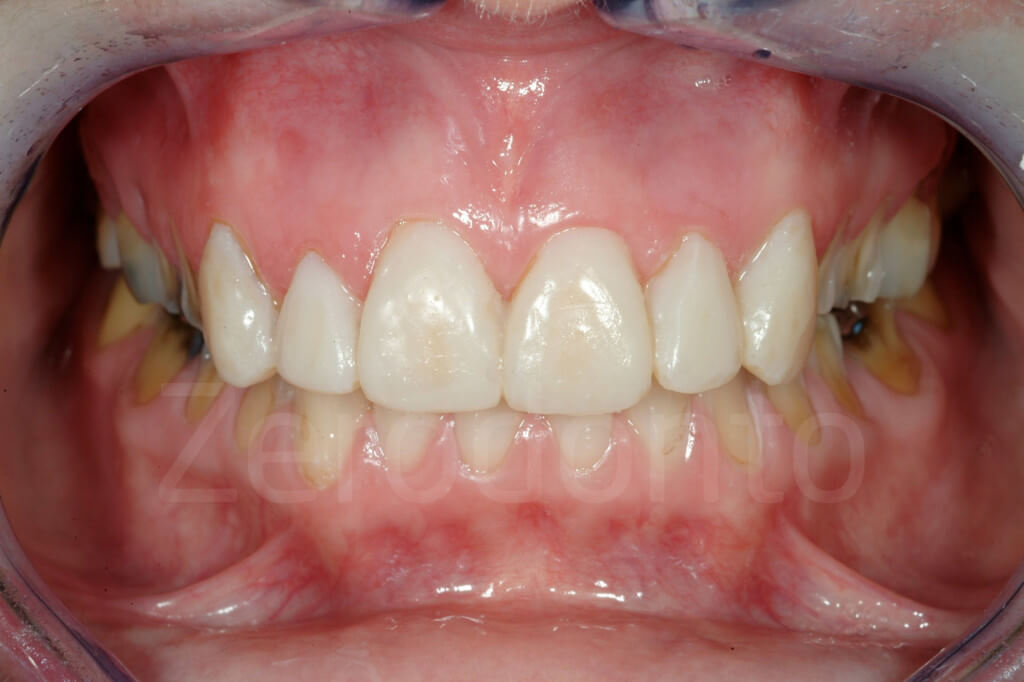
Fig 59-61: Maxillary vestibular mock-up (first clinical step). Removing the 4 premolars the result was not in harmony any longer
To obtain a mock-up of all maxillary teeth is not necessary at this initial stage of the therapy to have a full mouth wax-up. In fact, the 3-STEP technique proposes that surface of the maxillary teeth. To save time and facilitate the next clinical step, neither the cingula of the anterior maxilla nor the palatal cusps of the maxillary posterior teeth should be included. The maxillary second molar is never included in the waxup. At the completion of the maxillary vestibular waxup, the first clinical step (maxillary vestibular mock-up) is introduced so that the clinician can confirm the direction taken by the technician. The factors that should be considered during this assessment will now be discussed.
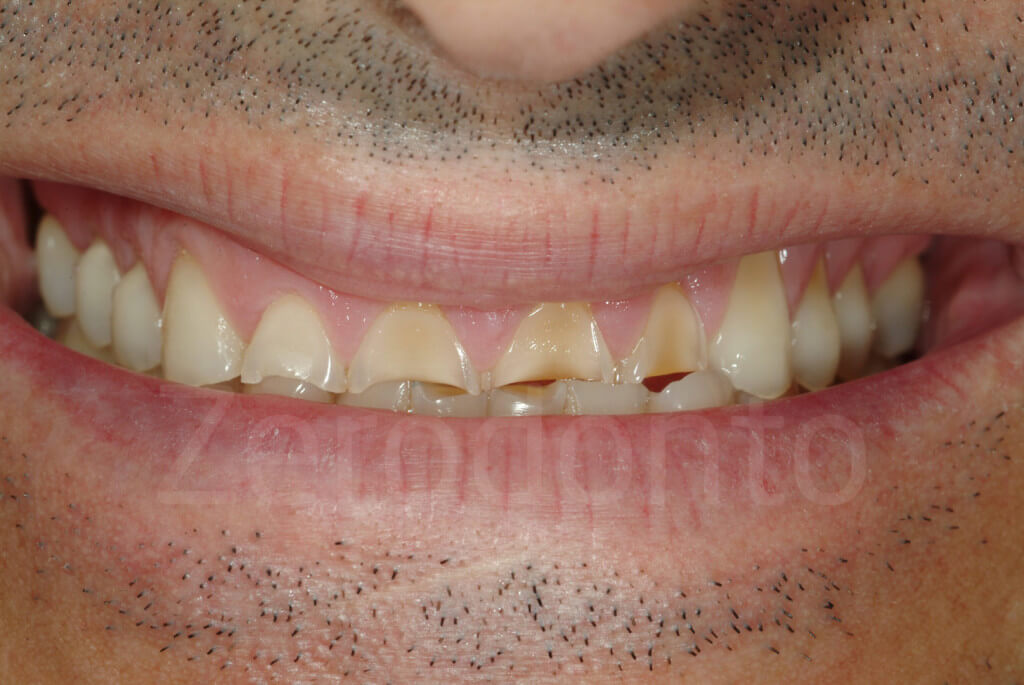
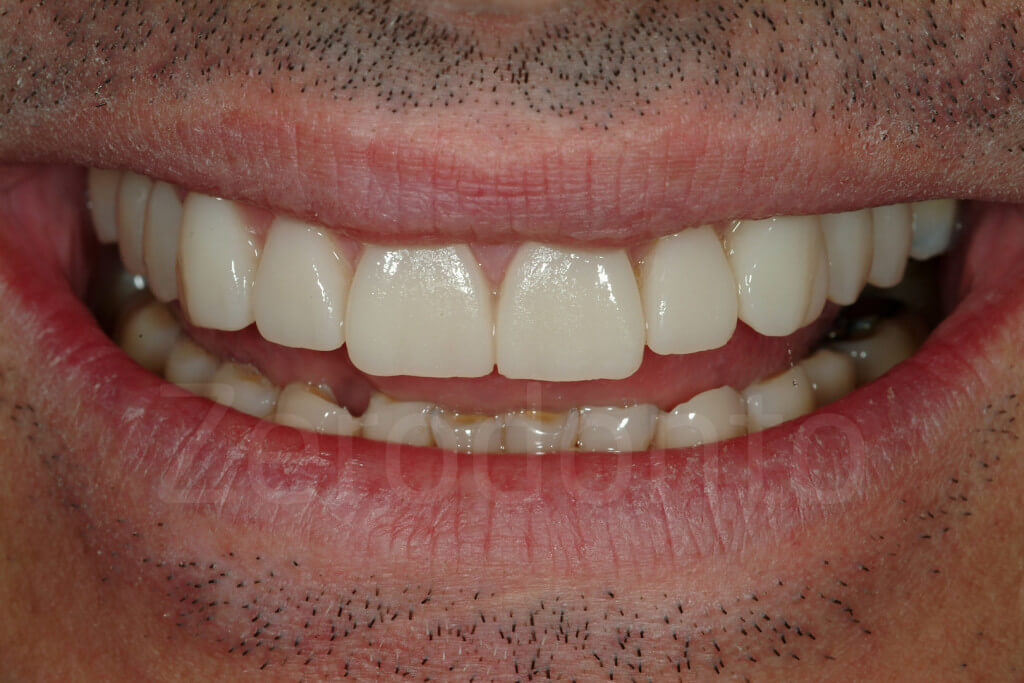
Fig 62-63: First clinical step, the maxiilary vestibular mock-up
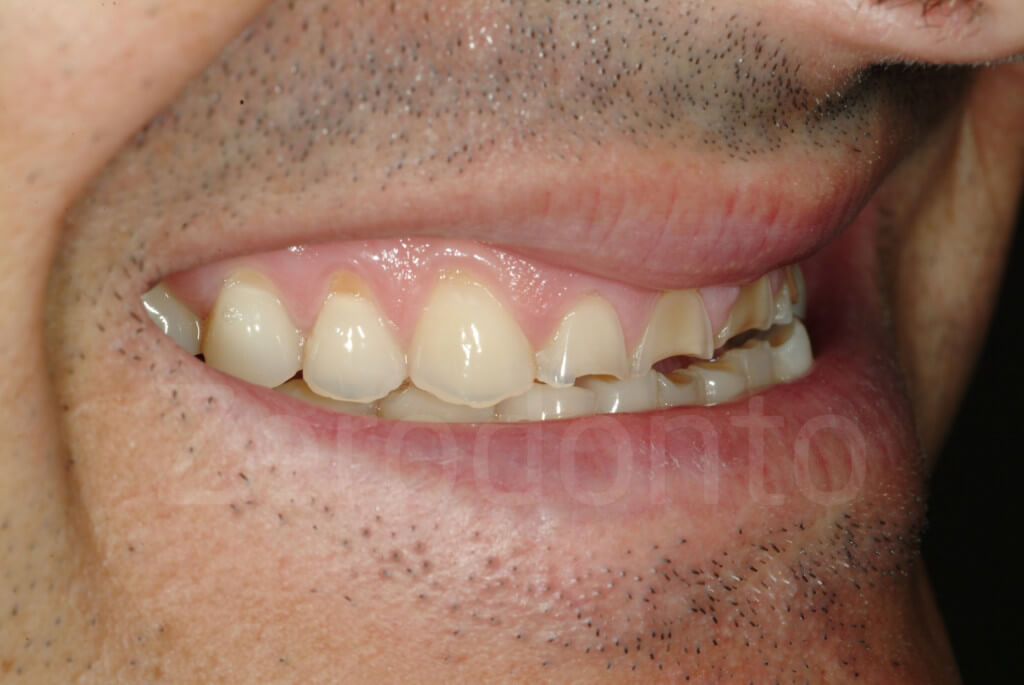
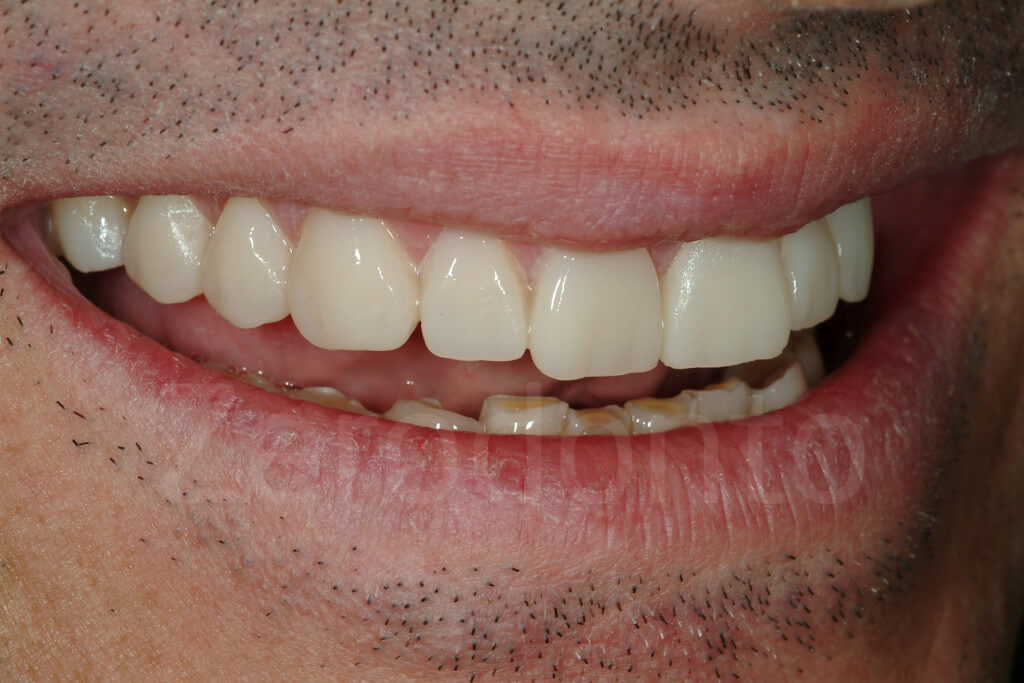
Fig 64-65: The ¾ smile picture is essential to judge if the incisal edge and the esthetic occlusal plane are in harmony with the lower lips.
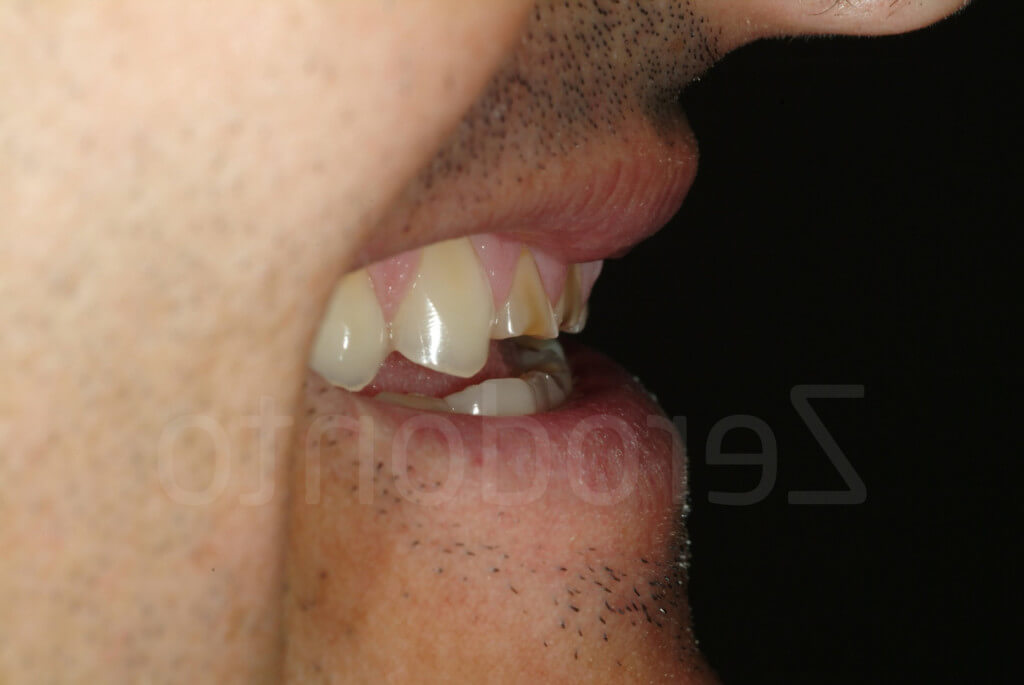
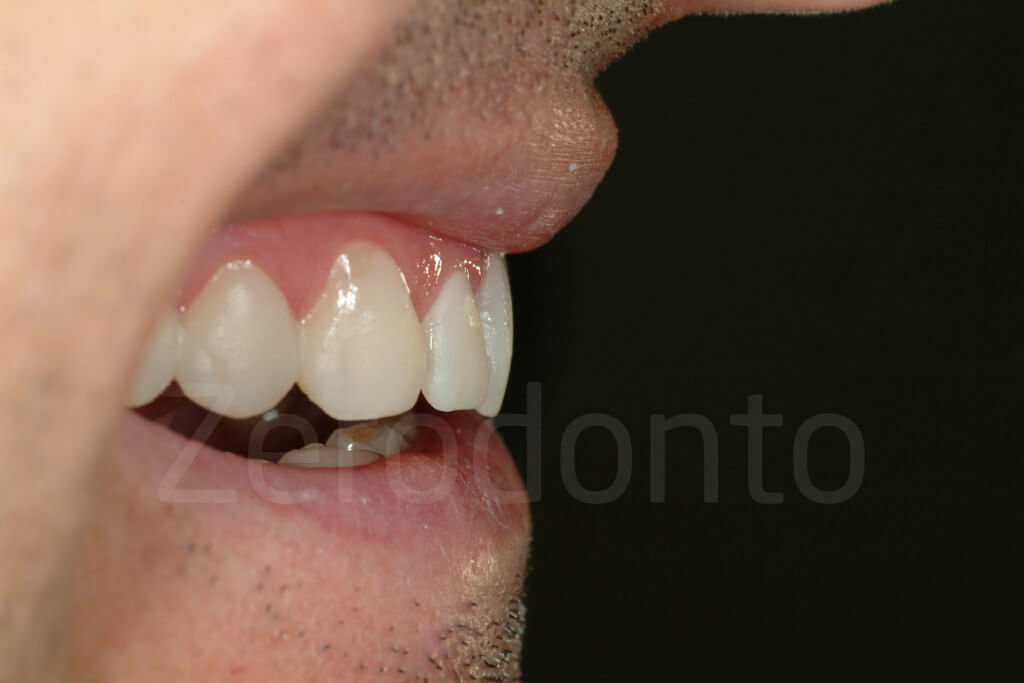
Fig 66-67: The straight profile picture shows the inclination of the maxillary incisors, which in an additive rehabilitation with will always be restored thicker than the initial status.
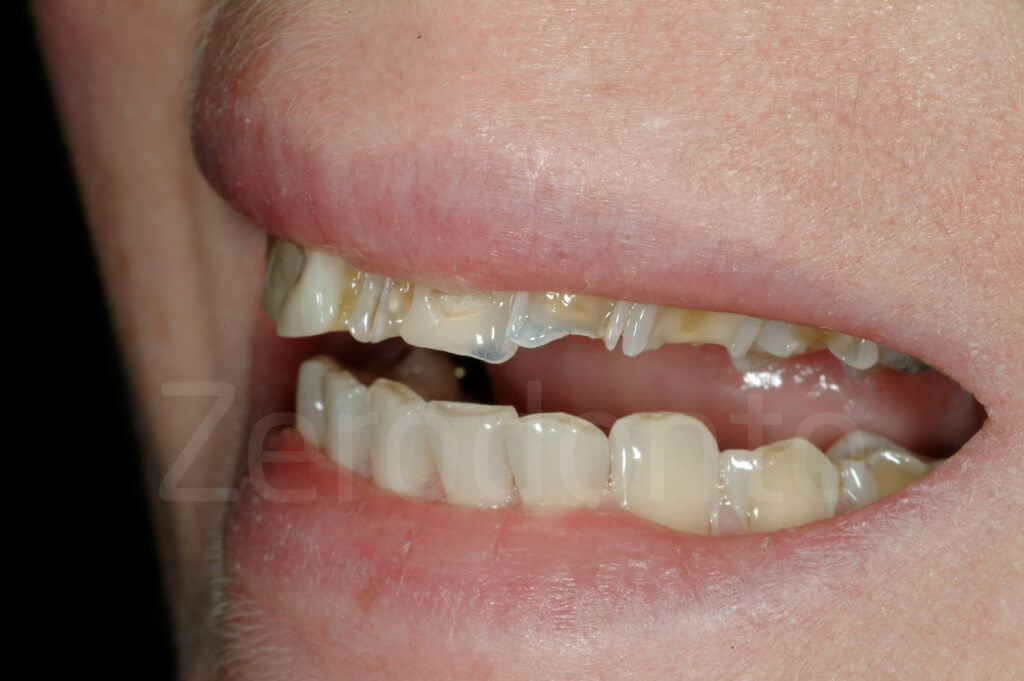
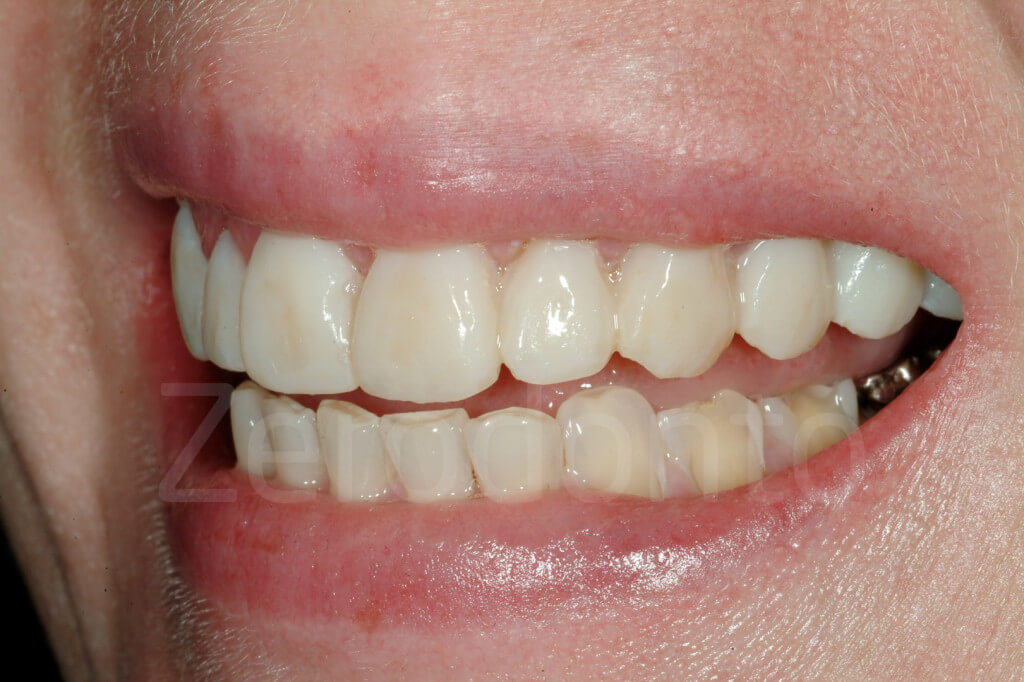
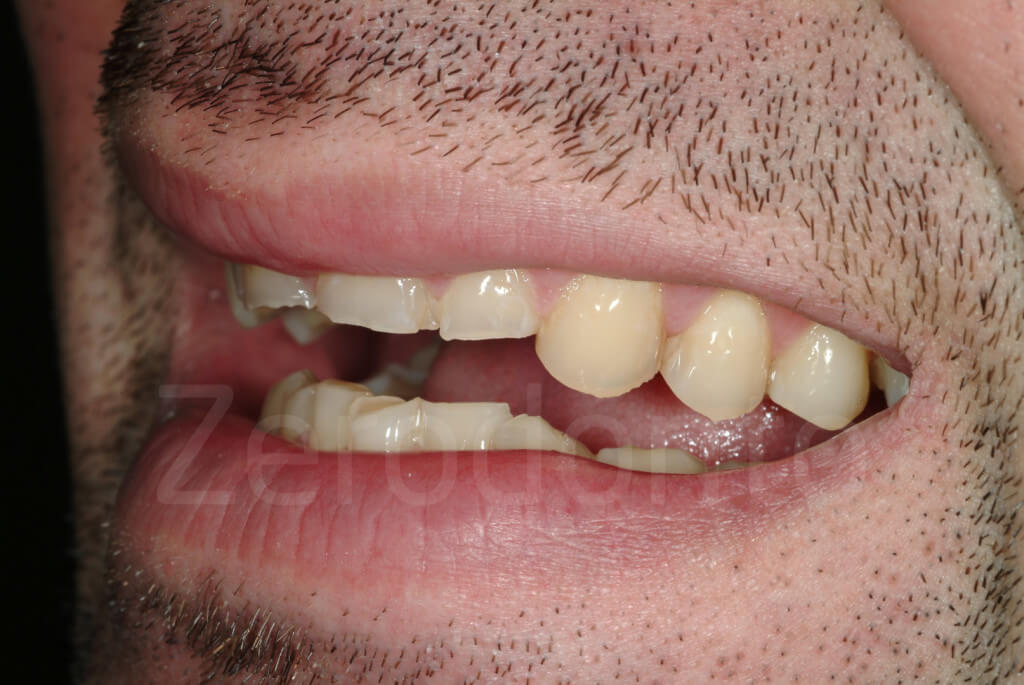
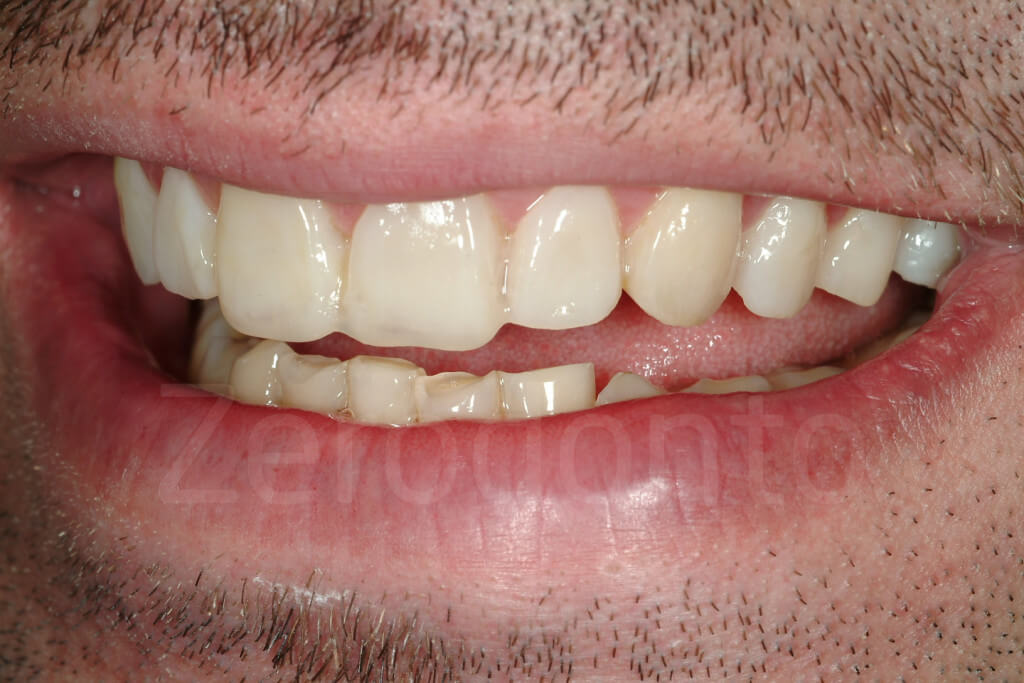
Fig 68-71: With the mock-up in place the lips move differently during smiling
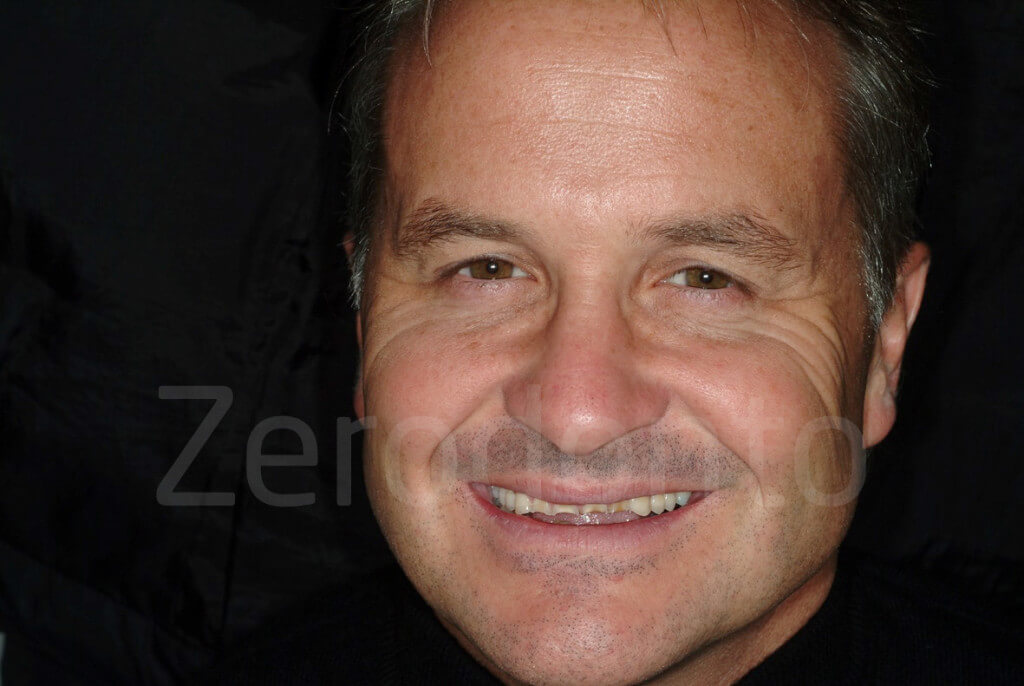
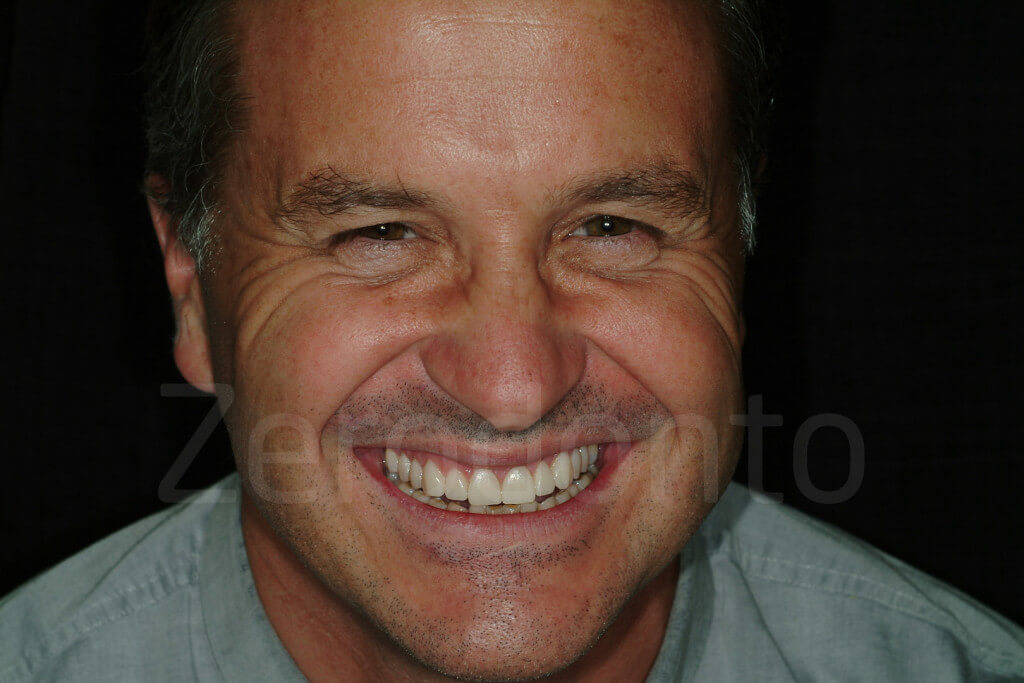
Fig 72-73: With the mock-up in place patients can completely change their way of smiling like in this case where the patient showed that he could present a gummy smile
Incisal edges
Patients are often shocked by the increased length of the incisors selected by the clinician and technician. After years of seeing themselves with a compromised dentition, many patients cannot immediately adapt to more voluminous teeth. Often, patients will eventually agree to such a change if they are allowed to test the new teeth; however, some patients will never accept it. Clinicians cannot impose their personal opinions onto their patients, but they can try to guide the patient in making an informed decision.
The mock-up represents an excellent opportunity for patients and clinicians to truly understand each other’s points of view. The mock-up covering the teeth can be shortened or lengthened (using flowable composite), and their shape can be modified. If major changes are made, an alginate impression can be taken to guide the technician.
Esthetic Occlusal plane
The innovative aspect of the 3-STEP technique is the extension of the mock-up to the vestibular aspect of the maxillary posterior teeth. The inclusion of the four premolars is crucial, not only to visualize their buccal aspect in comparison with the anterior teeth (vestibular harmony), but also to relate the plane of occlusion to the incisal edges.
Maxillary incisal edges and the occlusal plane should be in harmony for an optimal esthetic and functional result In a frontal, smiling view, the cusps of the posterior teeth should follow the lower lip and be located slightly more cervically than the incisal edges. Otherwise, an unpleasant, “reverse” smile is generated.
When an increase of the VDO is anticipated in a full-mouth rehabilitation, the question of how to divide the extra interocclusal space is generally answered by sharing the space equally between the mandibular and maxillary arches. However, such a decision is completely arbitrary and may lead to a repositioning of the occlusal plane at a lower level than the original.
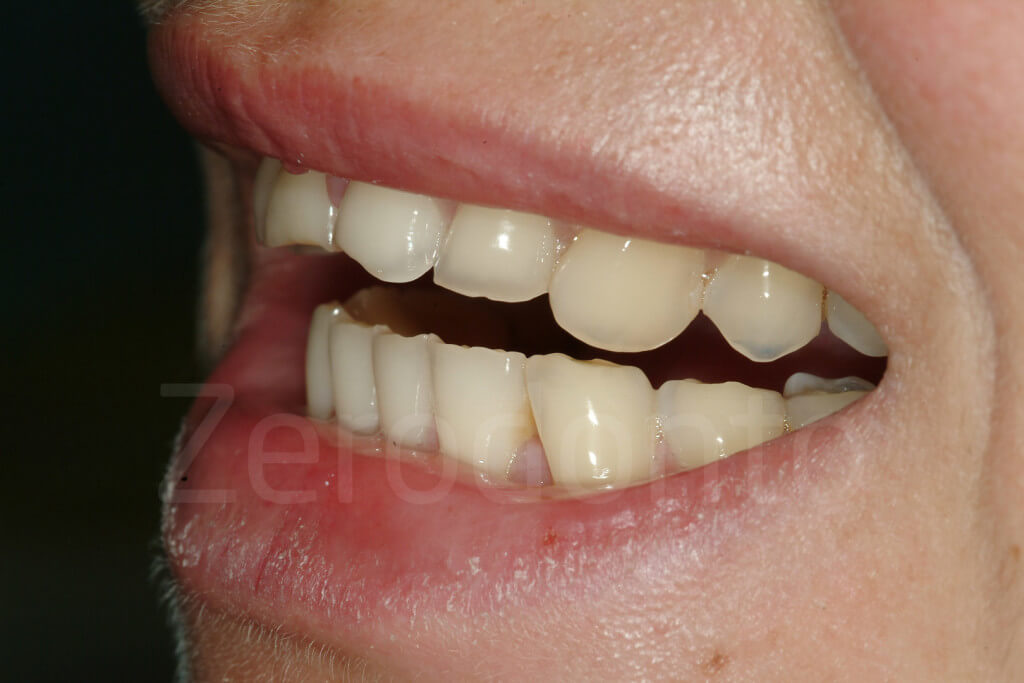
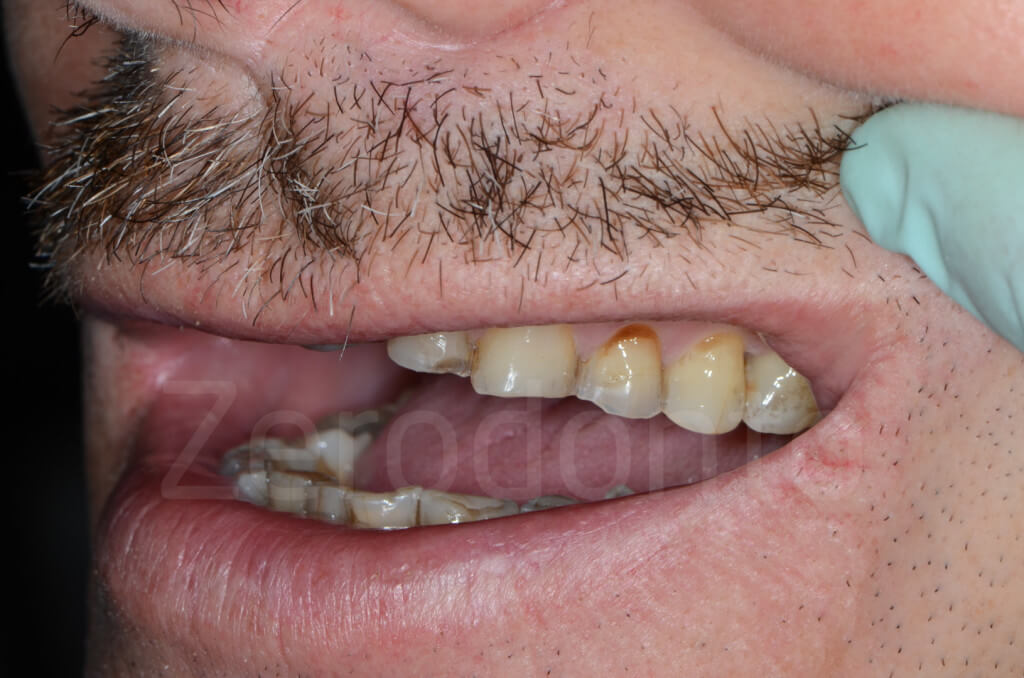
Fig 74-75: Patients affected by dental erosion often present already a reverse smile. It is important to capture the ¾ smile, where the incisal edges and the occlusal plane are visible, even when the patient does not lift the upper lip.
Unfortunately, in cases of tooth wear related to dental erosion, the loss of tooth structure is often compensated for by supraeruption, especially in the maxillary posterior region and mandibular anterior region. One goal of a full-mouth rehabilitation should be the correction of such a situation.
The technician must know to what extent the incisal edges can be lengthened before deciding on the esthetic occlusal plane’s position and waxing up the posterior quadrants. A maxillary vestibular mock-up, which visualizes both the incisal edges and the buccal cusps of the posterior teeth, can help verify the orientation of the future occlusal plane.
Harmony with the maxillary molars
If the waxup is stopped at the level of the maxillary premolars, it will be possible during the maxillary vestibular mock-up to evaluate how the unrestored molars will blend in with the restoration planned for the premolars. The lip display will also preview the visibility of the buccal margins of the future restorations (onlays or veneer/onlays) for the molars.
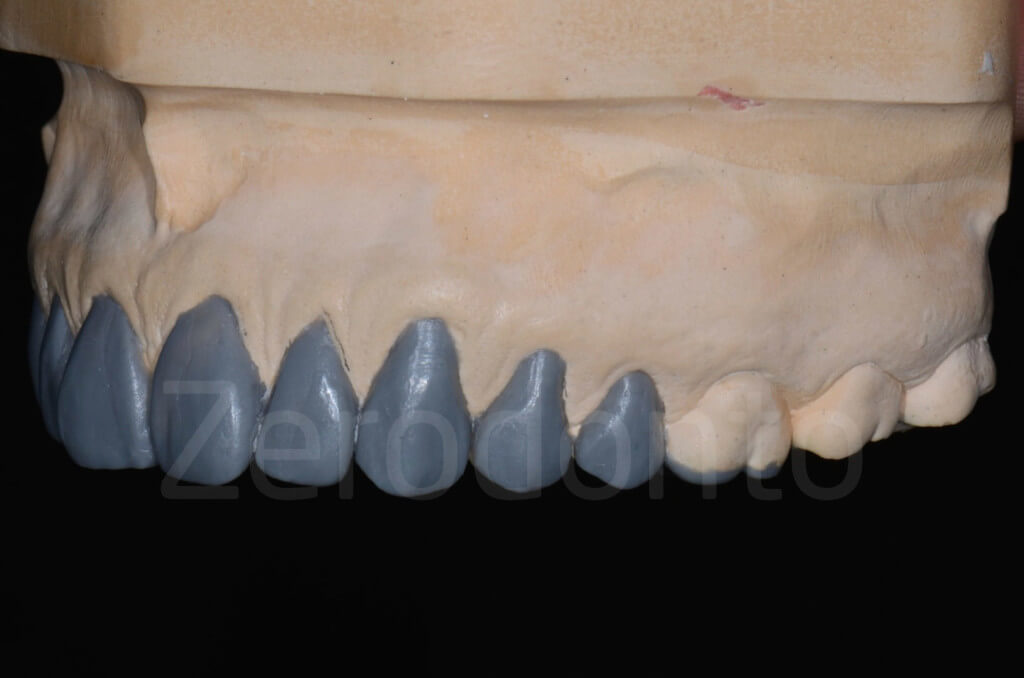
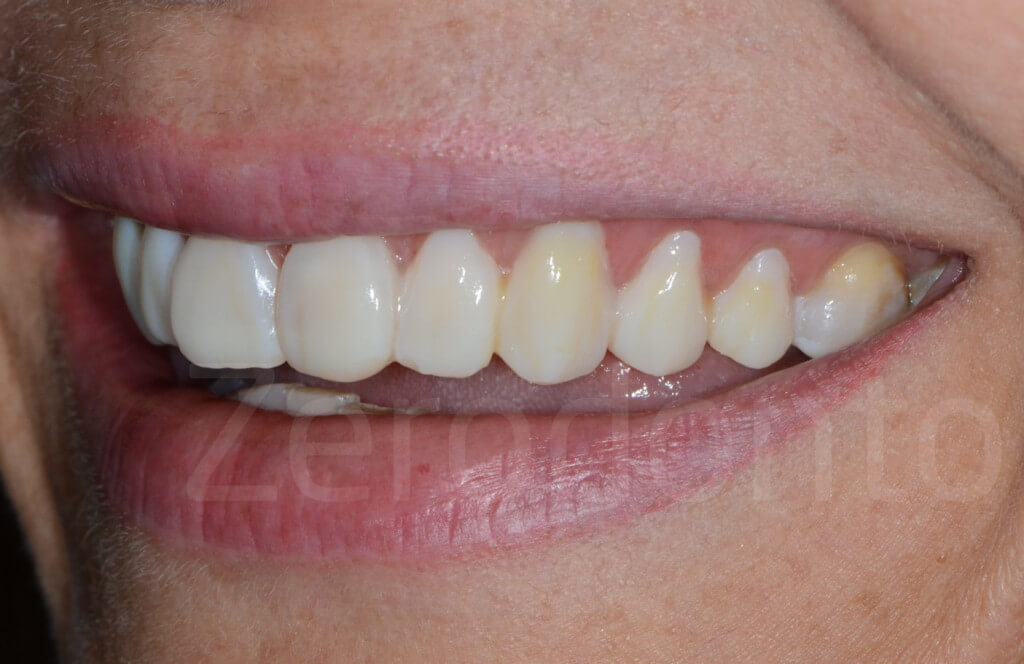
Fig 76-77: First laboratory step and first clinical step. It is possible to double check with the patient is the facial aspect of the unrestored first molar will be an esthetic problem for the patient.
Emergence profile and gingival levels
At the time of the waxup, the clinician and technician can determine whether crown lengthening is needed. To confirm if mucogingival surgery is necessary and to what extent, the technician should wax the cervical aspect of the future restorations overlapping the gingiva of the cast. Consequently, the teeth of the mock-up will cover the gingiva of the patient. Their emergence profile will be slightly altered, but they will still provide a good sense of the final outcome to both the clinician and the patient.
Based on the lip display, the teeth to be involved in the surgery can be selected, and the patient can make an informed decision whether to accept the surgery. This presurgical mock-up can be a powerful tool to convince reluctant patients. In these cases, the compromised result could also be visualized with another mock-up, this time without the gingival overlap.
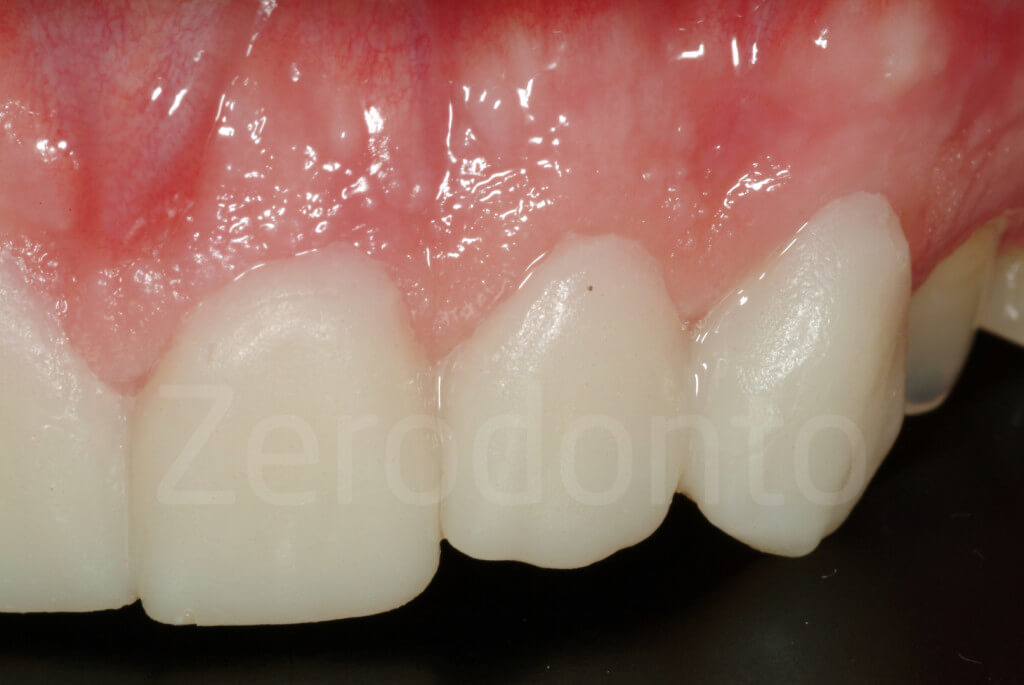
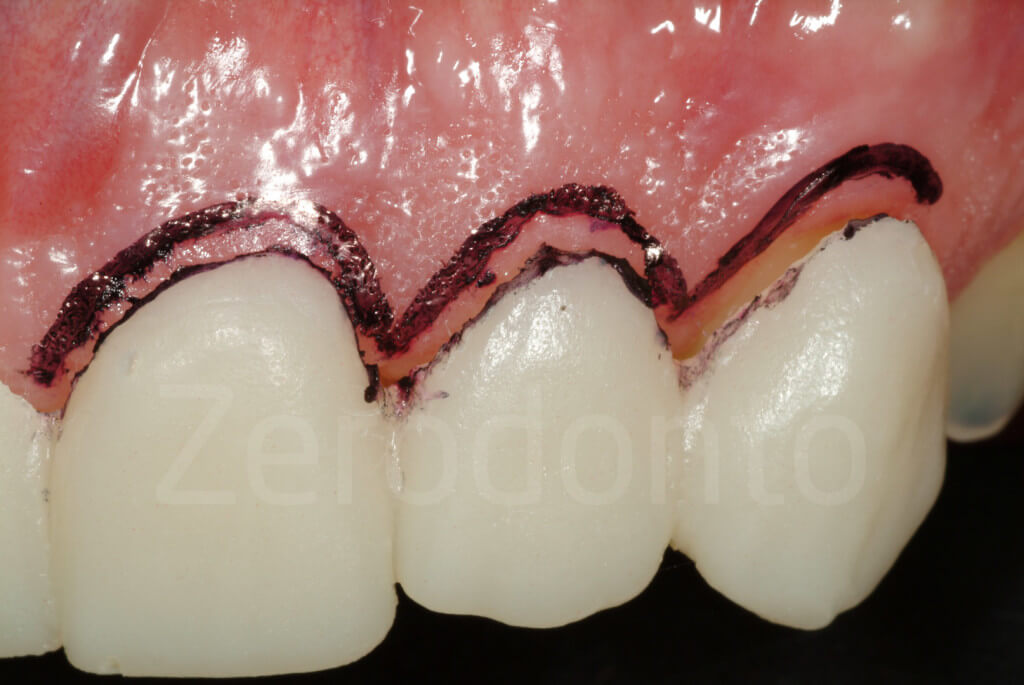
Fig 78-79: The wax up could be extended on the gingiva of the cast. The mock-up will then have a cervical aspect overlapping the gingiva, mimicking the possible crown lengthening.
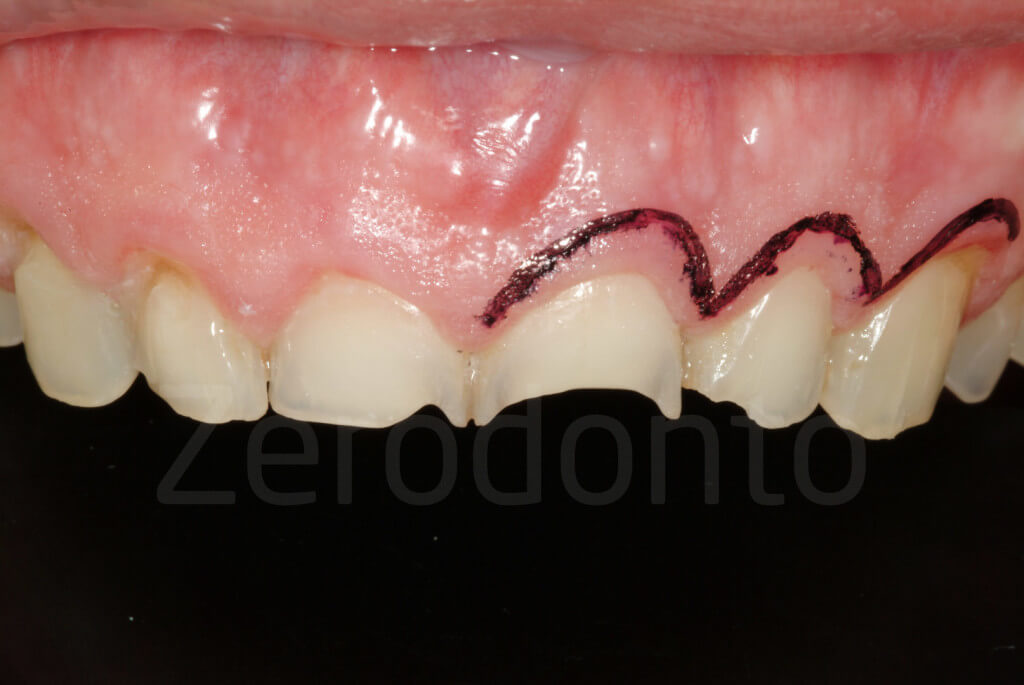
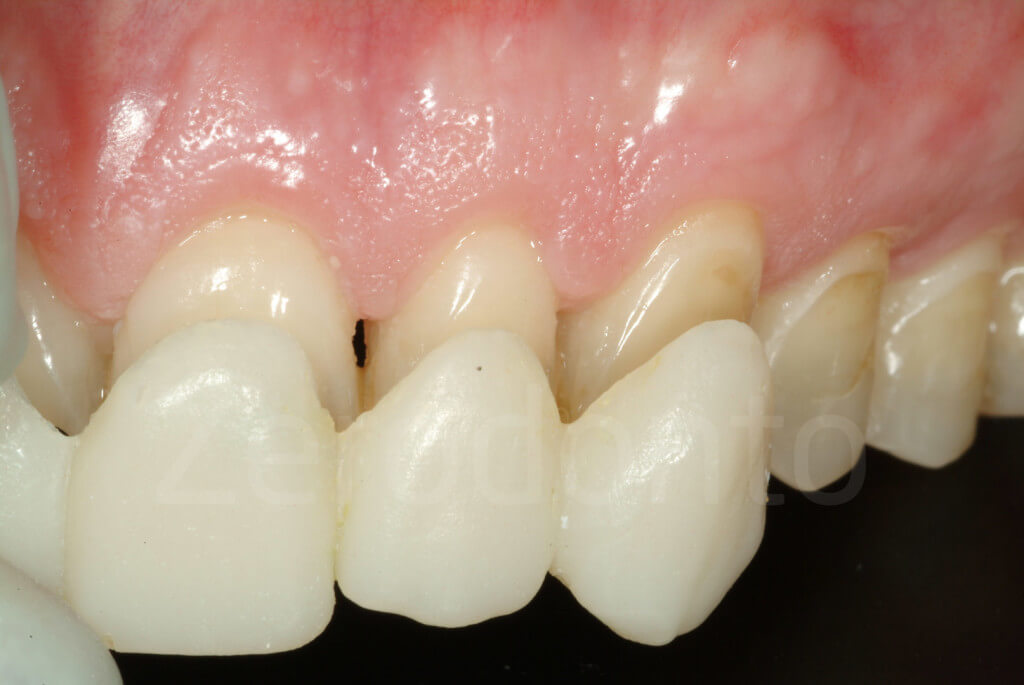
Fig 80-81: The gingiva could be marked and this used to show the patient the amount of gingiva which would be removed during surgery. The mock-up itself could be used to guide the mucogengival surgery
Number of teeth involved in the rehabilitation
Sometimes, patients are not fully aware of the level of destruction of their dentition. Motivated primarily by esthetics, patients may believe that a satisfactory result can be achieved by focusing only on the anterior teeth, and thus they will not be interested in a more comprehensive treatment plan. To avoid investing unnecessary time and money, a maxillary vestibular mock-up could be used. The mock-up covering the posterior teeth could then be removed, leaving the patient with the mock-up of only the six anterior teeth. While some of these patients will still “run away” as anticipated, others will be convinced to accept the more extensive treatment.
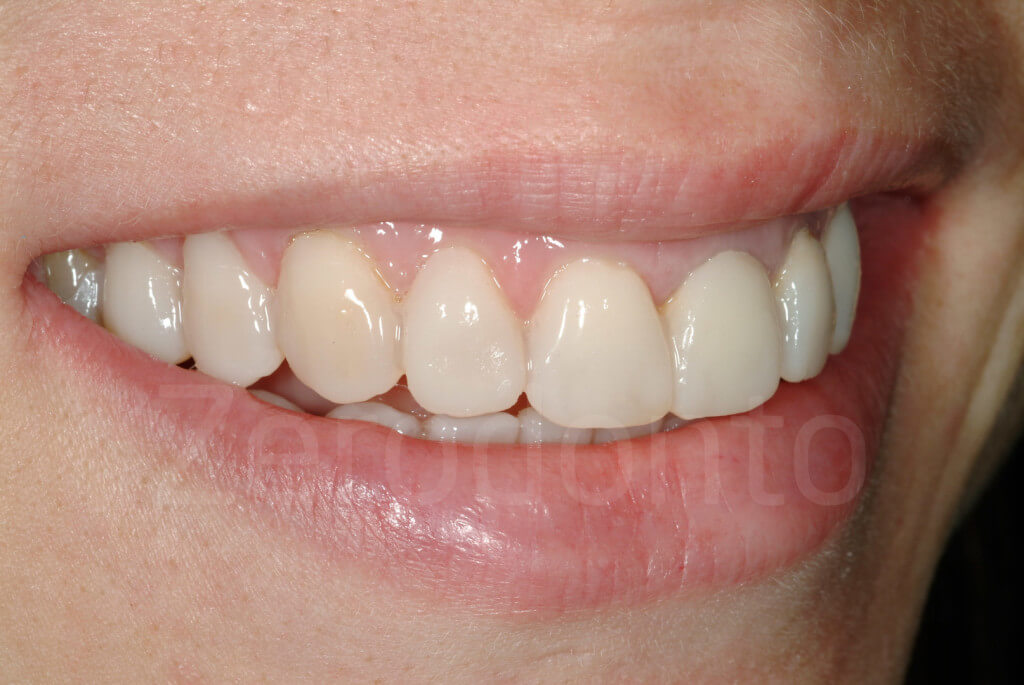
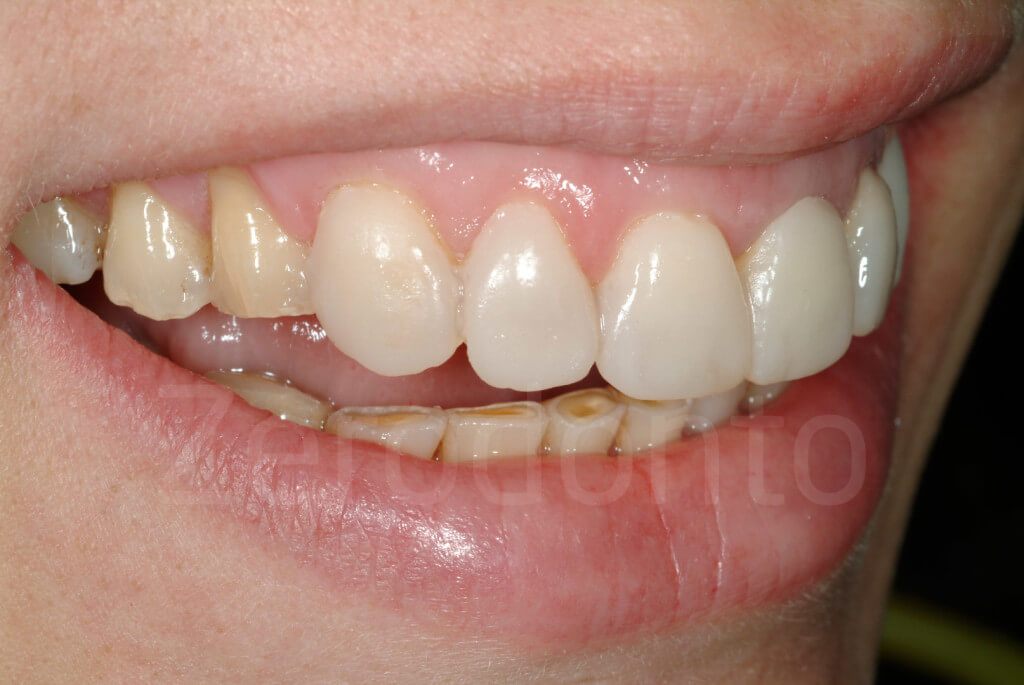
Fig 82-83: The maxillarv vestibular mock-up has the advantage of showing the patients the number of teeth which should be involved in the rehabilitation to obtain the esthetic result
Clinical steps for the maxillary vestibular mock-up
The maxillary vestibular mock-up is quickly and easily fabricated in the patient’s mouth and offers the possibility to concretely visualize the final outcome. A silicon key is made from the maxillary vestibular wax-up and loaded with a tooth-colored material in the patient’s mouth (Protemp 3M ESPE or Telio, Ivoclar).
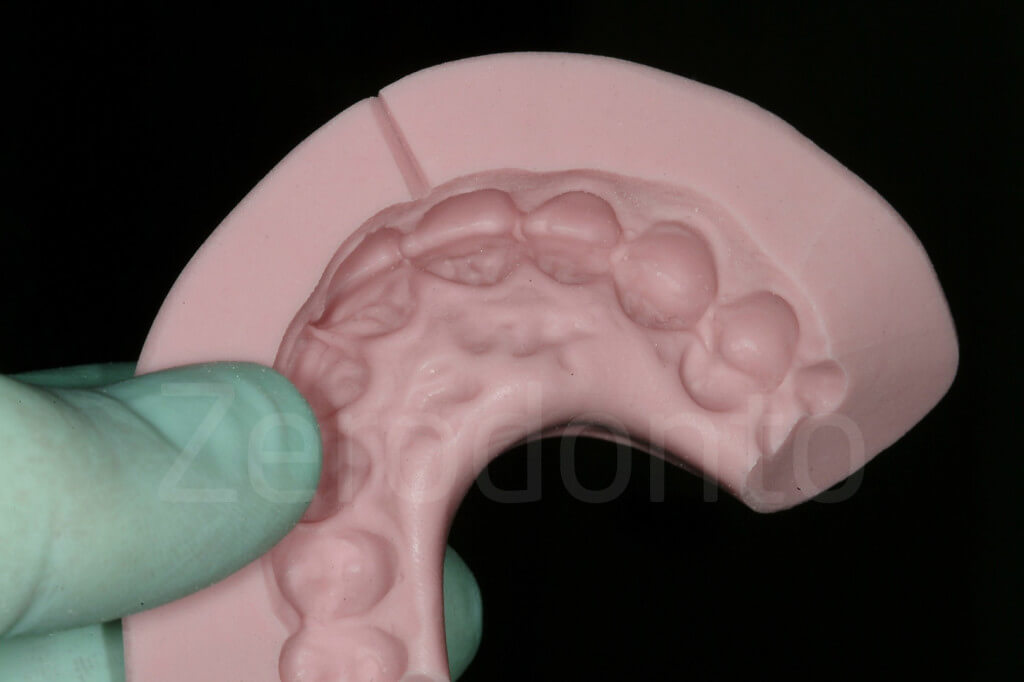
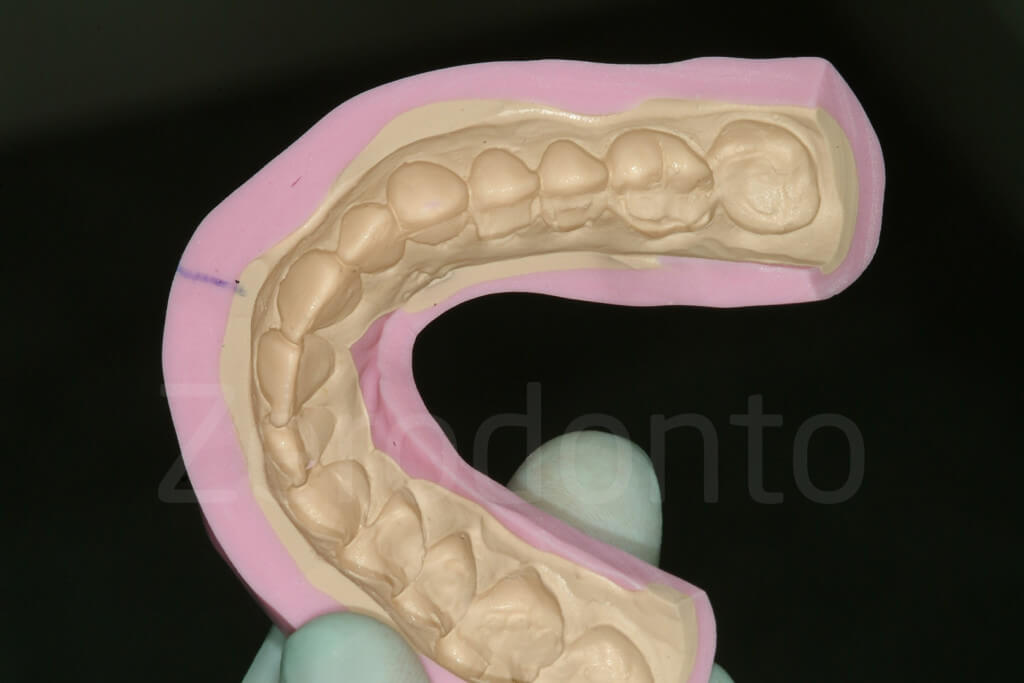
Fig 84-85: The waxup is duplicated by a silicone key
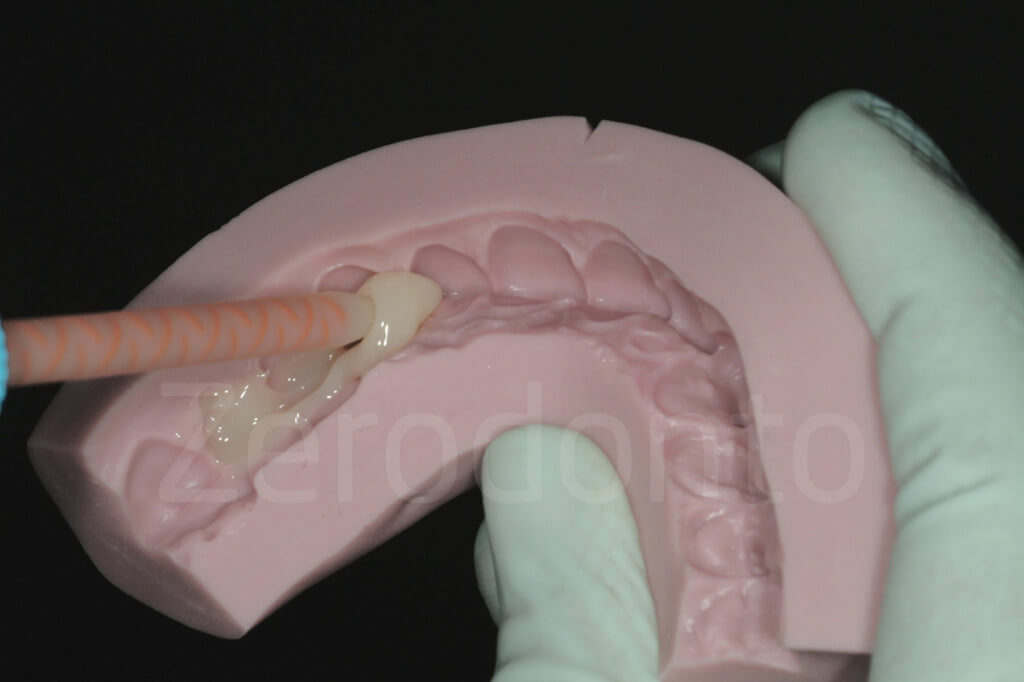
Fig 86: This key is filled with provisional composite (e.g. Protemp, Telio)
After its removal, all vestibular surfaces of the maxillary teeth will be covered by a thin layer of composite, reproducing the shape selected for the future restorations with the wax- up. Since the cingula of the anterior teeth and the palatal cusps of the posterior teeth are not included in the waxup, the silicon key will be stable in the mouth. It will also be stabilized on both sides by the unrestored second molars (distal stops).
Due to the key’s close adaptation, excess material will be minimal and easy to remove using a scalpel or scaler.
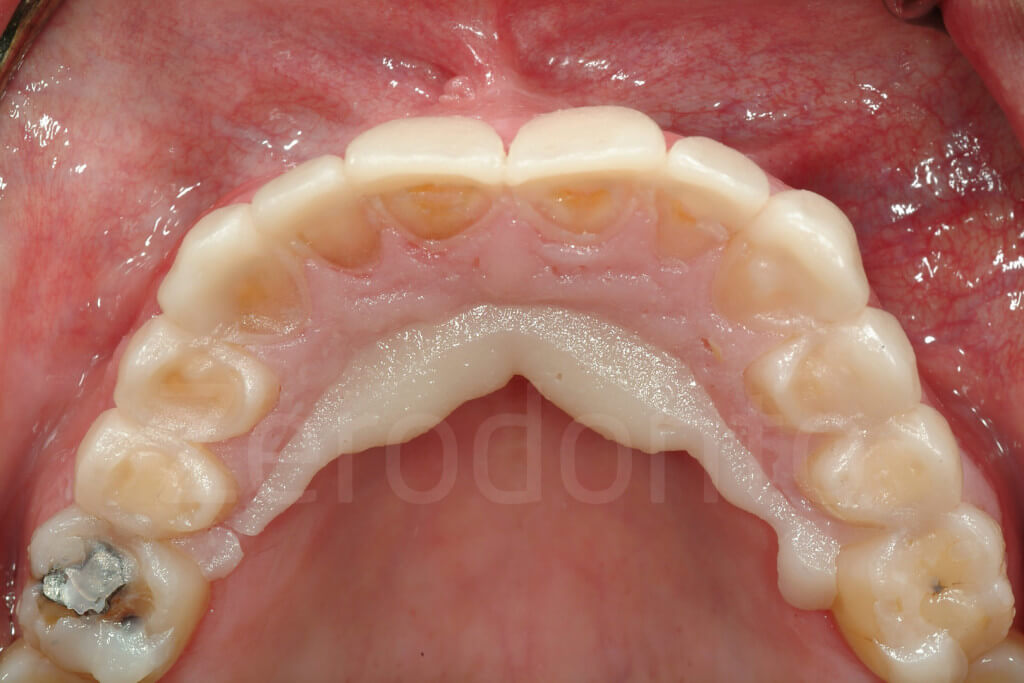
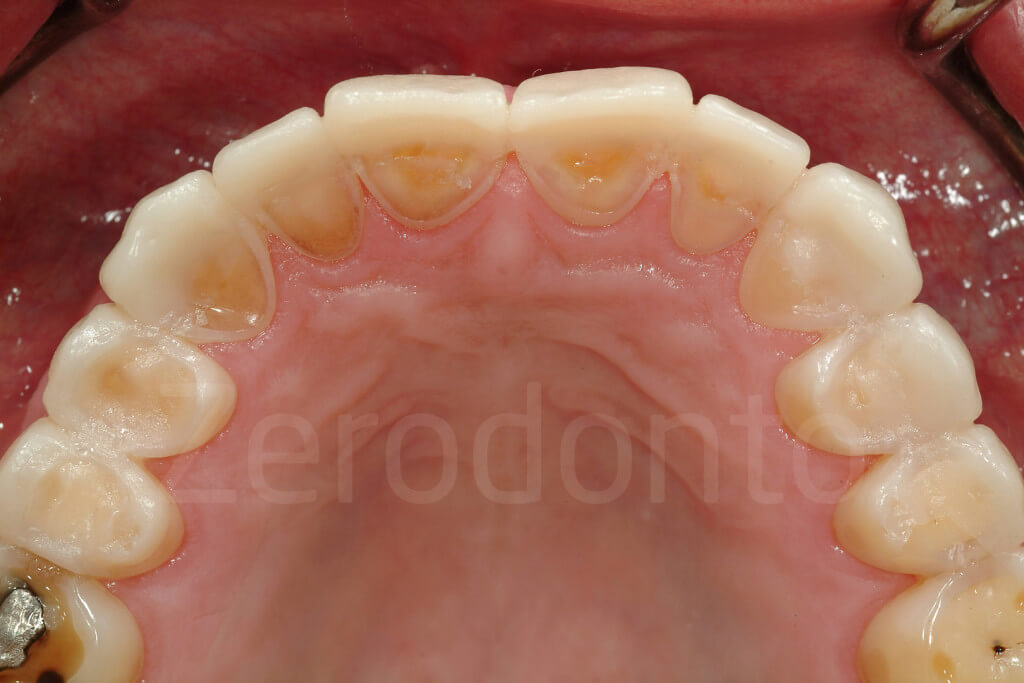
Fig 87-88: Thanks to the absent of wax on the palatal aspect of the model, the excess of the mock-up will be easy to be removed
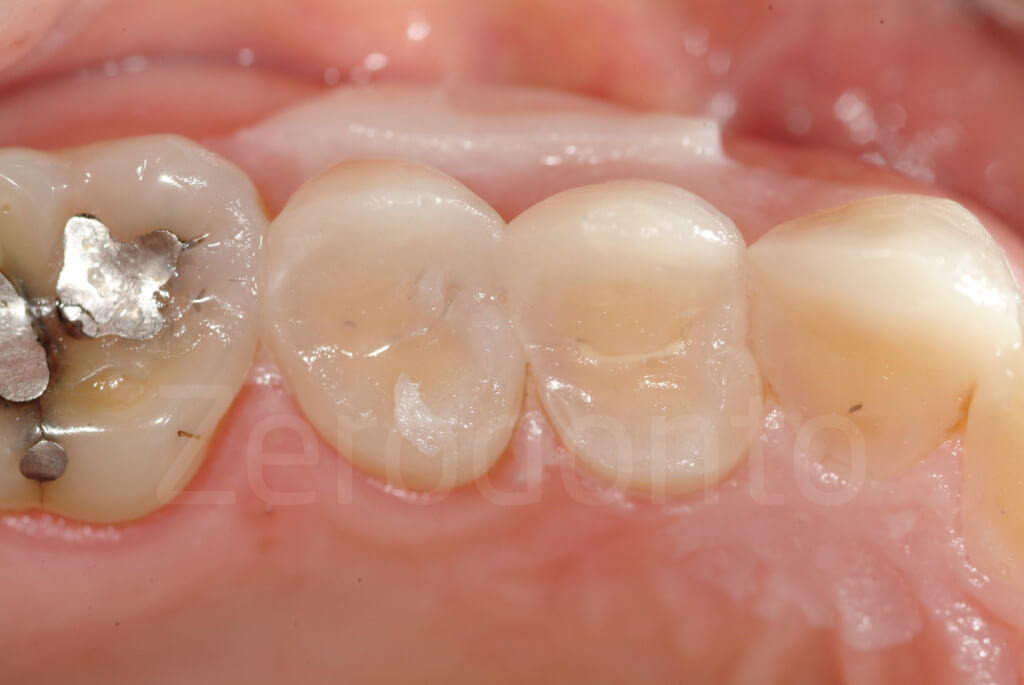
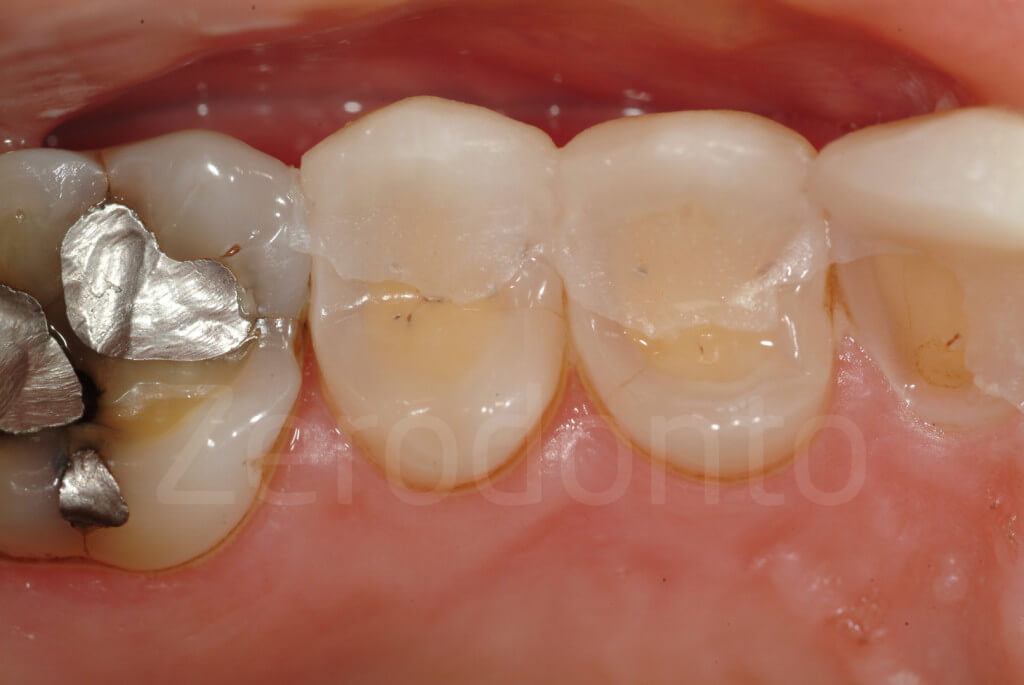
Fig 89-90: Immediately after the removal of the mock-up key. Look at the minimal excess of composite present
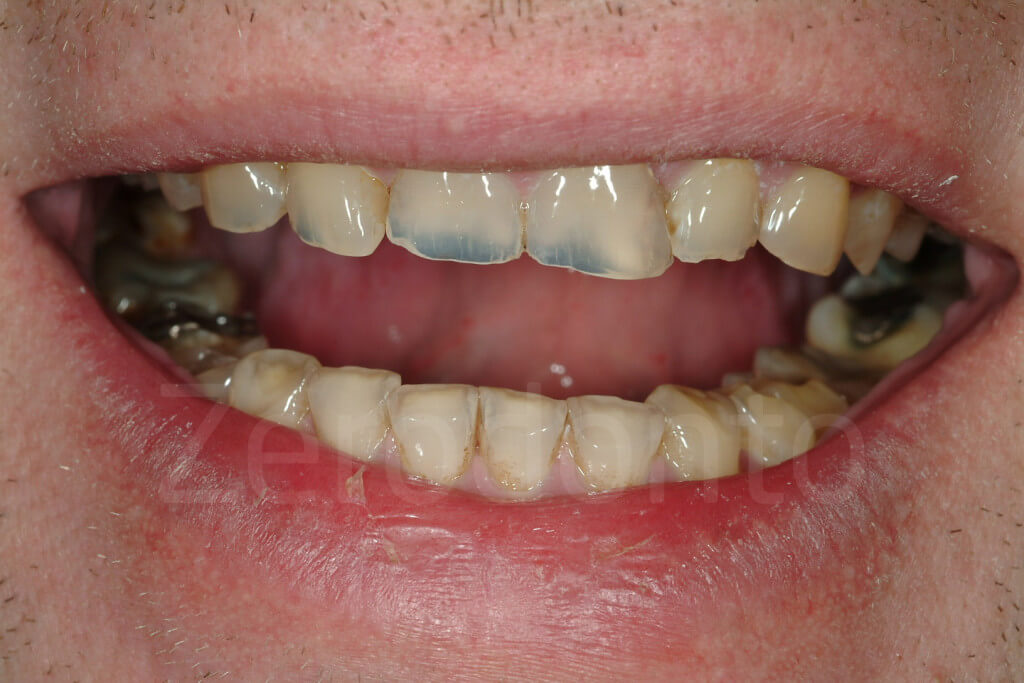
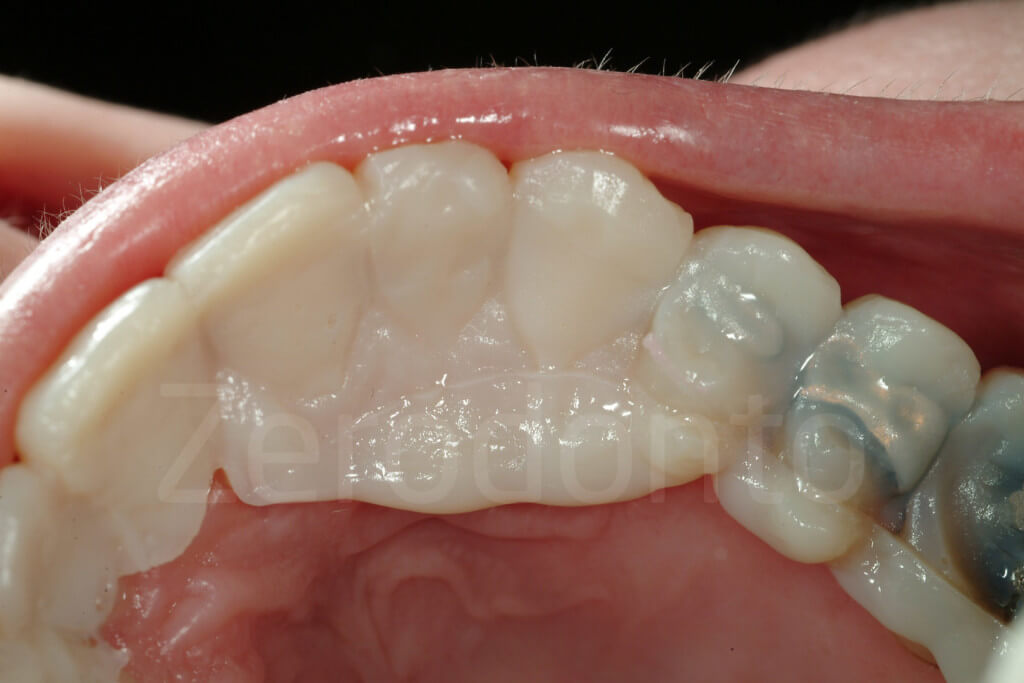
Fig 91-92: A vestibular mock-up is an advantage when the incisal edges are very weak. There are less risks of creating excess of material difficult to be removed with the risk of breaking the unsupported enamel
It is not recommended to remove and recement the mock-up, because this may break it or distort its appearance. The mock-up is stabilized by excess material in the retentive areas (interproximally). The clinician, however, should pay particular attention to that excess, since it can interfere with the patient’s normal oral hygiene procedures. The challenge is to open the gingival embrasures just enough to allow dental floss (eg, SuperFloss, Oral B) to pass through without jeopardizing the strength of the mock-up. It is also recommended to accurately remove the excesses at the lev- el of the buccal gingival sulci to better understand the emergence profile and gingival harmony of the future restoration.
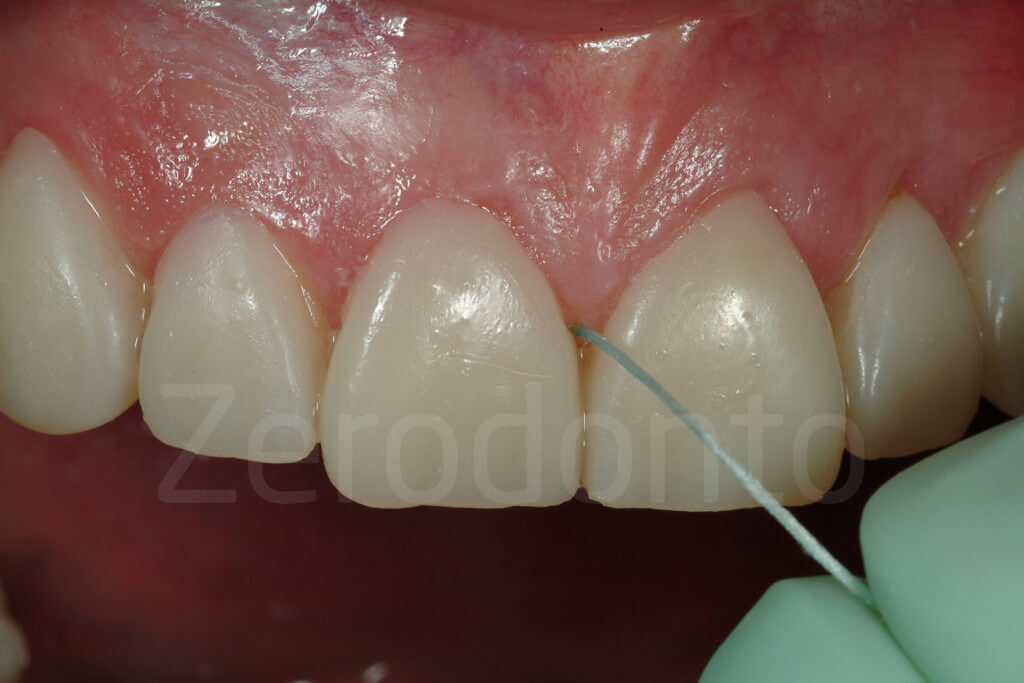
Fig 93t: The interproximal embrasures should be open to allow the patient to pass the superfloss if the mock-up is left in place for longer time
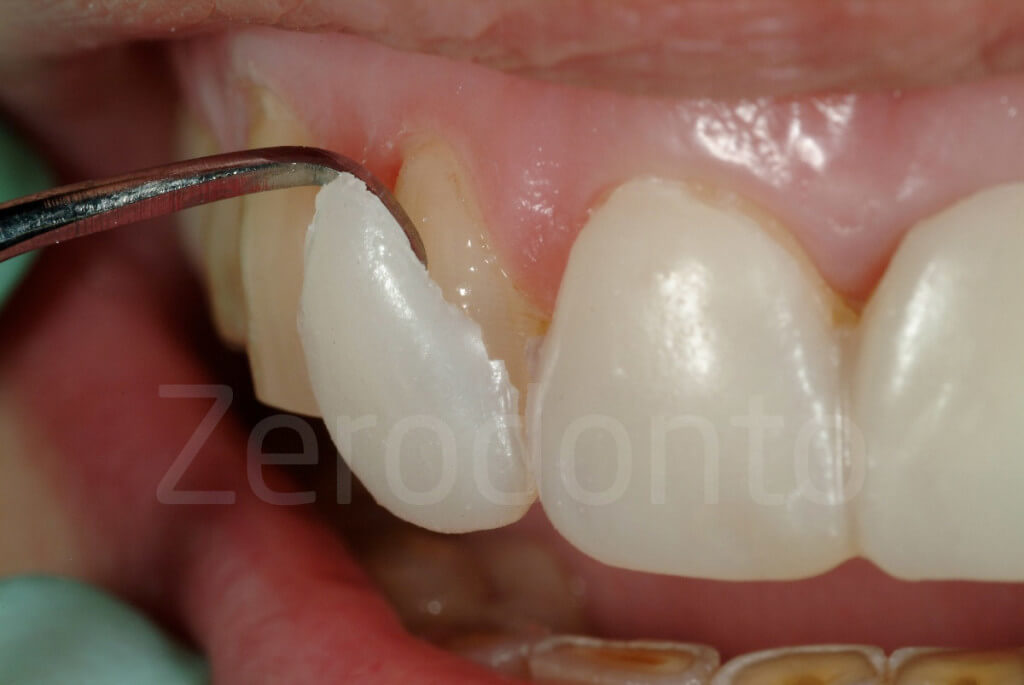
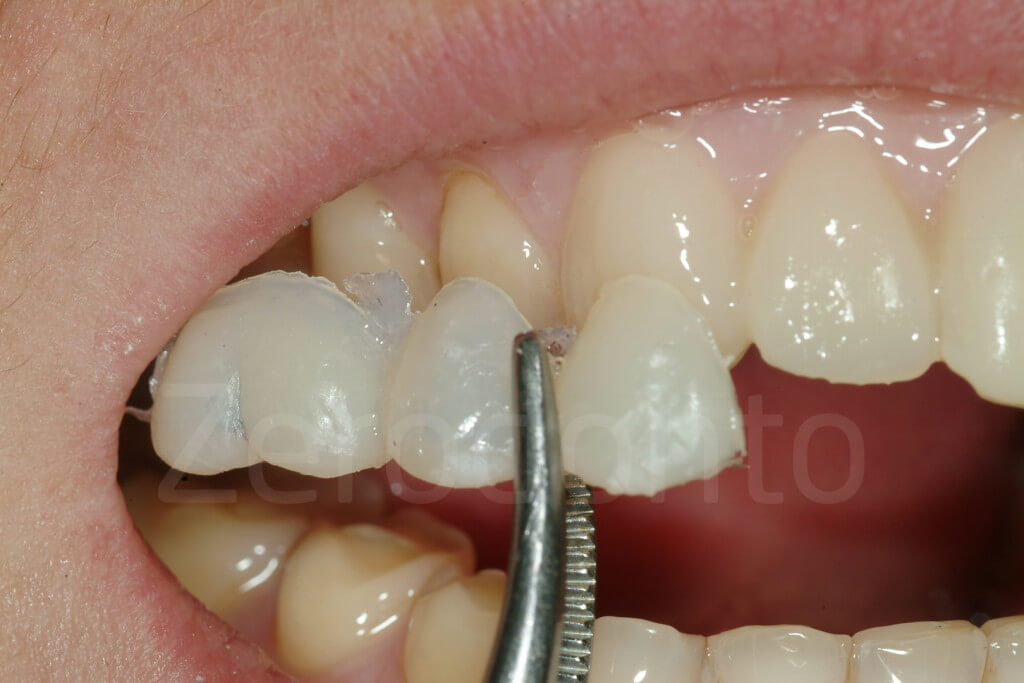
Fig 94-95: Due to the limited extension of the mock-up it could be easily removed by the patient, just pulling it vestibularly
The patient can leave the office wearing the mock-up for a short time to show it to family members and friends. Due to its minimal thickness, the mock-up will eventually break off, making it easily removable by the patient. After evaluating the maxillary vestibular mock-up in the patient’s mouth, any changes can be made by the technician, who will then progress with the second laboratory step.
Second step: posterior waxup, transparent keys and increase of VDO
Centric relation: centric occlusion dilemma
In the presence of generalized advanced dental erosion, which often significantly affects occlusal morphology in the posterior segments of the dentition as well as anterior guidance, the clinician faces the dilemma whether to restore the patient in centric relation (CR) or in maximum intercuspation position (MIP). According to numerous classic articles published in the field of Gnathology, CR is recommended as the only acceptable position when it comes to full-mouth rehabilitations, since it is considered the only reproducible one. This concept was developed for conventional full-mouth rehabilitations, when all the teeth were going to be restored by means of full coverage (crowns or fixed dental prostheses) and when working extensively on both arches at the same time had an elevated risk of losing all intermaxillary reference points. An additional argument for CR was that patients treated under extended local anesthesia were unable to collaborate during the occlusal adjustments.
Currently, there is an increasing trend towards minimizing the necessity for complicated, time-consuming clinical procedures on the one hand, and reducing the number of full crown restorations on the other hand, particularly when treating young patients. Consequently, the new clinical approach (full-mouth ADDITIVE re-habilitation) for the treatment of dental wear consists exclusively of posterior onlays and anterior palatal veneers (and sometimes facial veneers too), and is strategically planned in a way that allows rehabilitation of patients quadrant-wise instead of by restoring both dental arches simultaneously.
In a dynamic rehabilitation process, where two key parameters of a functional occlusion, ie, VDO and interarch relation, are constantly maintained by the contralateral side of the mouth, using CR as a land-mark reference of occlusion may not be so crucial.
To stop the progression of the described tooth destruction (erosion and attrition), the exposed remaining dentin should be efficiently protected. Due to the supraeruption of the anterior quadrants, an increase of VDO is mandatory to restore the original tooth form. However, in patients with class II molar occlusion, the combination of increased VDO and CR position may set the anterior teeth significantly apart and this can lead to an absence of anterior contacts with the final restorations.
Since it is not recommended to substantially increase the incisal length of the mandibular anterior teeth (generally supererupted in cases of advanced generalized dental erosion), anterior contacts can logically only be re-established by increasing the size of the maxillary cingula. In fact, several of the patients affected by severe generalized erosion treated at our clinic presented a class II molar occlusion with a major discrepancy between MIP and CR. Thus it was preferred to restore their occlusion in MIP and to establish anterior contacts without the necessity of creating oversized maxillary cingula.
Furthermore, to evaluate if under the previously described conditions and strictly following the 3-STEP technique the use of CR as the interarch relationship of reference is not a prerequisite, the decision was made to restore all the patients affected by severe erosion in MIP. From the preliminary data collected so far, no significant adverse effects have been encountered that would question the choice of using MIP.
The “increased VDO” dilemma: how much and how to test?
In patients affected by severe generalized erosion, the question of whether VDO has eventually decreased during this pathological process is difficult to answer, as sever-al compensatory mechanisms, eg, super-eruption of the alveolar process, may have occurred. It is also clinically quite irrelevant.

Fig 96: The increase of VDO is relate do biological needs (no more removal of healthy tooth structure) and restorative needs (after the increase of VDO re-establishment of the anterior contact points
An increase of VDO is always mandatory, in order to reduce the need for substantial tooth preparation and to avoid the necessity of elective endodontic treatments. However, any increase of VDO should be minimal so it is tolerated by the patient, and guarantees at the end of the rehabilitation the preservation or re-establishment of functional anterior interarch contacts.
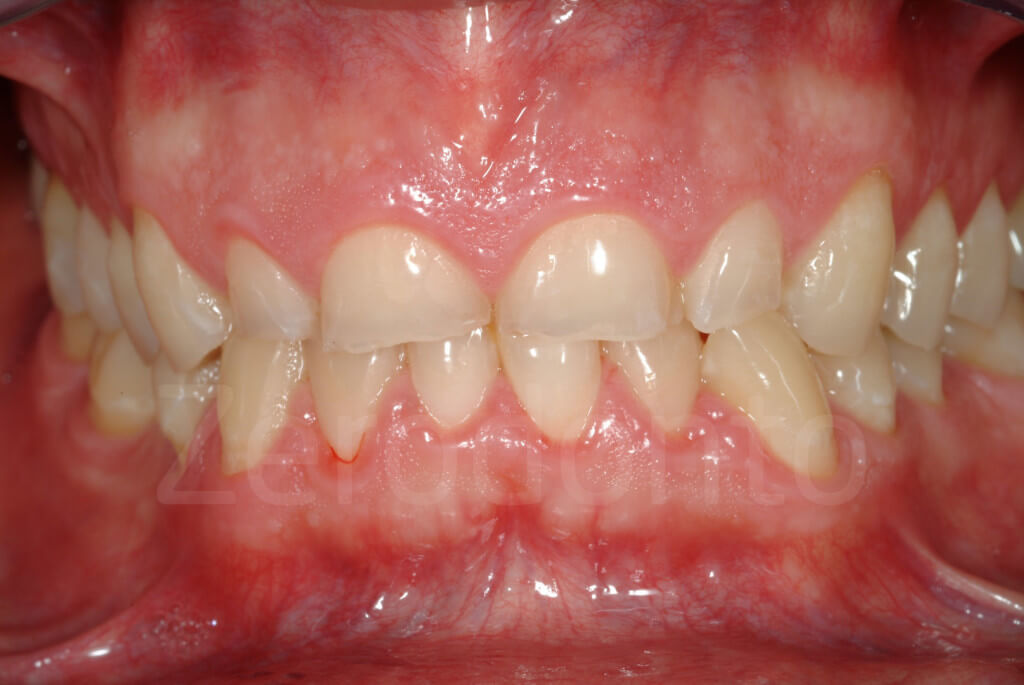
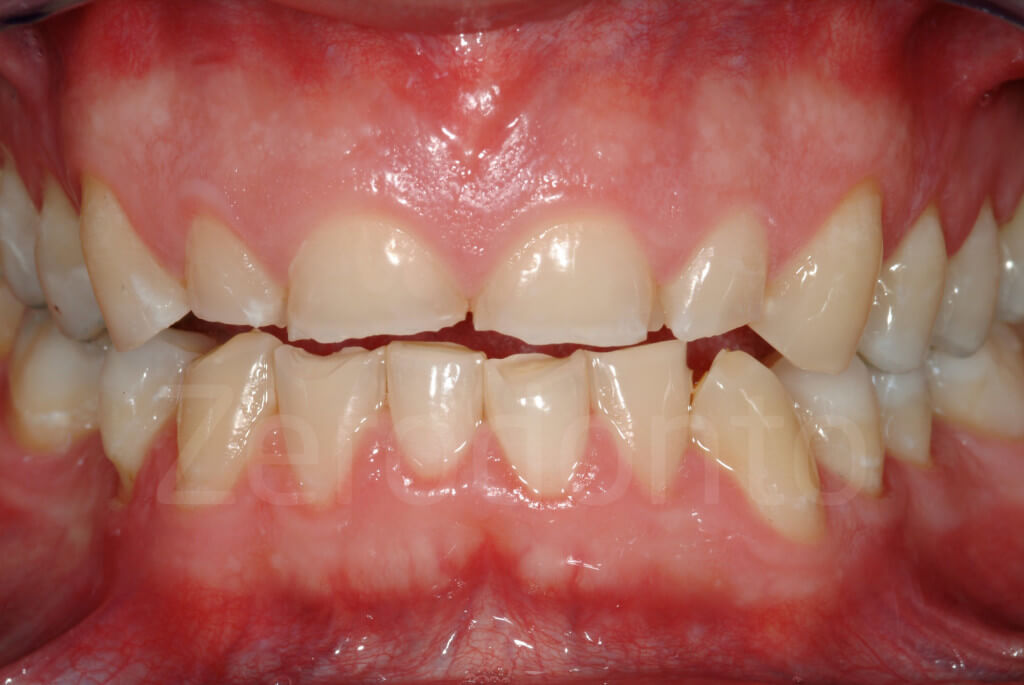

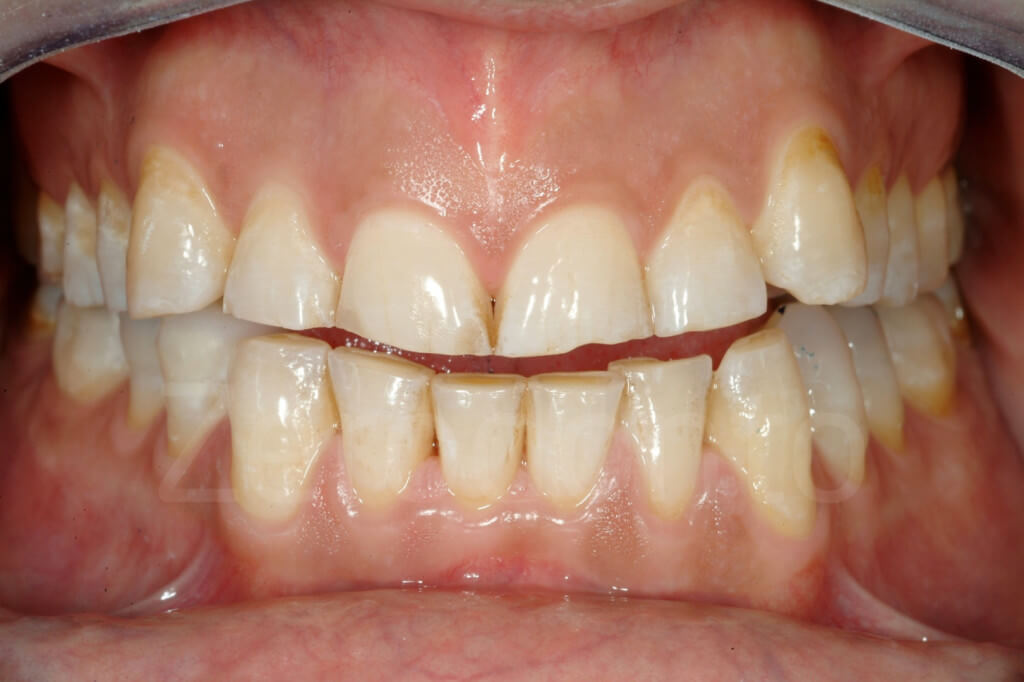
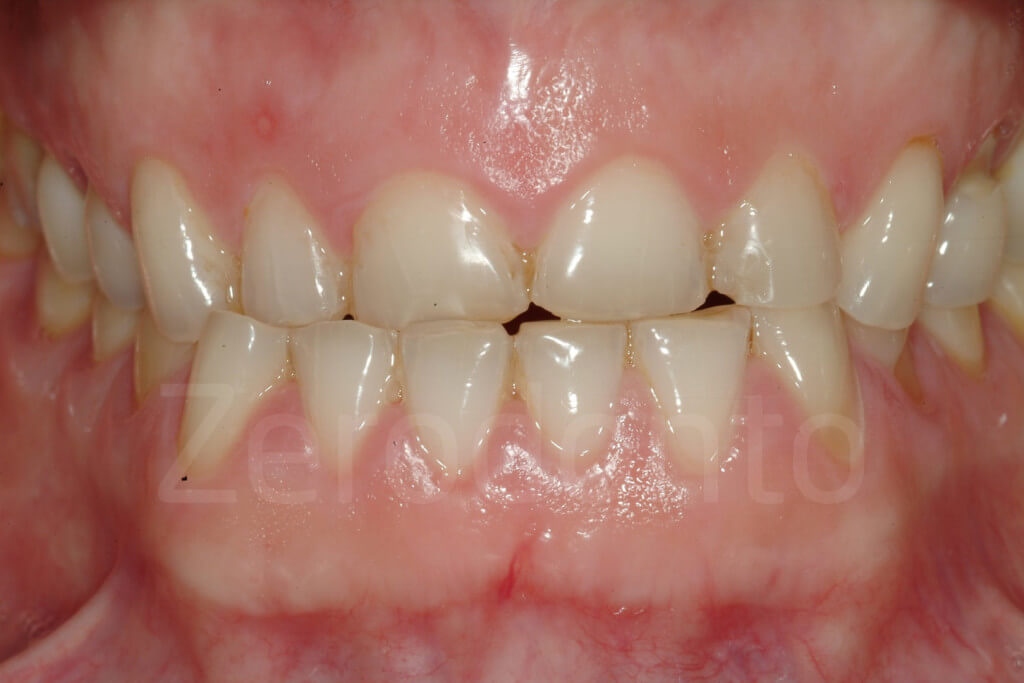
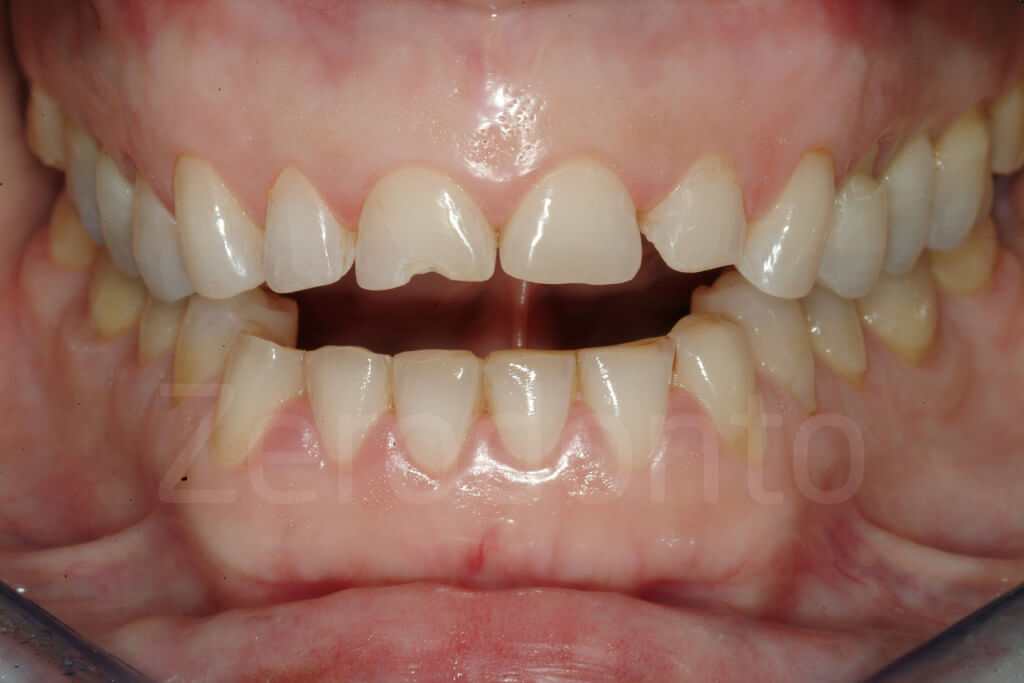
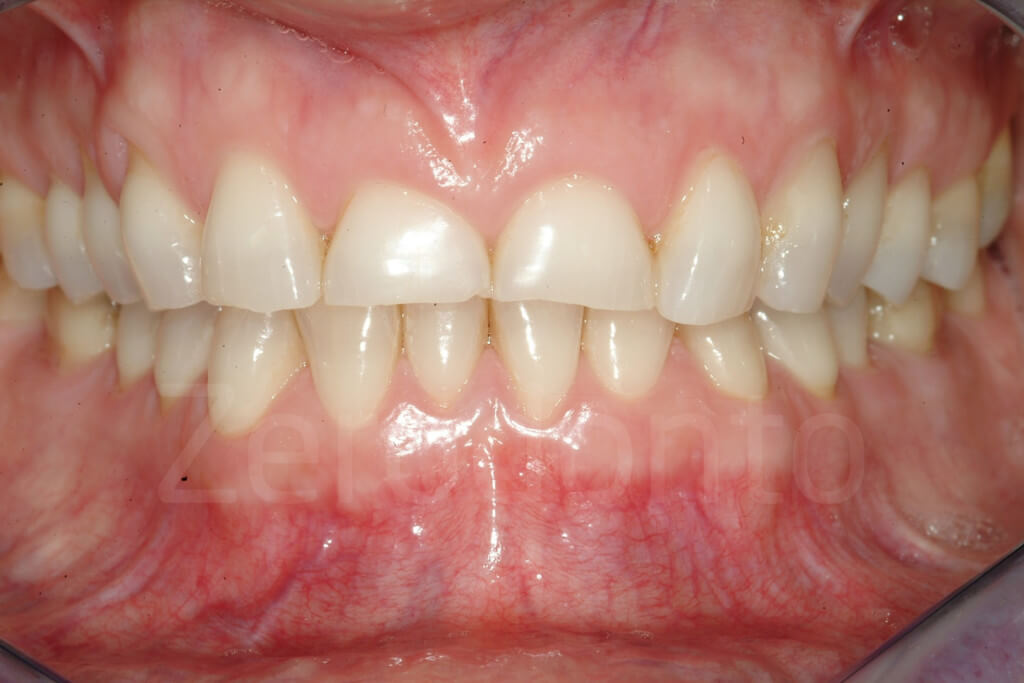
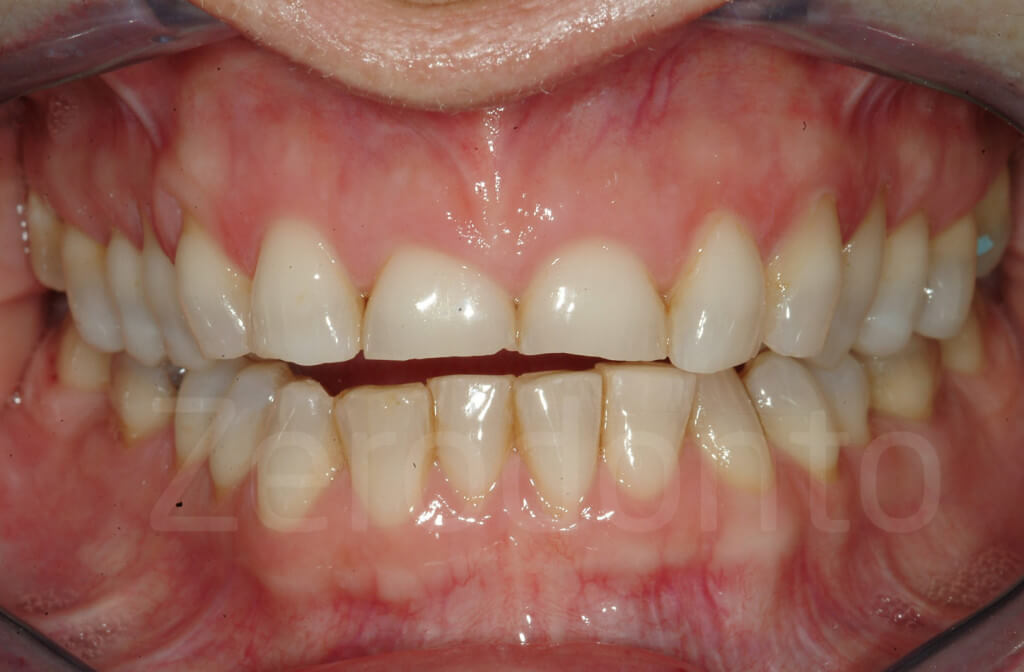
Fig 97-104: Patients affected by generalized dental wear initia status and status after the II clinical step. All of them present a new posterior support at an increased VDO with an anterior open bite
Furthermore, the new VDO should always be tested clinically, before irreversible treatments begin, since it is selected arbitrarily on the articulator.
In this context, a traditional and fully reversible approach consists of the use of an occlusal guard, which requires compliance of the patient. However, considering the active lifestyle of most people, it is rather naïve to expect that patients will wear such an occlusal guard 24 hours a day for several months. A more realistic approach may be the use of interim restorations. In the case of adhesive rehabilitation, the dental technician could fabricate provisional composite onlays, which would subsequently be bonded to the teeth, including the palatal aspects of the maxillary anterior dentition. There are several disadvantages to this method, such as the associated additional lab fees. Furthermore, it may in many instances not be a truly reversible approach, since it could require some tooth preparation to assure minimal thickness of the onlays.
The third possibility for clinical testing of the feasibility of an arbitrarily chosen increase of VDO is the use of direct composites. However, free-hand direct composites are very time consuming, particularly if the clinician aims to duplicate exactly the occlusal scheme determined by waxup on the mounted study casts.
It should be repeated that not only the posterior, but also the anterior teeth should be involved in the treatment in order to increase the VDO and to recreate adequate anterior guidance. The respective result may be disappointing, especially if the clinician expects to position the mandible in CR and to establish simultaneously stable occlusal contacts at the identical VDO that had been previously selected on the articulator, a task that is generally considered almost impossible.
All the three of the above techniques that have been proposed to test an in-crease of VDO have some major draw-backs. The dilemma of how to transfer efficiently and correctly the new occlusion defined with the waxup remains. As a con-sequence, the second step of the 3-STEP technique proposes an easy and reversible approach to establish a new posterior support and to test the adaptation of the patient to this new VDO. This approach, combining the advantages of the abovementioned techniques, allows fabrication of a “fixed” occlusal guard, made of splinted composite onlays, directly fabricated in the mouth.
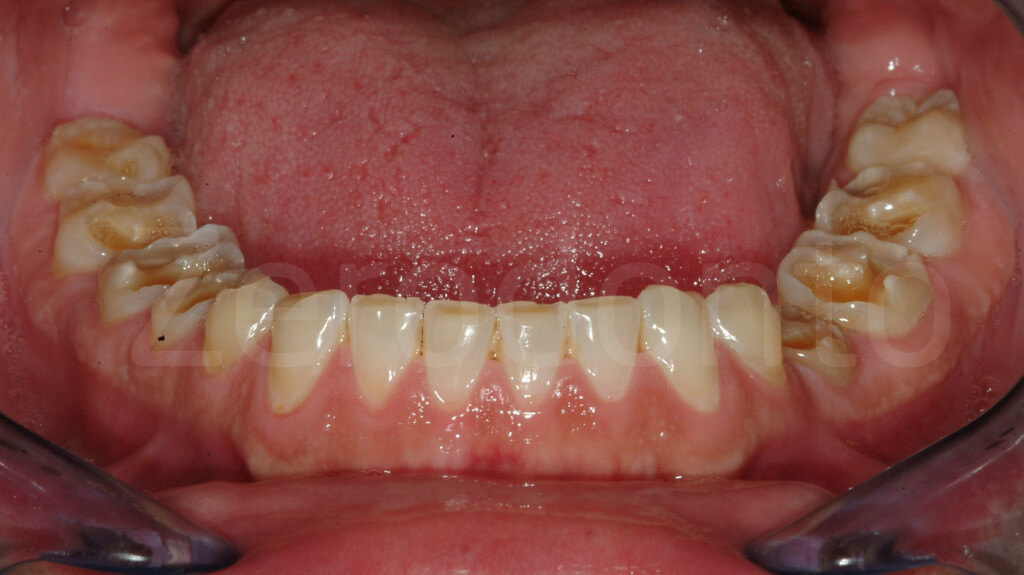
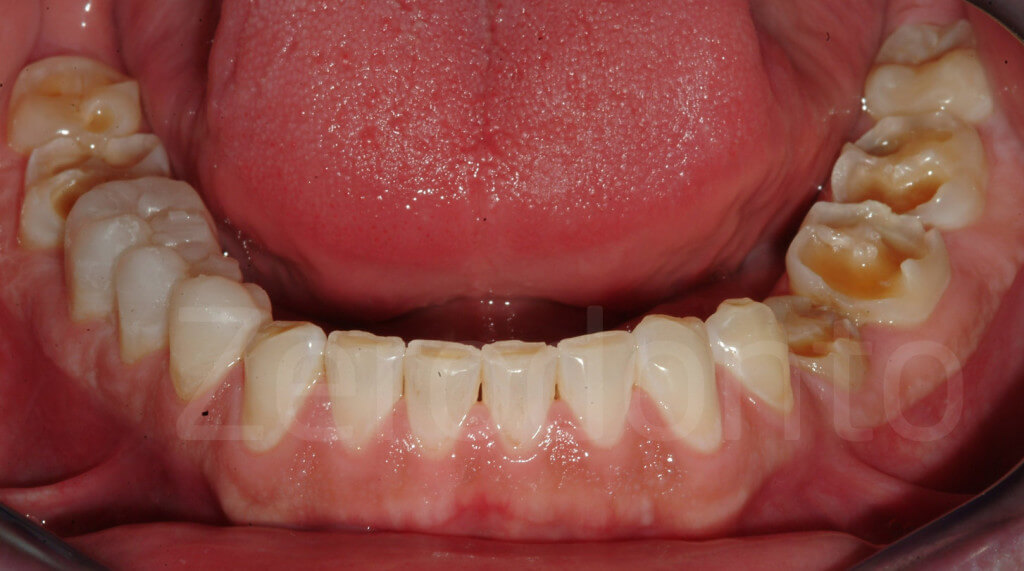
Fig 105-106: White therapeutic bite, fabricated directly in the mouth (quadrant 4)
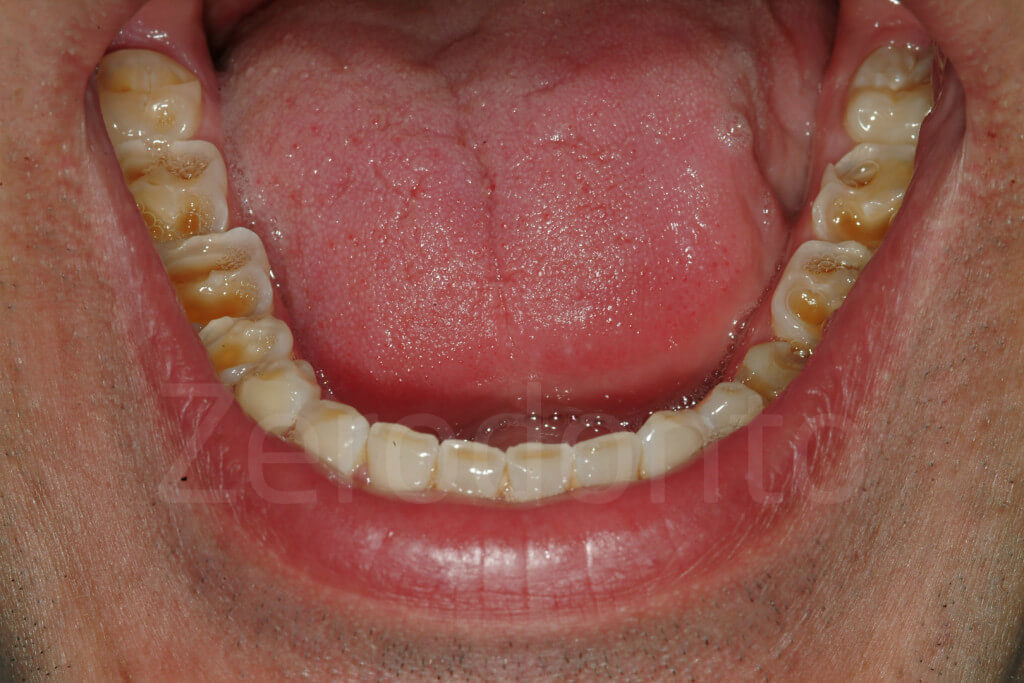
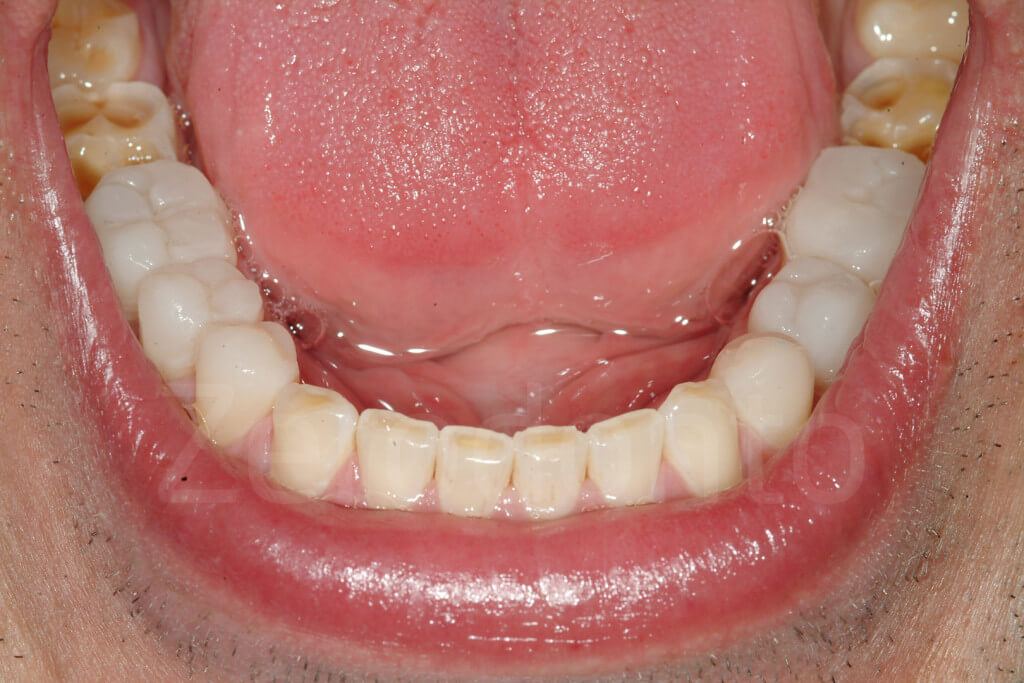
Fig 107-108: Same patient where both the madibular quadrants have been restored with the direct composite restorations fabbricated in the mouth with the transparent keys (white bite)
LABORATORY Step 2: the posterior occlusal waxup
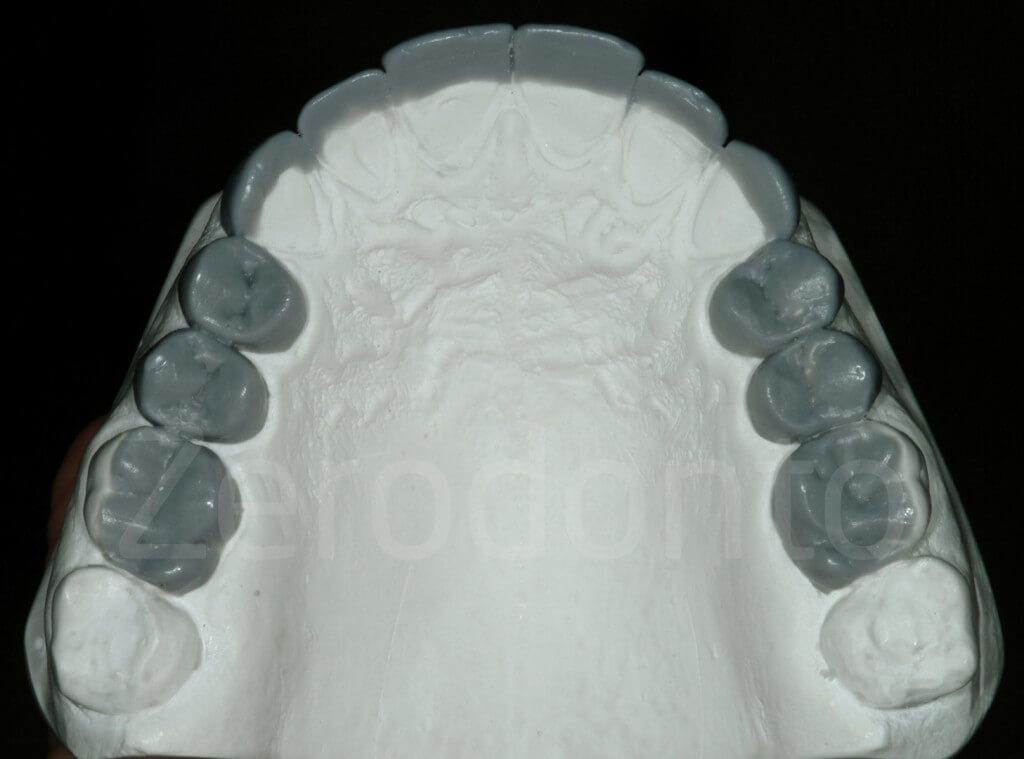
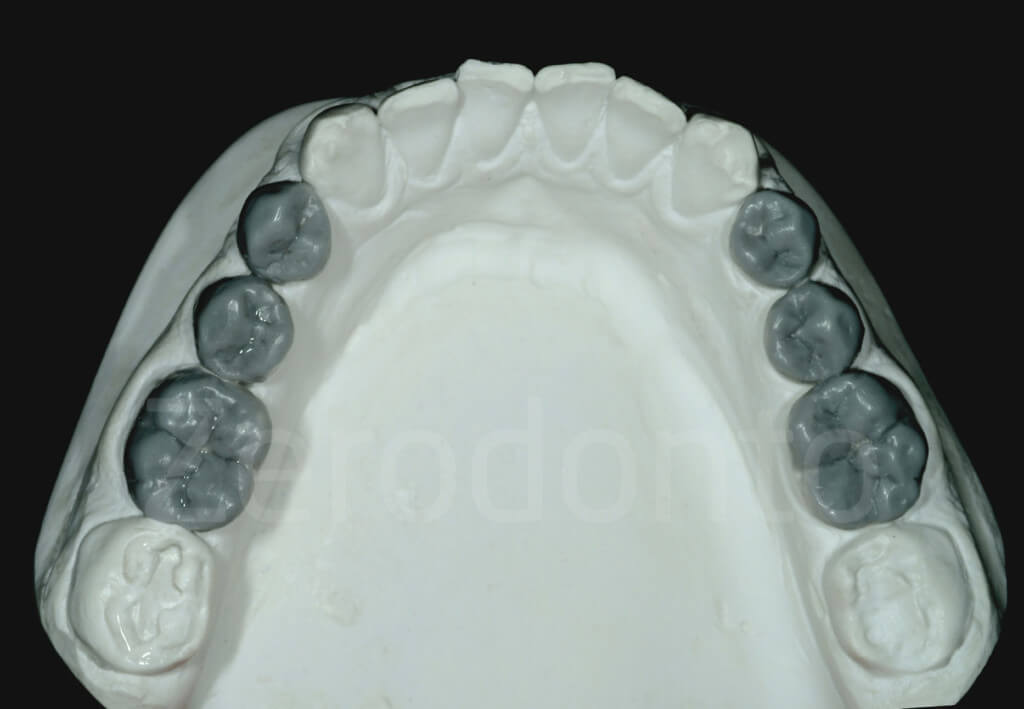
Fig 109-110: II laboratory step:wax up of the posterior teeth ( 2 premolars and 1 molars)
At the beginning of the treatment, the two maxillary and mandibular casts are mounted on a semi-adjustable articulator with a face bow in MIP. During the first step, the technician performed a vestibular waxup on the maxillary cast, and the position of the plane of occlusion was subsequently validated clinically.
For each patient, the new VDO is decided arbitrarily on the articulator, taking into consideration the posterior teeth, where the maximum increase is desirable to maintain a maximum of mineralized tissue, and the anterior teeth, which should not be set too far apart to jeopardize the recreation of anterior contacts and the related anterior guidance. Once the increase of the VDO is established and the plane of occlusion validated, it is easy for the technician to wax up completely the occlusal surfaces of the posterior teeth.

Fig 111: The article explaining the partial interactive waxup of the 3-STEP technique is published on the Journal of Esthetic Dentistry autumn 2016
The second laboratory step, however, proposes only to wax up the occlusal sur-faces of the two premolars and the first molar in each sextant. The palatal as-pect of the maxillary canines may also be waxed at this stage to better select the cusp shape and inclination in relation to the occlusal scheme selected (eg, canine guidance or group function). In more complex cases (shallow future anterior guidance), the technician may be obligated to wax up all the cingula of the maxillary anterior teeth as well, to verify the disclusion of the posterior quadrants in protrusion.
At completion of the posterior occlusal waxup, the technician will fabricate for each quadrant one key, made of translucent silicone (Elite Transparent, Zhermack). These keys will be used in the second clinical step intraorally to fabricate direct composites, reproducing the waxup very closely.
The patient is scheduled for 2hour-appointment where the 4 keys are used to fabricate the direct posterior composite in the patient’s mouth.
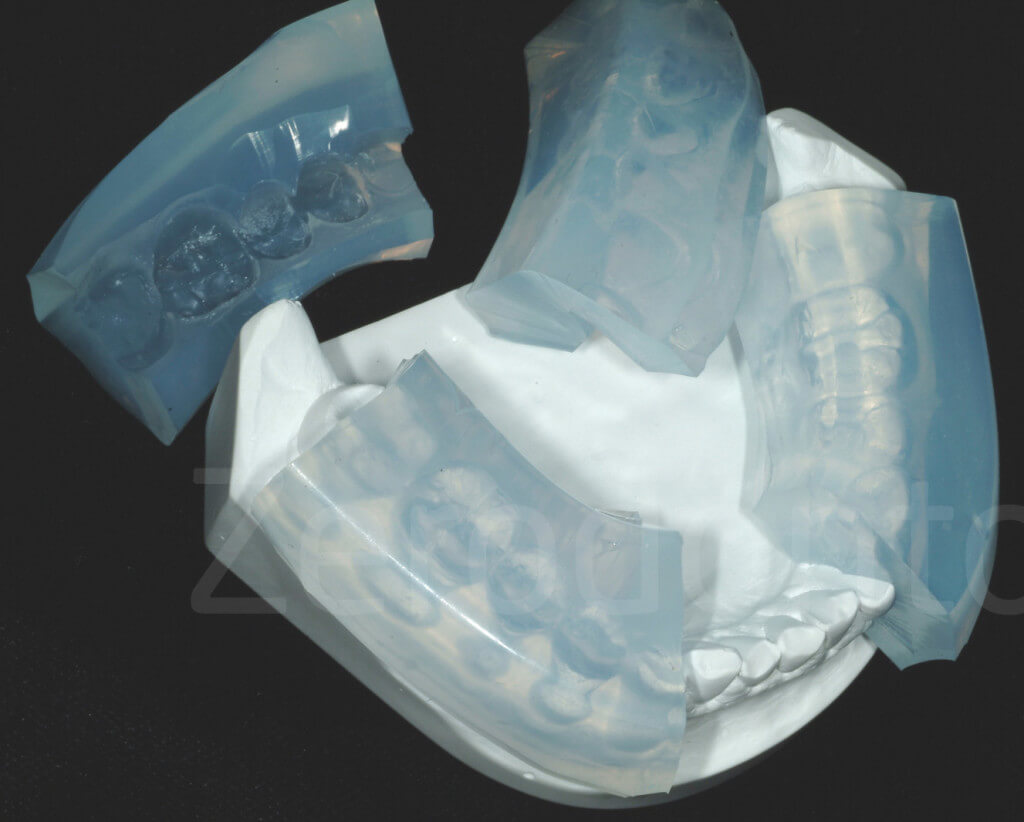
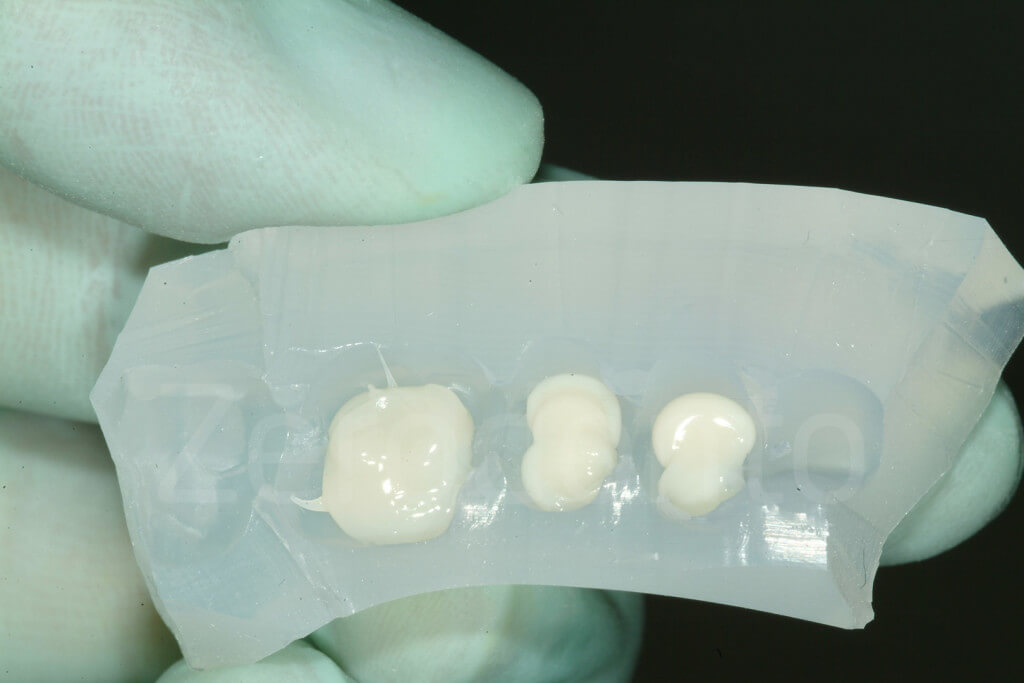
Fig 112-113: Transparent vdo keys
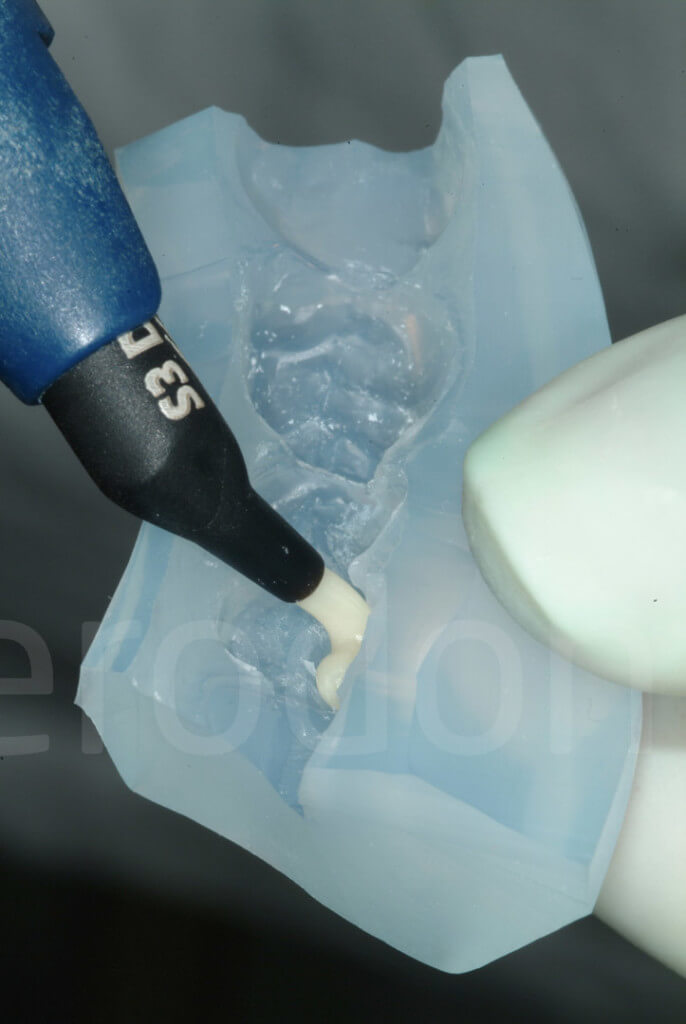
Each key is loaded with an hybrid composite, and placed on each posterior quadrant.
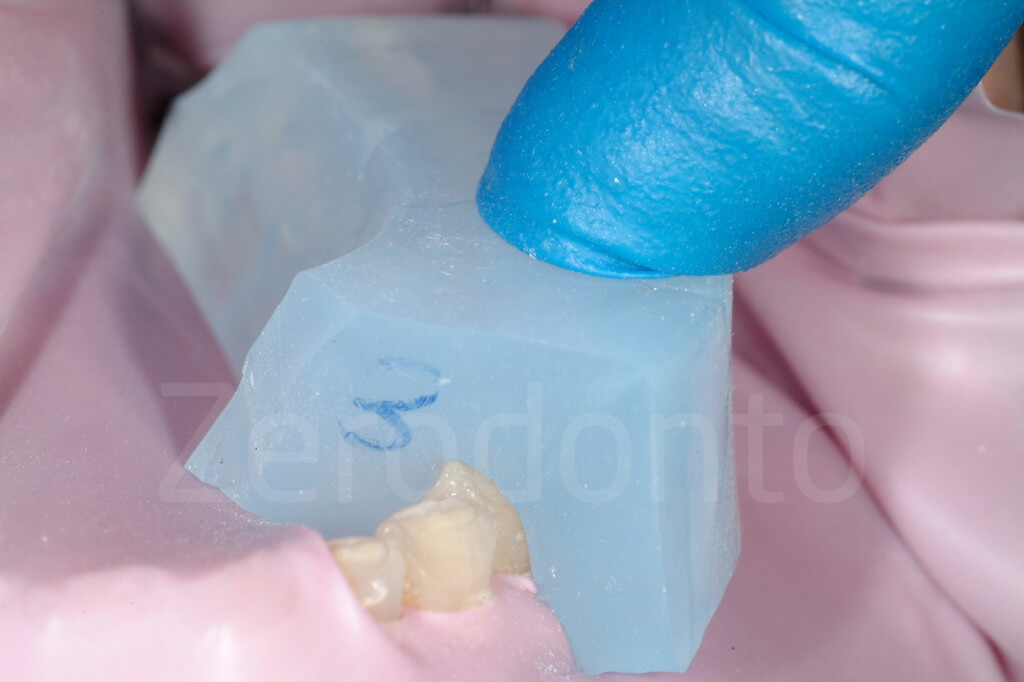
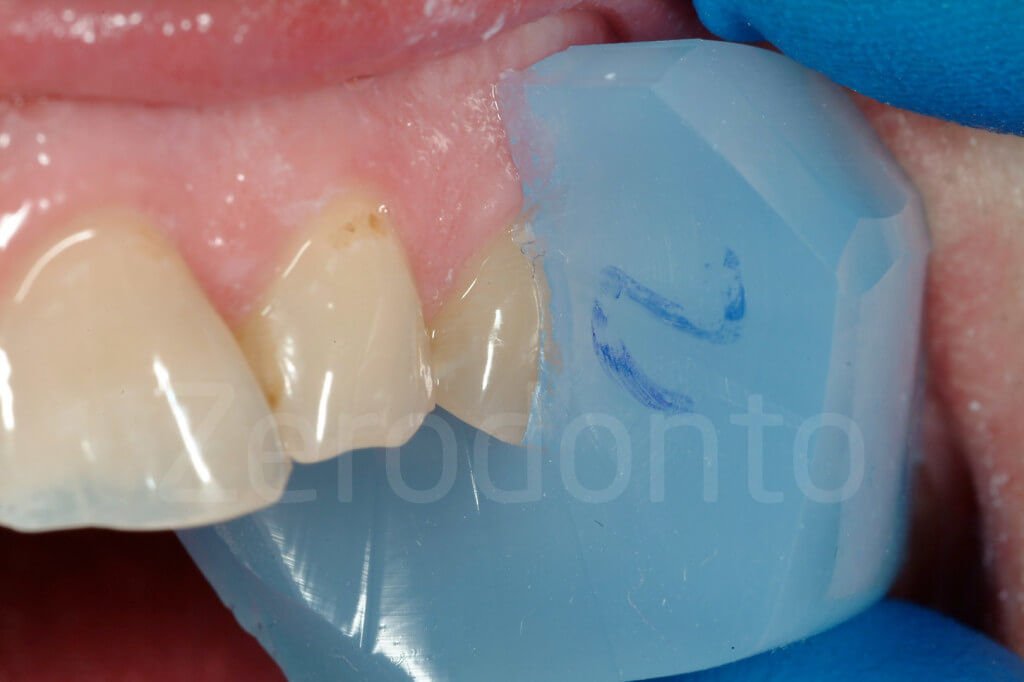
Fig 115-116: With or without the rubber dam, the keys are placed in the mouth
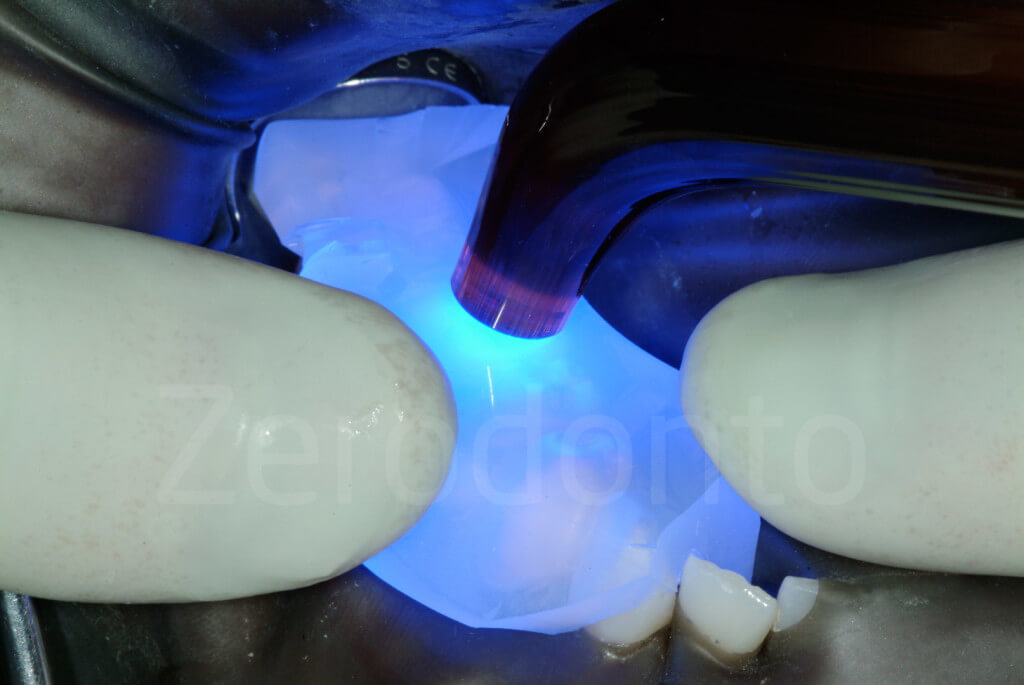
Fig 117: The composite is polymerized through the key thanks to its transparency
Thanks to the transparent aspect of the keys it is possible to polymerize the composite through the key. Since the keys, made of translucent silicone, are not as rigid as desired, it is crucial not to use too viscous a resin composite, or to load the key excessively. To avoid distortion, the composite should be pre-warmed.
At this stage, the second molars are not included in the occlusal waxup, nor will they be restored with a provisional occlusal composite.
Implementation of this technique includes splinting the three posterior teeth involved, thus blocking the occlusal access of two in-terproximal contacts areas and preventing the use of dental floss. Adequate oral hy-giene, however, is possible since the gingival embrasures are kept open and Superfloss can be used with a lateral path of insertion.
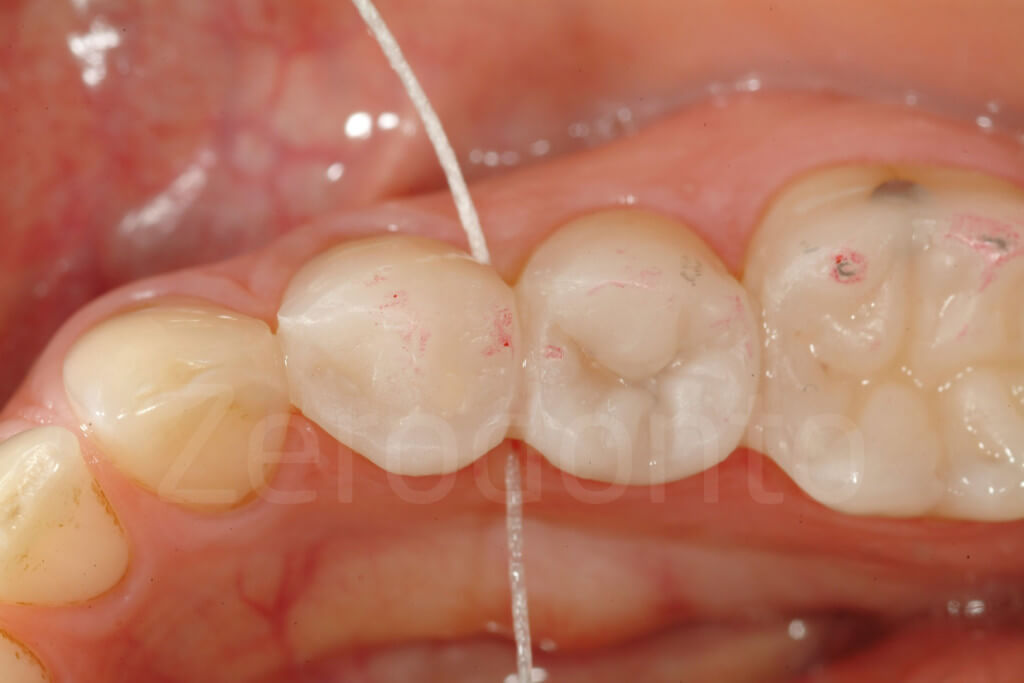
Fig 118: The interproximal contact points are closed between the 2 premolars and the firs molar. However, the space for superfloss should be left open
At this stage, the second molars are not included in the occlusal waxup, nor will they be restored with a provisional occlusal composite due to the following reasons:
■ to assure the presence of a stable distal occlusal stop for accurate positioning of the translucent keys during the fabrication of the posterior interim composites
■ to acknowledge the fact that three posterior teeth are considered sufficient to establish stable posterior support in each sextant
■ to have a reference indicating the amount of increase of VDO.
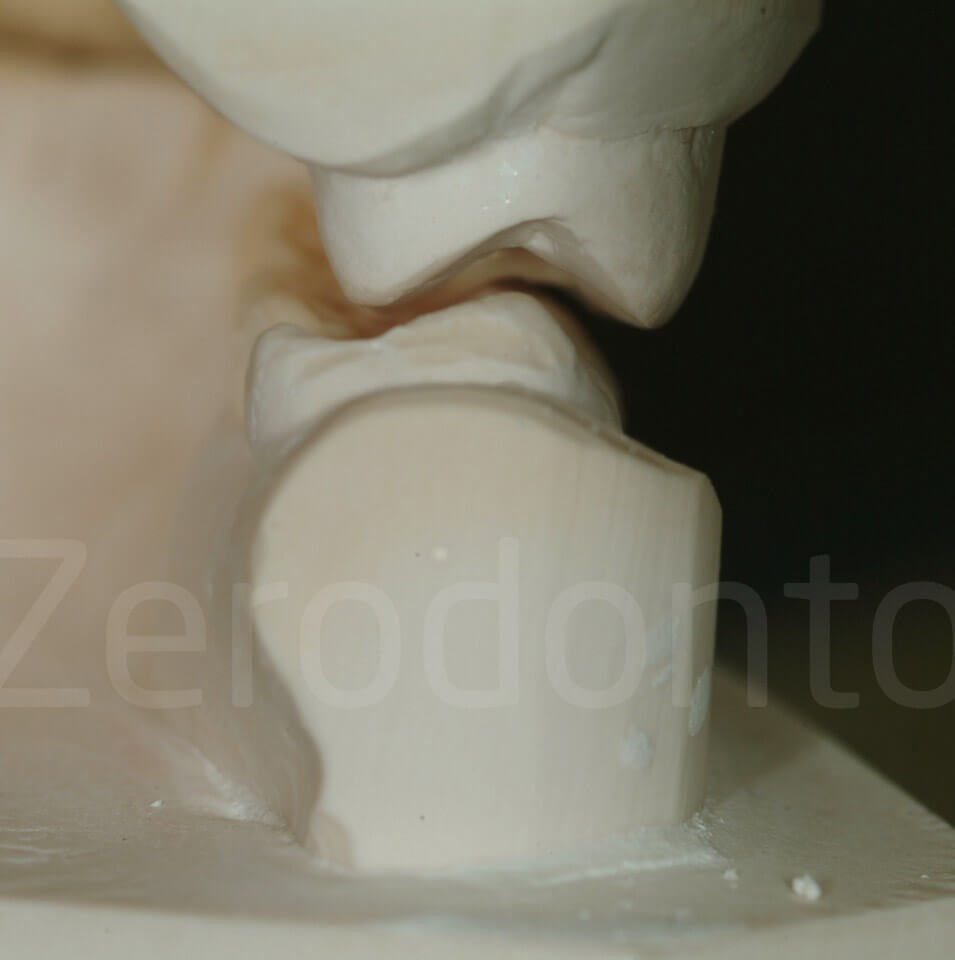
Fig 119: The second molar is used to indicate the increase of VDO
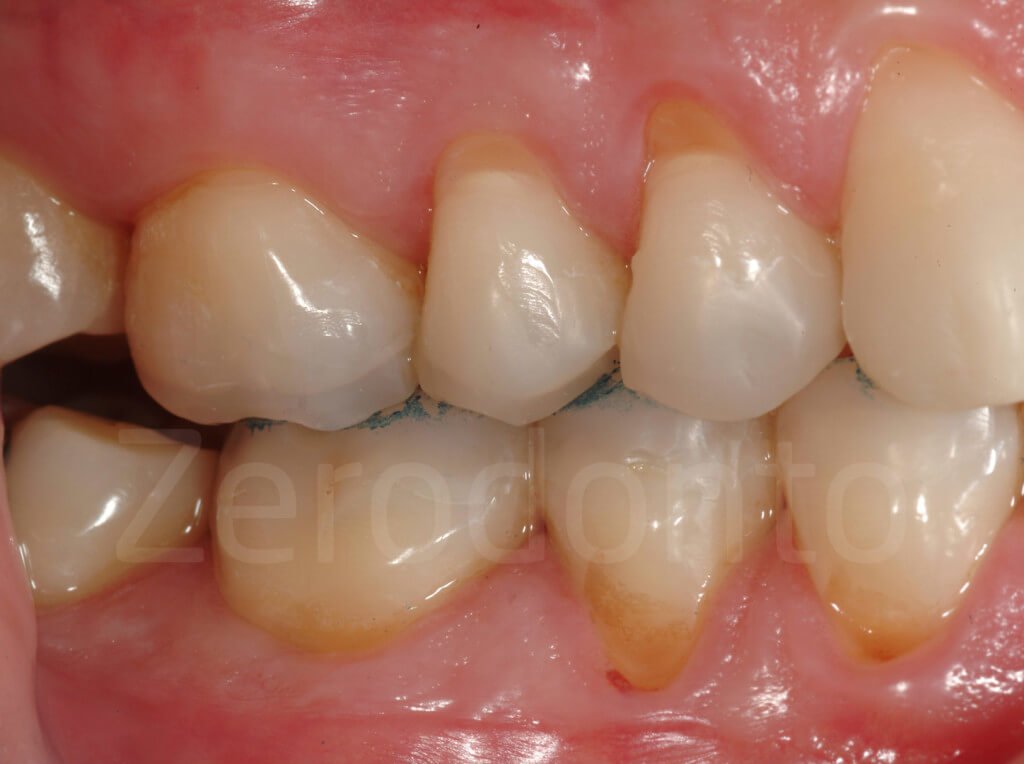
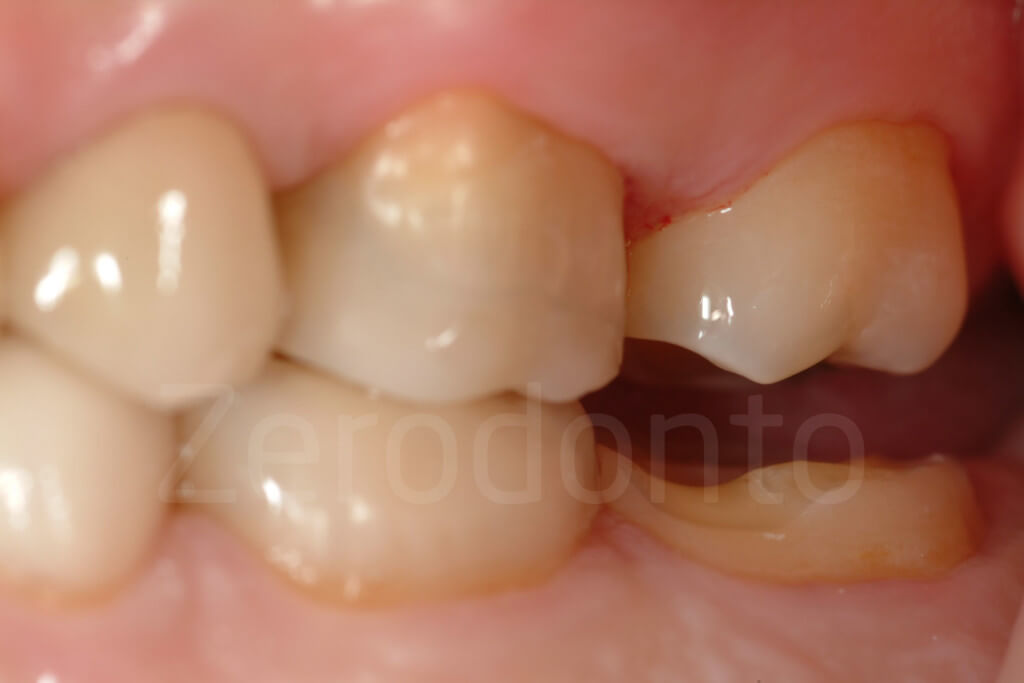
Fig 120-121: The second molar indicates the increase of VDO after the II STEP (white bite). In both the patients the second molars were originally in contact
As stated above, the original models of the patient are mounted in MIP and the in-crease in VDO is decided on the articulator. Despite the fact that the articulator’s hinge axis is going to be different from the patient’s, in our experience it does not generate sufficiently different occlusal contacts on the composite resin to require the mounting of the casts in CR.
Minor occlusal adjustments should be expected by implementing this technique, and when the keys are accurately fabricated and positioned in the mouth, the time required for the adjustment is limited. In addition, since there is normally no need to anesthetize the patient, control of the occlusion will be facilitated and consequently more accurate.

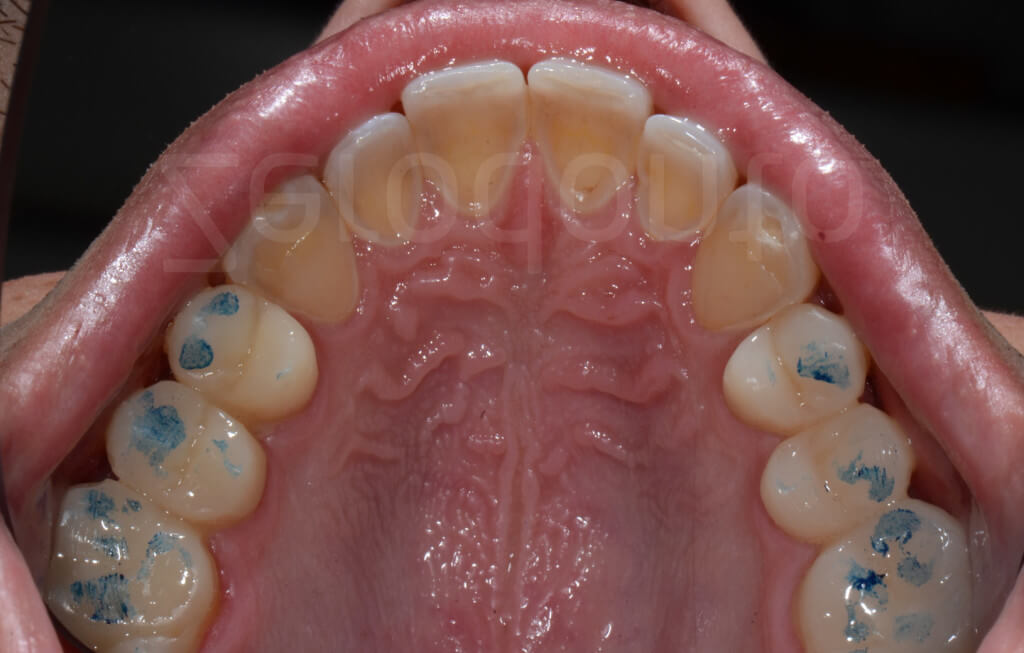
Fig 122-123: After the II STEP, occlusal adjustments are aspected and esecuted with two articulate papers. The objective is to reach for each tooth involved in the white bite a contact point
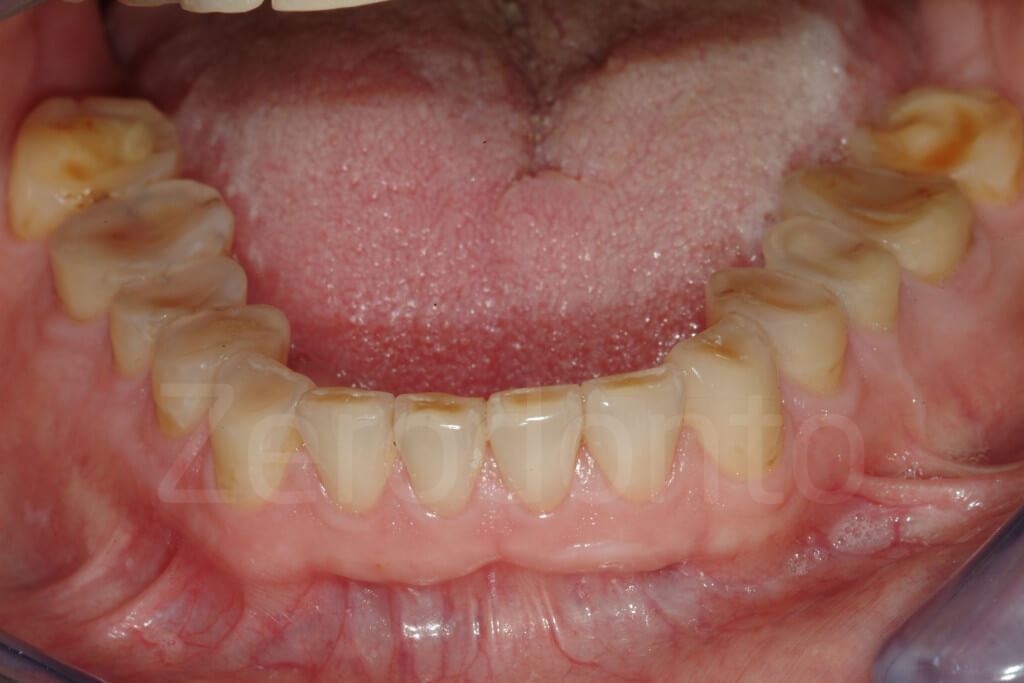
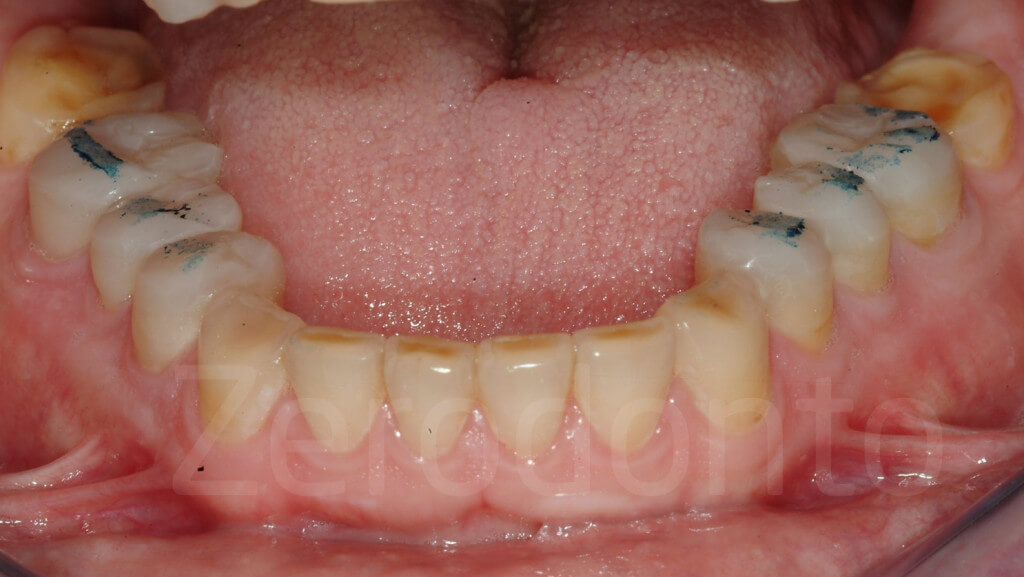
Fig 124-125: White bite. Each restored tooth should have a contact point (static occlusion)
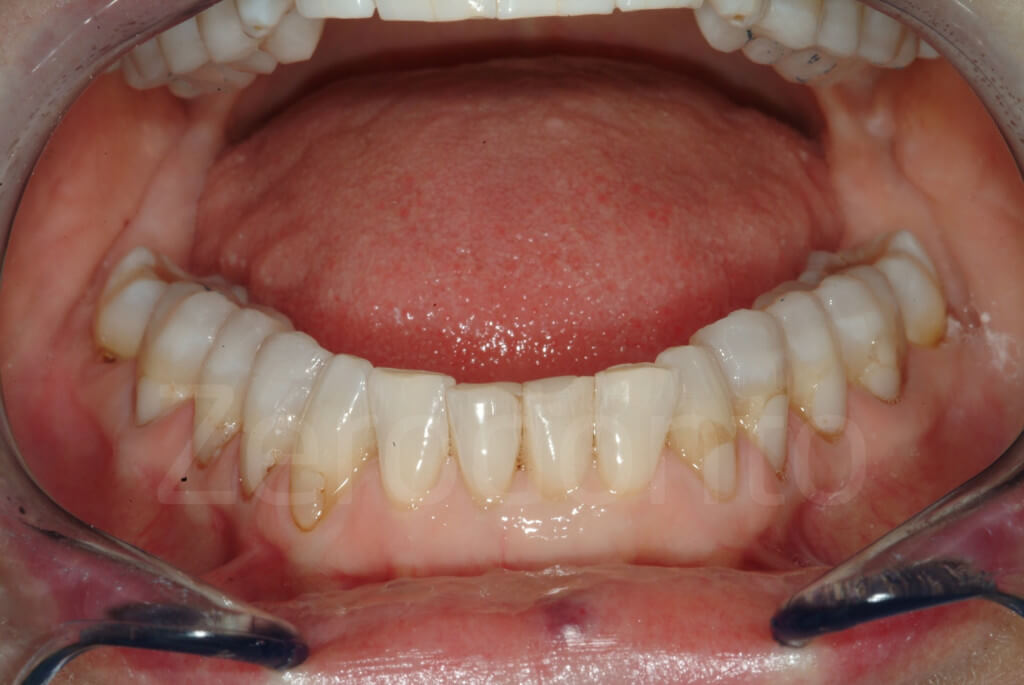
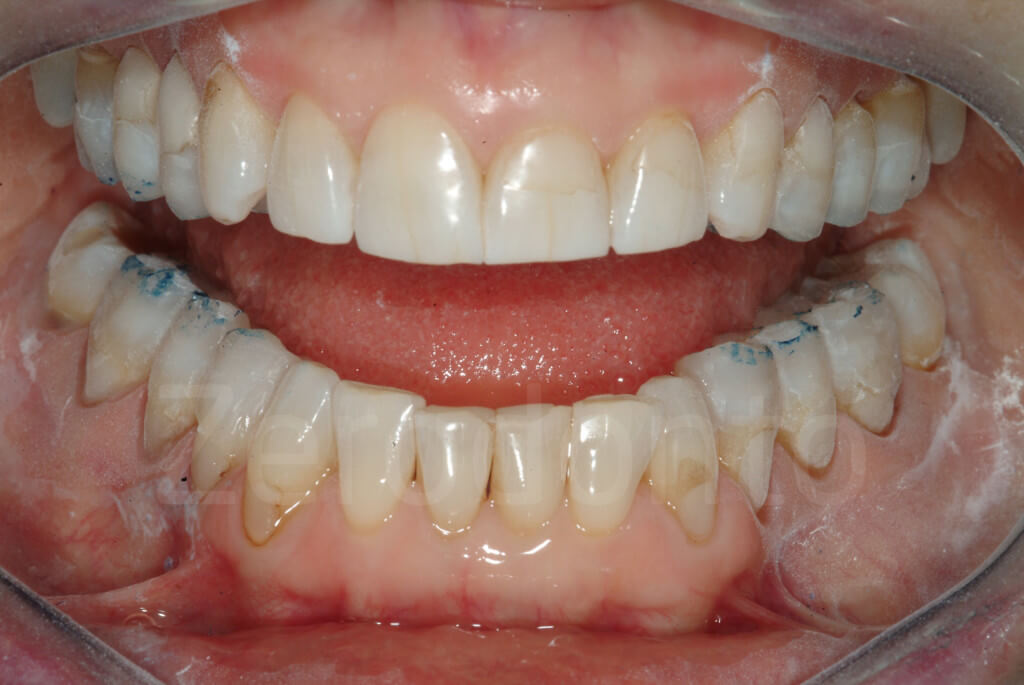
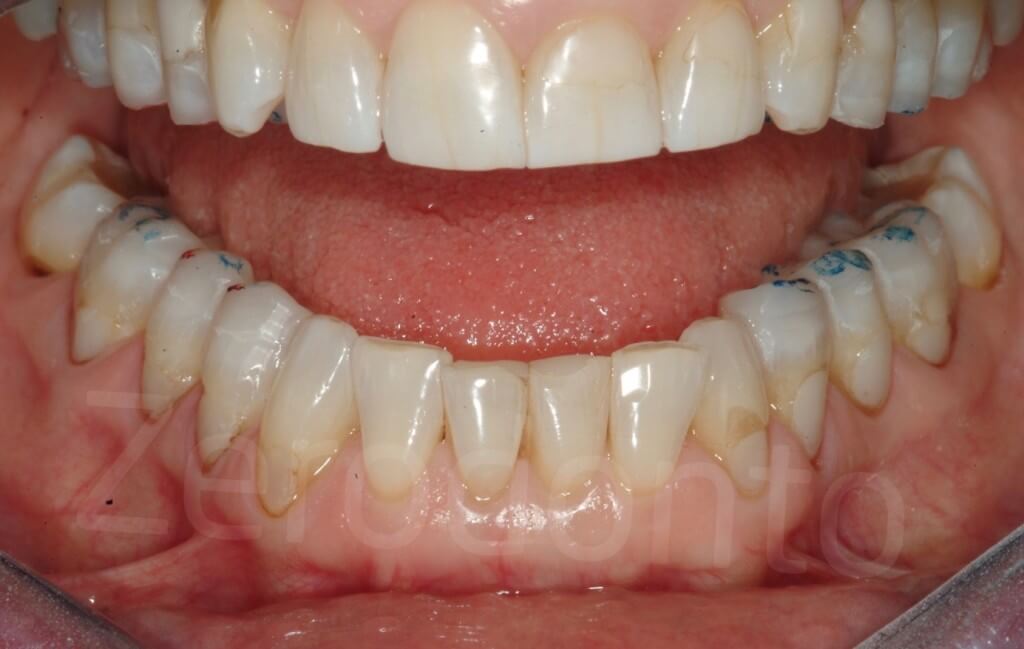
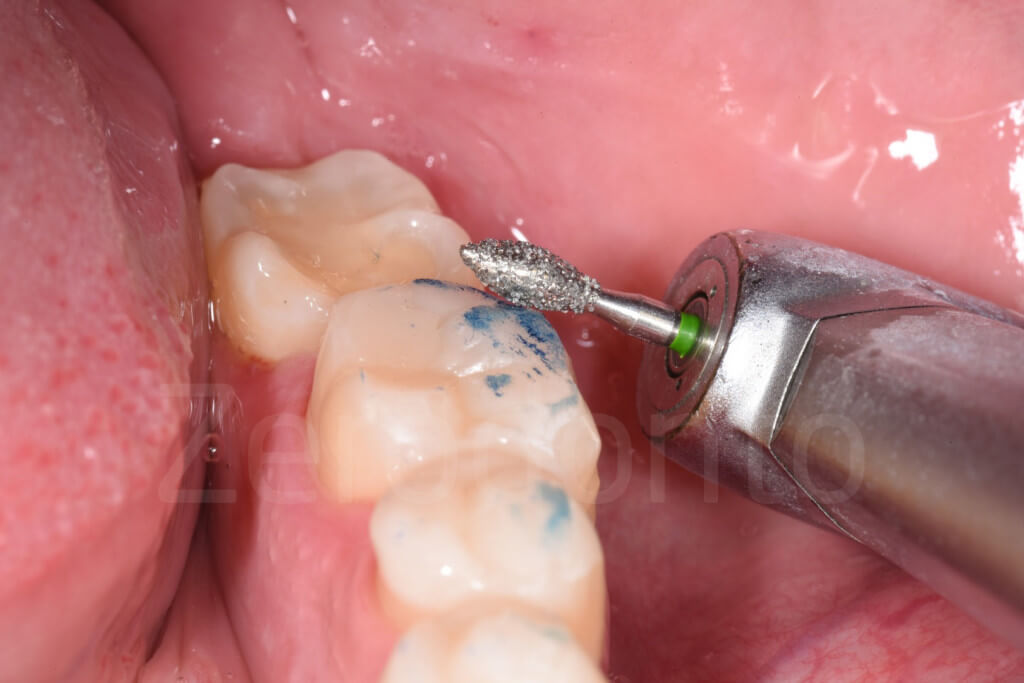
Fig 126-129: Immediately after the fabrication of the white bite, and the progressive occlusal adjustements
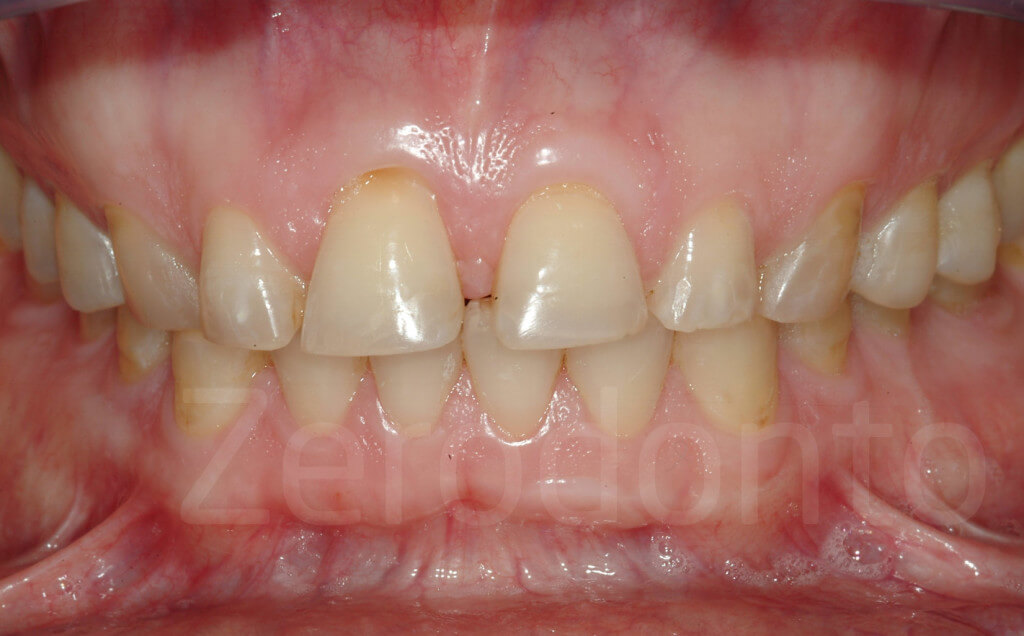
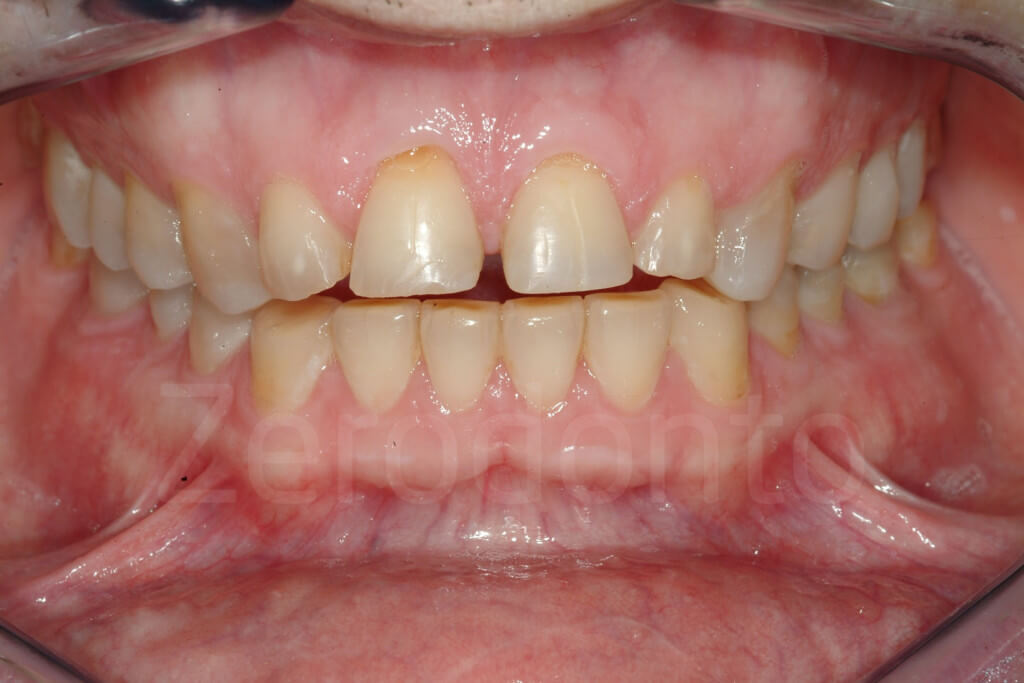
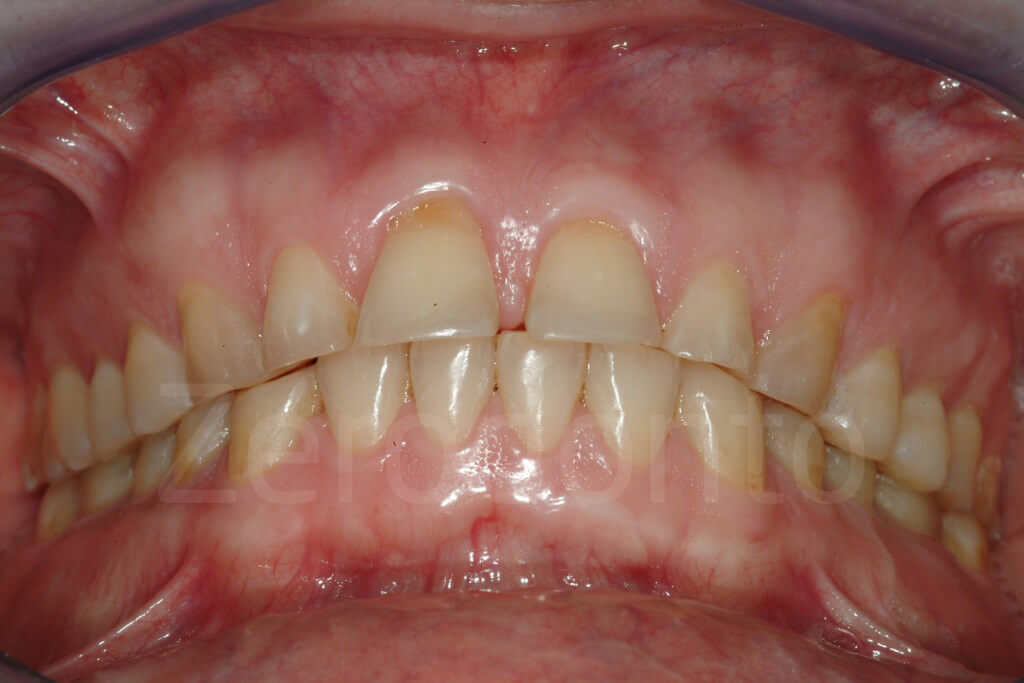
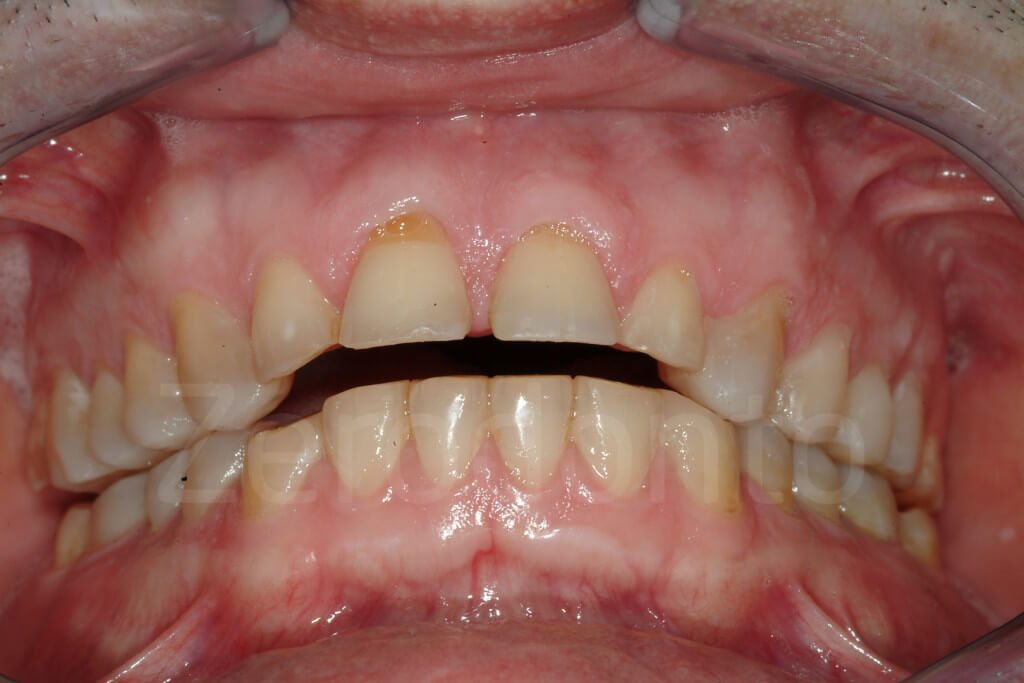
Fig 130-133: II step. With the therapeutic white bite it is possible to test if this patient can afford to correct his deviated mandible
This “fixed” occlusal guard (therapeutic white bite) has the major advantage that the compliance of the patient is 100% in terms of testing the increased VDO. Since no tooth preparation is requested for the fabrication of the posterior occlusal composites, the treatment can be considered completely reversible; if signs and/or symptoms of temporo-mandibular dysfunction arise, the initial status could be re-established by grinding off the occlusal composites. These composite restorations are meant to be provisional, and they will be replaced (with final composite or ceramic onlays) after the anterior quadrants are definitely restored (step 3 of the three-step technique). This is one of the reasons that the use of rubber dam is not vital during this particular step, and the removal of existing functioning restorations (e.g, old amalgam restorations) is not strictly required.
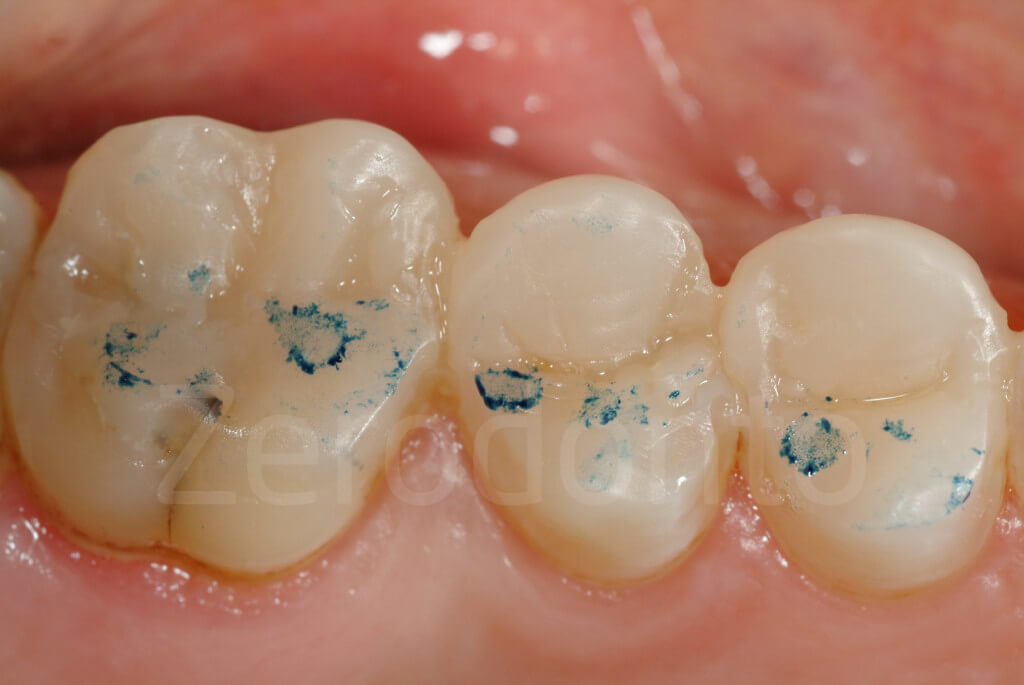
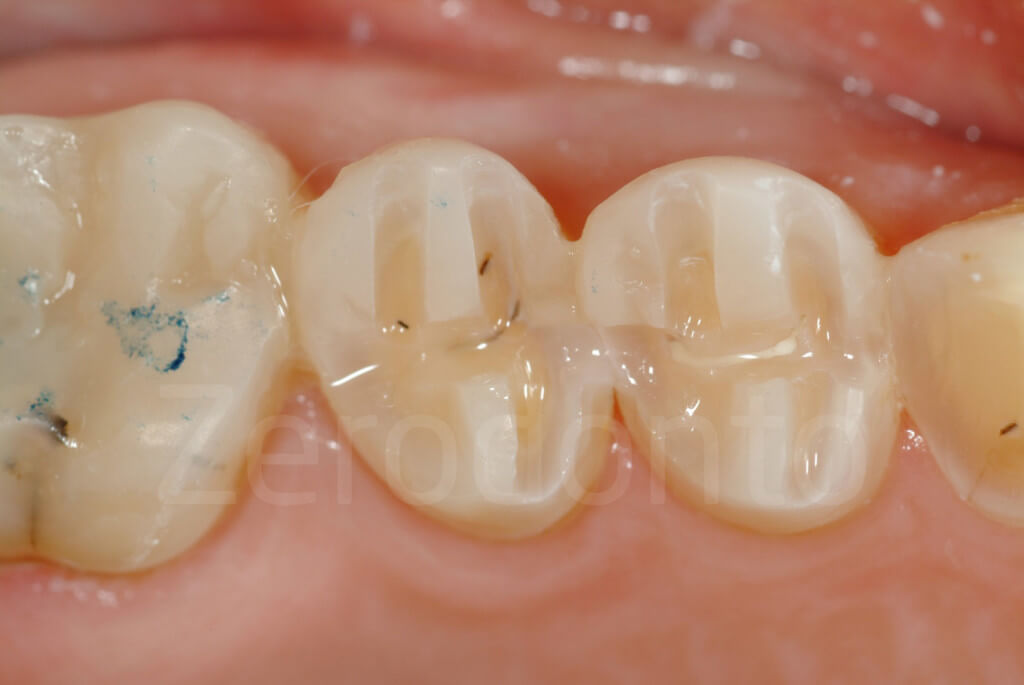
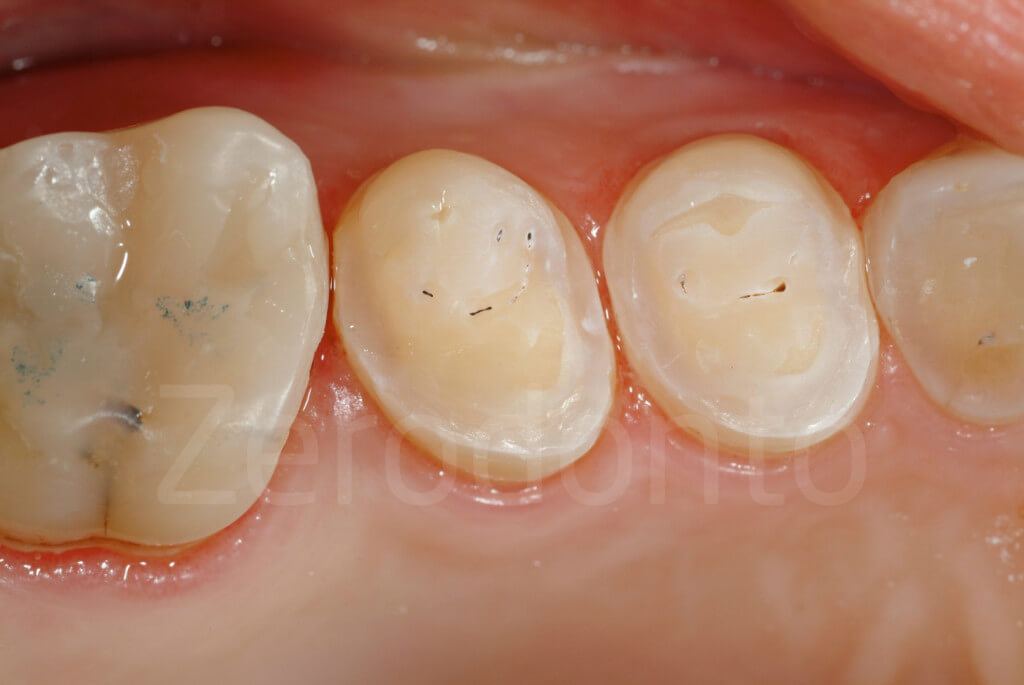
Fig 134-136: At the completion of the 3-STEP, the posterior provisional restorations will be replaced by the final ones. The composite is removed with a bur.
Another advantage of these interim composites is their potential for modification. After, for example, completion of the restoration of the maxillary anterior teeth, it is still possible to adjust the position of the occlusal plane with respect to the new incisal edge position, by modifying the vestibular cusps of the posterior provision-al composites. Finally, their presence will facilitate the occlusal adjustments of the final restorations placed in the opposite quadrant. The laboratory technician could decide to fabricate the latter to the perfect form and all the occlusal adjustments could be carried out on the opposite provisional posterior composites.
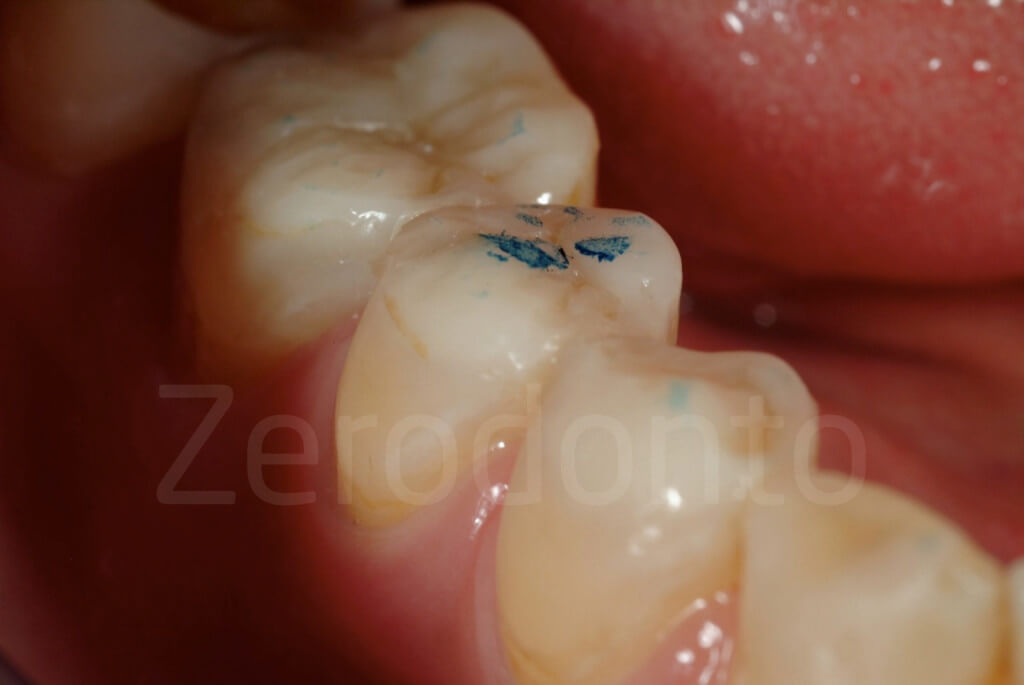
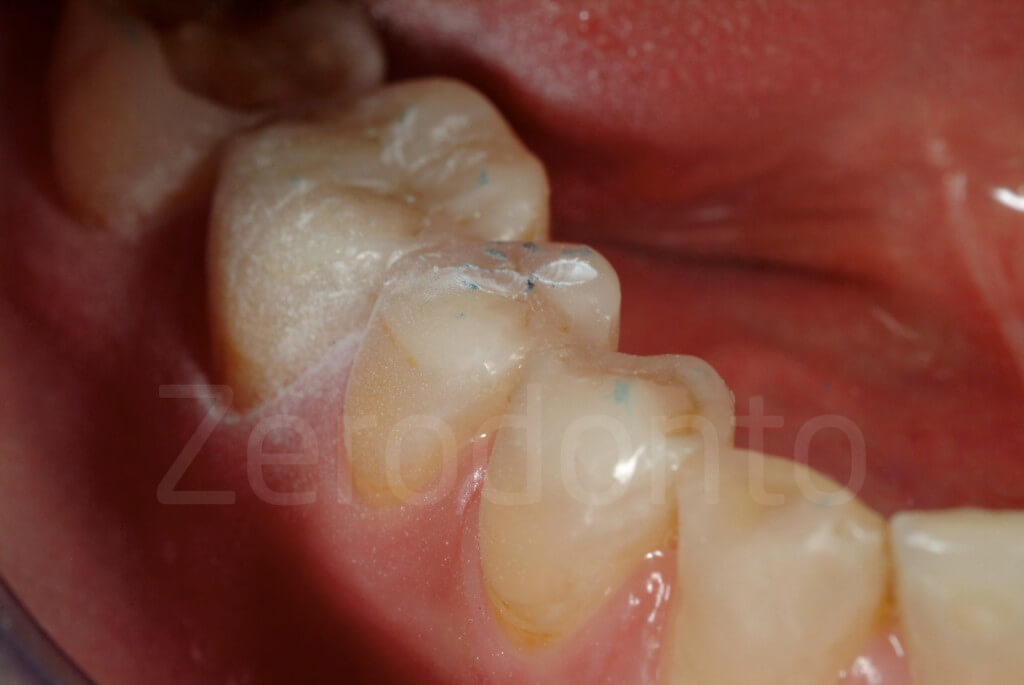
Fig 137-138: Occlusal adjustments can be done at the level of the provisional restorations in the antagonistic arch.
The second clinical step has been conceived to simplify the clinician’s work, without compromising the final outcome of the full mouth rehabilitation.
In this case, it was decided not to attempt to restore the anterior teeth with provisional resin composite, which have the potential to inflamed the gingiva at the level of the palatal aspect (e.g. crucial for the quality of the bonding that no bleeding is present). In the authors’ experience the increase of VDO is well tolerated by the patients even when an anterior open bite is created temporarily. Some speech impairments could be anticipated. However, patients informed before treatment usually deal very well with this problem.
Currently, there is no consensus of the time necessary to test the comfort of the patient with respect to a new, increased VDO, and each clinician appears to decide based on personal opinion rather than on scientific evidence. At the University of Geneva, the original protocol suggested waiting one month. This is a completely arbitrary and experimental choice. Nowadays the waiting time is only 1 week, necessary for the patient to feel comfortable. If neither signs nor symptoms of temporomandibular dysfunction appear, the acceptance of the new VDO can be confirmed, and the third step (the creation of the anterior contacts) can be undertaken.
As already mentioned, if the clinician is concerned about leaving the patient without anterior contacts and thus without a functional anterior guidance during the testing phase of the newly introduced, increased VDO, the third step could be initiated more rapidly.
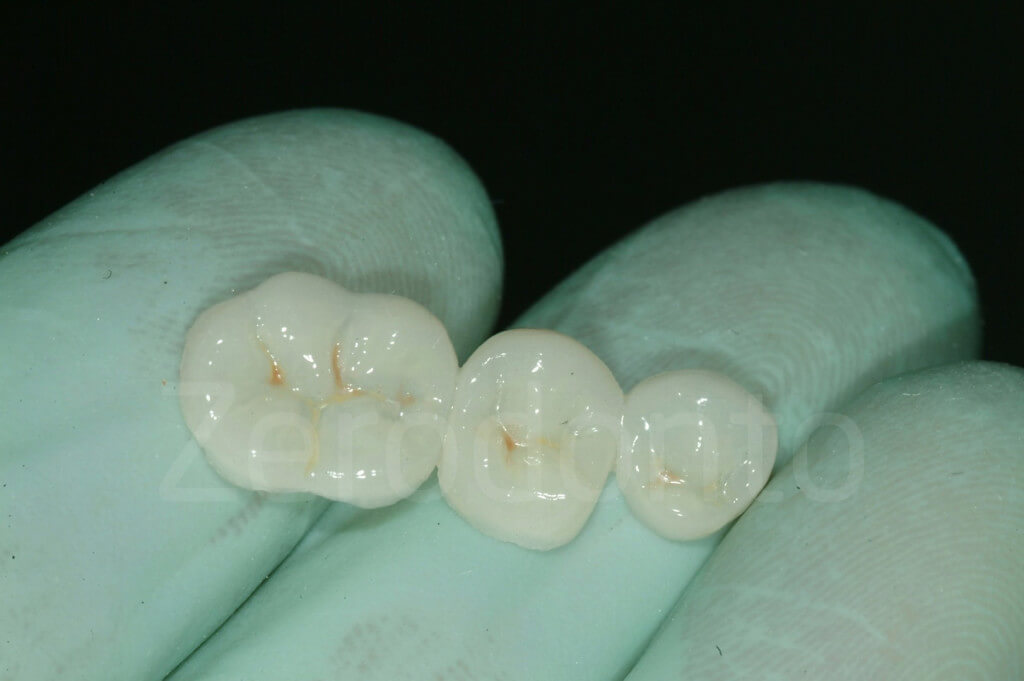
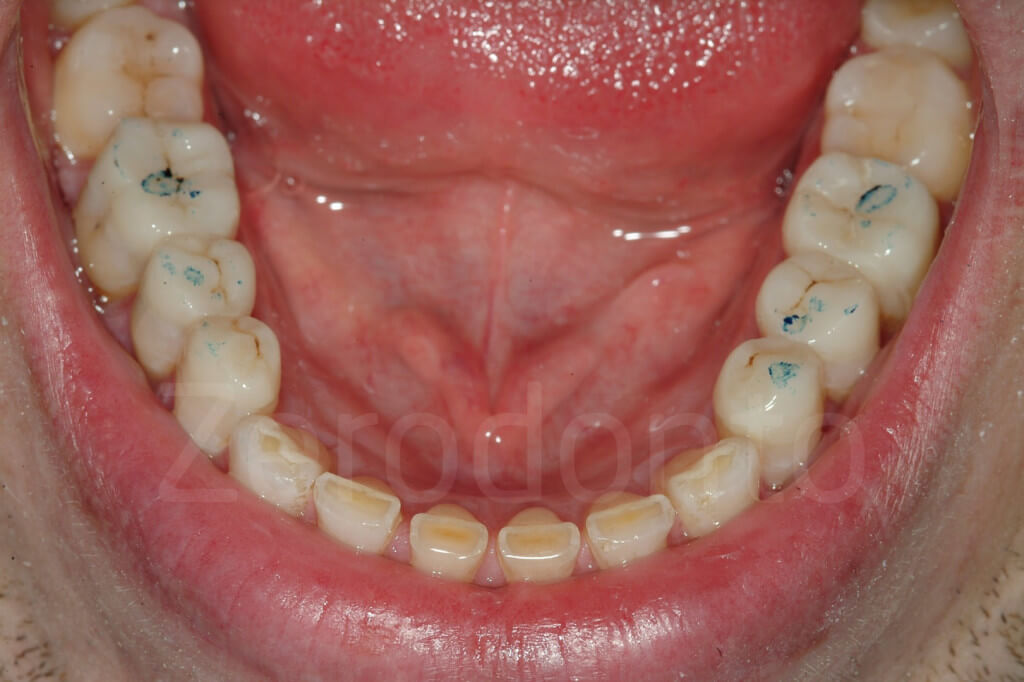
Fig 139-140: White bite done in the laboratory
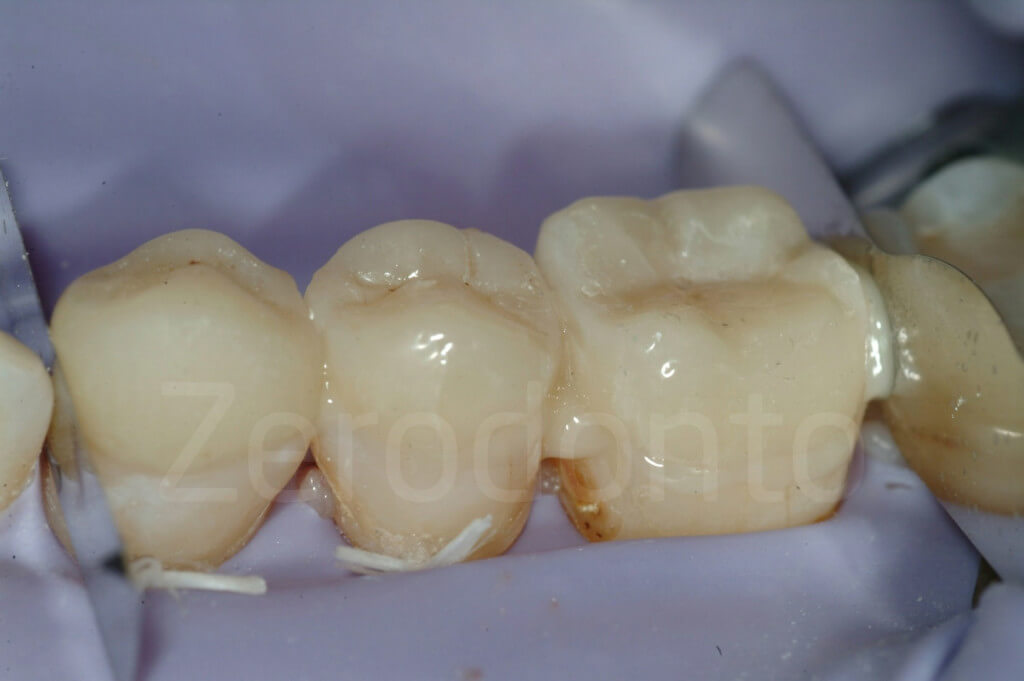
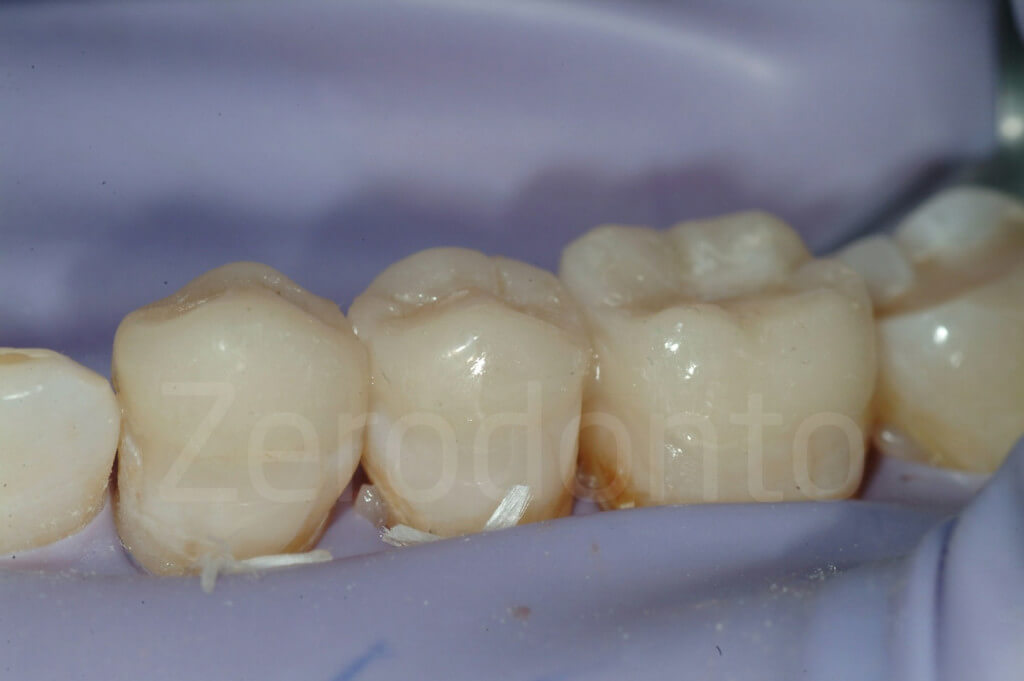
Fig 141-142: The indirect white bite is easier to be bonded for some clinicians, but it has a laboratory fee to considered.
Patients should be informed that sometimes the esthetic appearance of their smile could worsen at this transitional stage of therapy, especially in the case of an extremely damaged anterior dentition. The worsening of their smile is due to the fact that the maxillary posterior teeth have been lengthened by the posterior provisional resin composites, whereas the maxillary incisal edges have not yet been restored.
Some speech impairments can also be expected, as the anterior teeth are set apart and more air can escape during the pronunciation of the letter ‘s’. However, patients are generally so motivated after the first clinical step that they do not find this treatment phase particularly stressful or unbearable.
As previously mentioned, thanks to the maxillary mock-up of the first clinical step, patients are very trusting, as the planned treatment objective has been visualized and thoroughly explained beforehand. Consequently, this transitional period is accepted without major complaints. The most frequent objection raised by colleague clinicians to this technique is that without adequate anterior guidance, a new occlusion at an increased VDO cannot be correctly assessed. However, to date, there is no robust scientific evidence available to support this criticism. In the authors’ experience, patients are able to function well for a short period of time without anterior contacts.
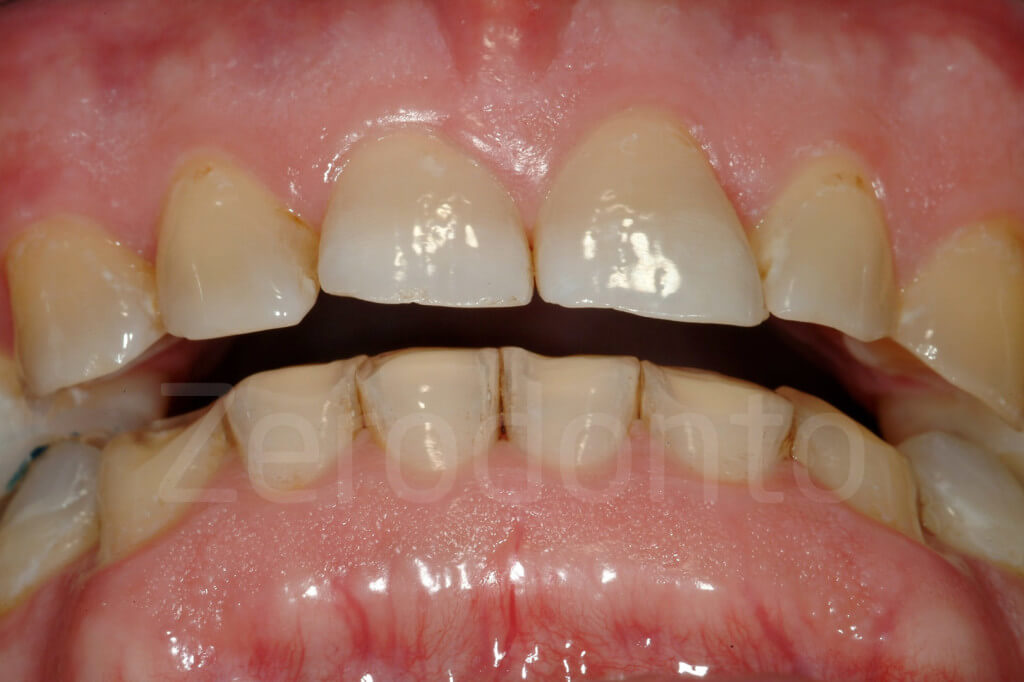
Fig 143: At the end of the II STEP, the patients present an anterior open bite which wit be resolved with the palatal veneers
THIRD STEP, THE PALATAL VENEERS
At the completion of the second step, a stable posterior occlusal support is established. As mentioned previously, owing to the presence of the posterior provisional resin composites, the anterior teeth are set apart. Consequently, the third and final step of the 3-STEP technique deals with the restoration of the anterior quadrants (reestablishment of an adequate, functional permanent anterior guidance).
Generally, the palatal aspect of the maxillary anterior teeth is severely affected by the destructive combination of erosion and attrition, which leads to a substantial loss of tooth structure. After the loss of enamel, the exposed dentin is subject to accelerated wear, which leads to a pronounced concave morphology, and frequently, to weakening and fracturing of the incisal edges. Following the guidelines for conventional oral rehabilitation concepts, such structurally compromised teeth should receive full crown coverage. In order to place the crown margins at the gingival level, the entire coronal tooth structure, mesially and distally, is removed to guarantee the path of insertion of the crown.
The entire facial aspect will also be substantially reduced in the process of preparing the 1.5 mm shoulder ceramic margins for porcelain-fused-to-metal crowns. Even when the more conservative all-ceramic crowns are adopted (eventually <1 mm of chamfer preparation) the clinician still has to eliminate the mesial and distal undercuts of the tooth and smoothen the sharp edges, leading to a highly invasive preparation of the axial walls.
Several studies have demonstrated the importance of the marginal ridges for posterior teeth. Restorations that extend to the mesial and distal aspect, such as a MOD restoration, greatly affect the strength of the restored posterior teeth.
In the authors’ opinion, the mesial and distal marginal ridges of the anterior teeth may have a similar importance as de- scribed for posterior teeth in guaranteeing structural strength, thus, representing a framework for enamel. Therefore, the removal of these mesial and distal marginal ridges of the anterior teeth could dramatically compromise the tooth flexibility the (“tennis racket theory”). Preparing such teeth for crowns will complete the destruction initiated by the erosive process. Not infrequently, elective endodontic treatment will be necessary, and posts will then be used to assure retention of the final crowns.
Only a few articles have been published that have aimed at investigating the survival rate of single crowns on vital natural teeth, and there are no long-term follow-up studies on the survival of devitalized and crowned teeth in very young patients. However, the problems that arise when a tooth looses its vitality, such us periapical lesions, discolorations, root fractures, etc. are well documented.
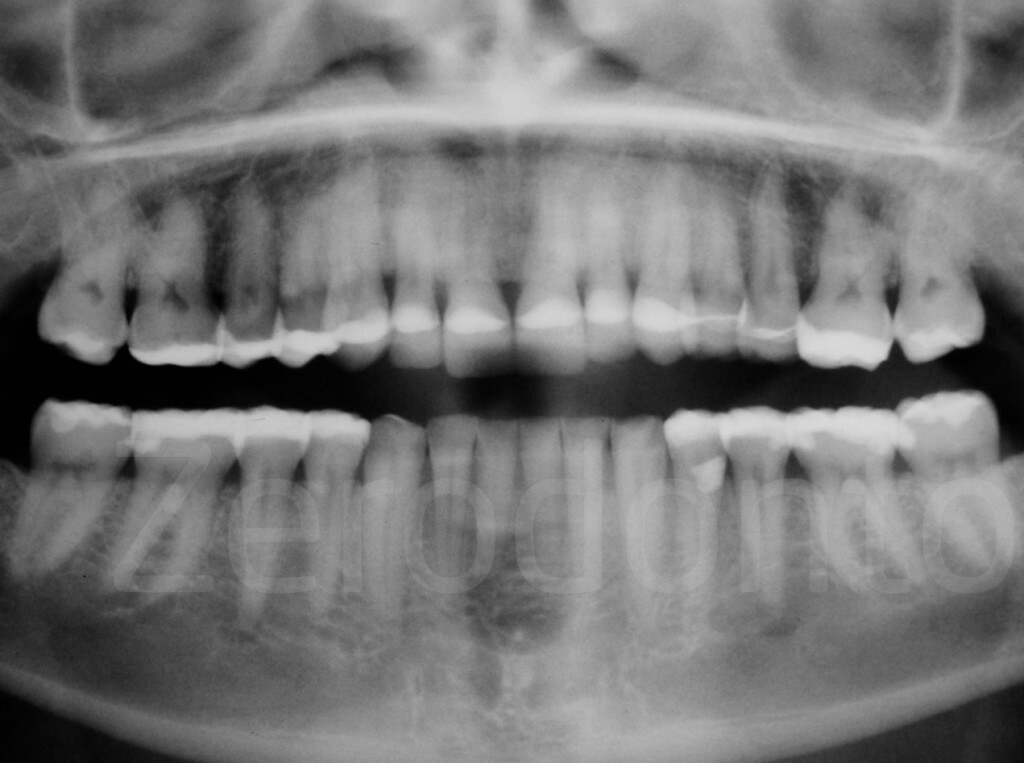
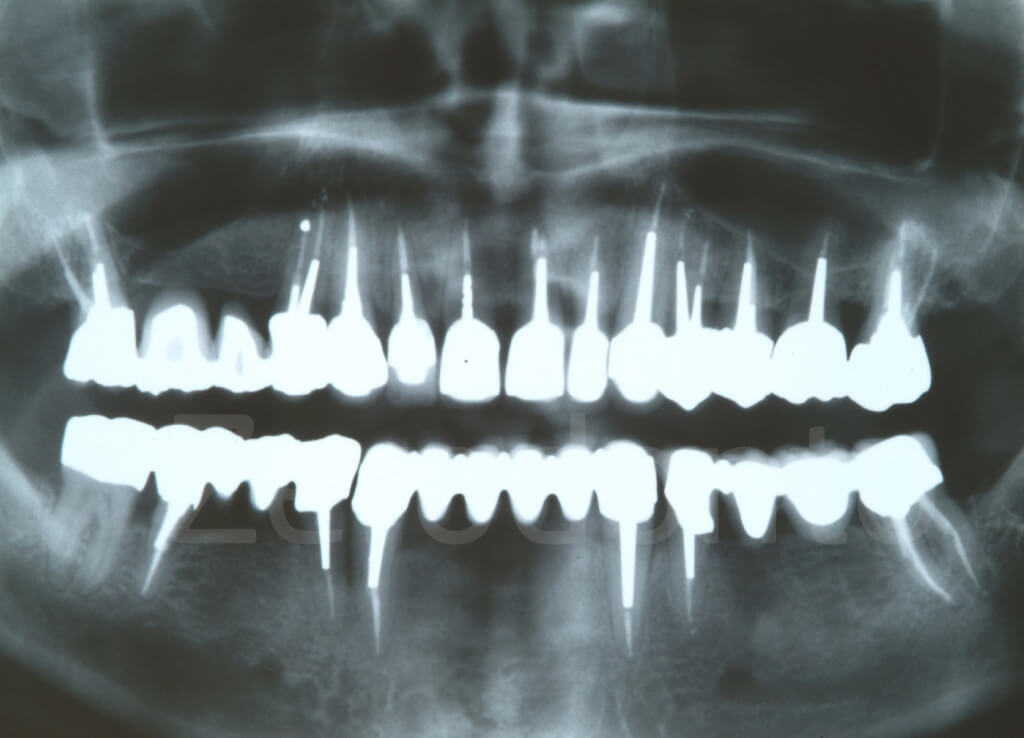
Fig 144-145: Additive rehabilitation versus subtractive one.
To avoid aggressive treatments on the one hand and to keep teeth vital on the other hand, an experimental approach of restoring the maxillary anterior teeth of patients affected by severe dental erosion was started at the University of Geneva, School of Dental Medicine. The authors’ minimally invasive treatment concept consisted of reconstructing the palatal aspect with resin composite (direct or indirect, as will be explained later in this article) and to restore the facial aspect with ceramic veneers.
The final outcome is reached by the most conservative approach possible, as the remaining tooth structure is preserved and located in the center between two different restorations (‘the sandwich approach’).

Fig 146: The ‘sandwich approach’. A severe compromised tooth could be restored with two restorations, a composite palatal veneers first and a ceramic facial veneer later
Not any longer experimental, but highly promising, ultra-conservative approach, implementing both basic principles of biomimetics and adhesive technology, has been published by Magne et al.
Severely compromised anterior teeth have been restored without following the classic rules of crown preparation, which traditionally would require localization of the restoration margins on sound tooth structure.
To the contrary, teeth with extensive class 3 defects were directly restored with adhesive resin composite restorations before the facial veneer preparations were performed, treating the resin composite as an integral part of the tooth. In other terms, a part of the veneer margins were located on resin composite. Along these lines the 3-STEP technique has pushed the limit of this innovative application, as the teeth to be restored with facial ceramic veneers had previously the entire palatal surface restored with resin composite. Such an ultra-conservative approach cannot be matched by any type of full-crown preparation.
Palatal aspect: direct or indirect resin composites?
After 1 week of functioning with the posterior occlusal interim resin composite restorations, it is assessed whether or not the patient feels comfortable with the new occlusion.
The type of restoration that is best indicated to restore the palatal aspect of the maxillary anterior teeth (i.e. direct or indirect resin composite) is then selected.
If the anterior interocclusal space is reduced (<1 mm), the resin composites can be done directly free-hand, saving time and money (there is no laboratory fee for the palatal veneers and only one clinical appointment is required). If the interocclusal distance between the anterior teeth is, instead, significant, free-hand resin composites could prove to be very challenging.
When the teeth present a combination of compromised palatal, incisal and facial aspects, it is difficult to visualize the optimal final morphology of the teeth, particularly while restoring at this stage only the palatal side with rubber dam in place. Thus, the result may be unpredictable and highly time consuming.
Under such conditions, fabricating the palatal veneers in the laboratory clearly presents some advantages, including superior wear resistance and higher precision during the creation of the final form.
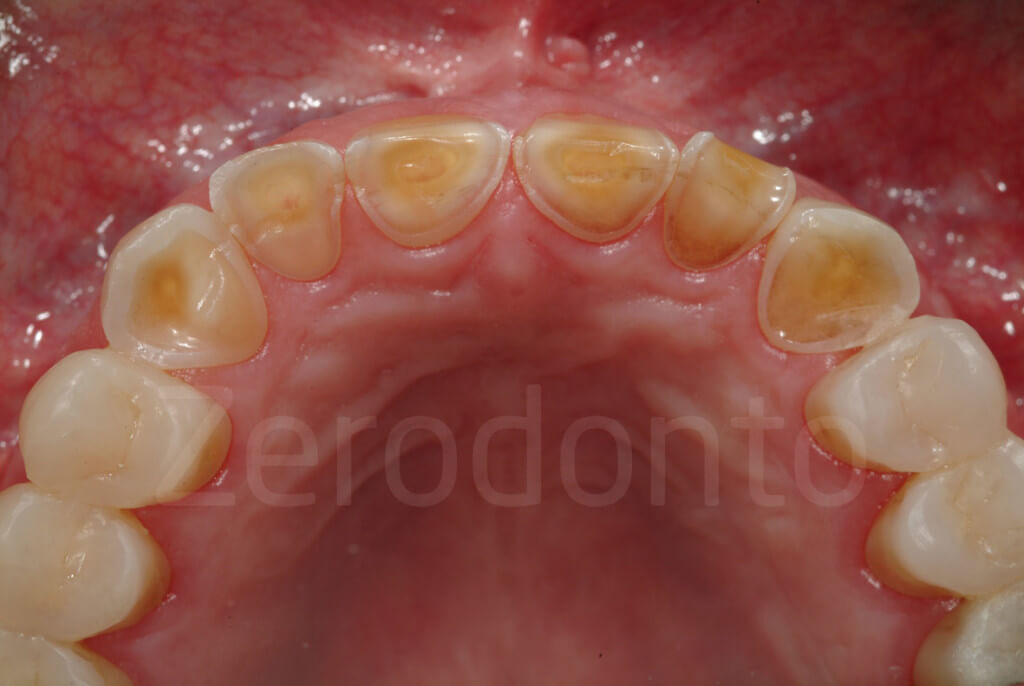
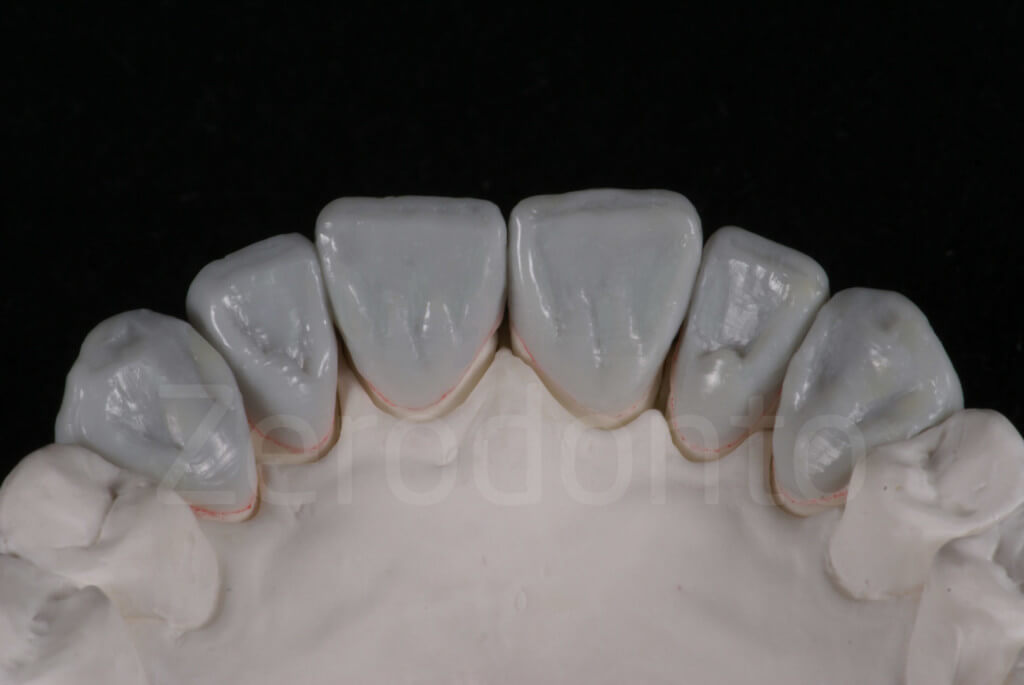
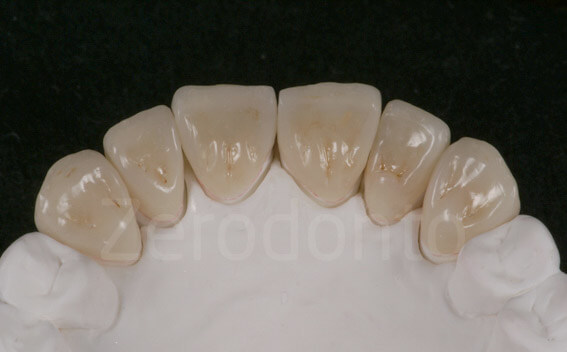
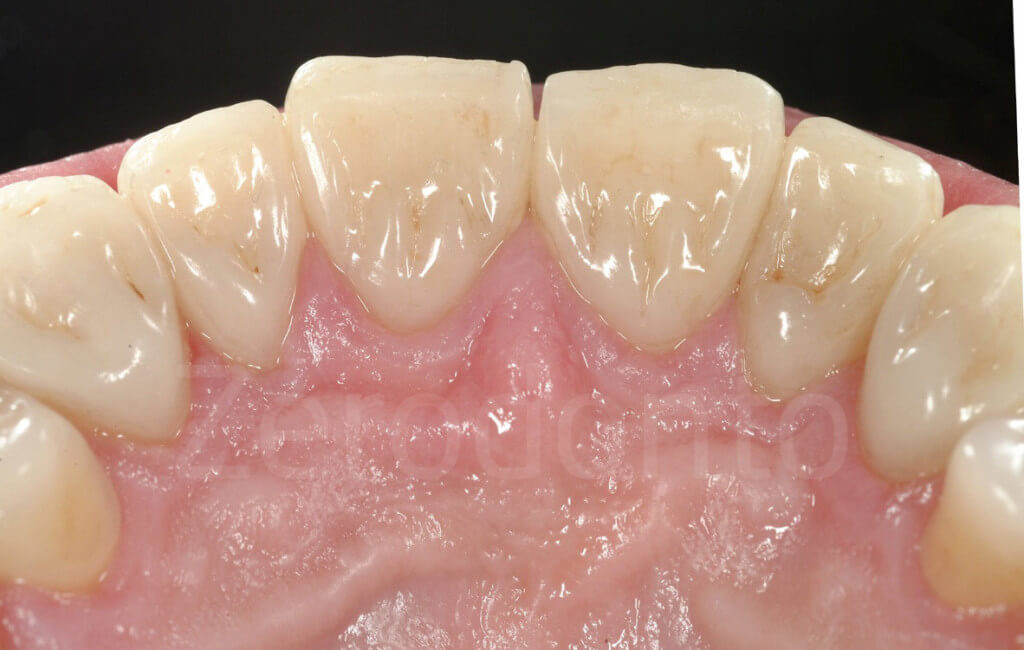
Fig 147-150: From the II STEP to the III STEP, 6 composite palatal veneers were fabricated and delivered.
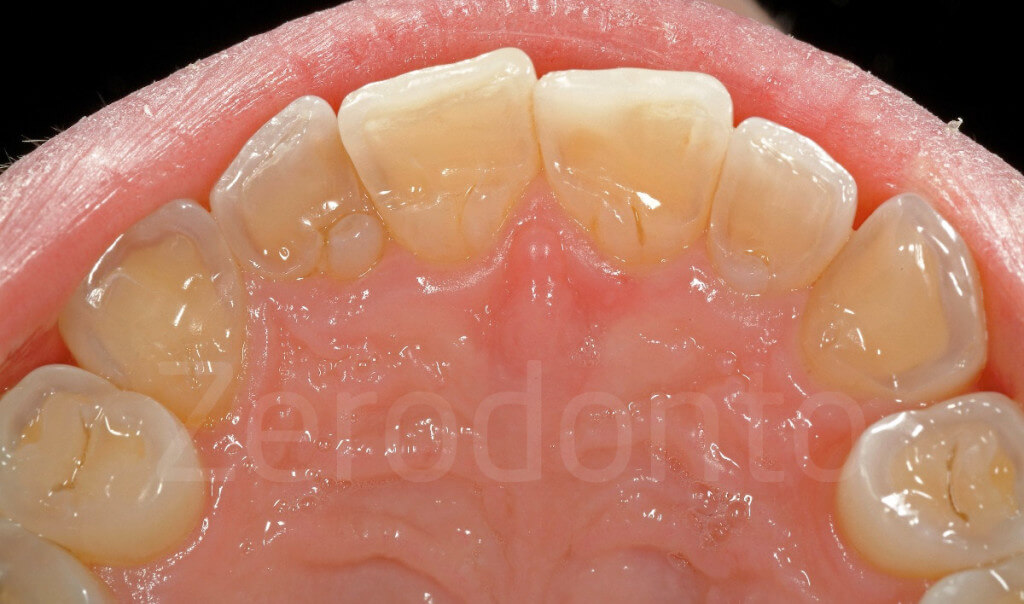
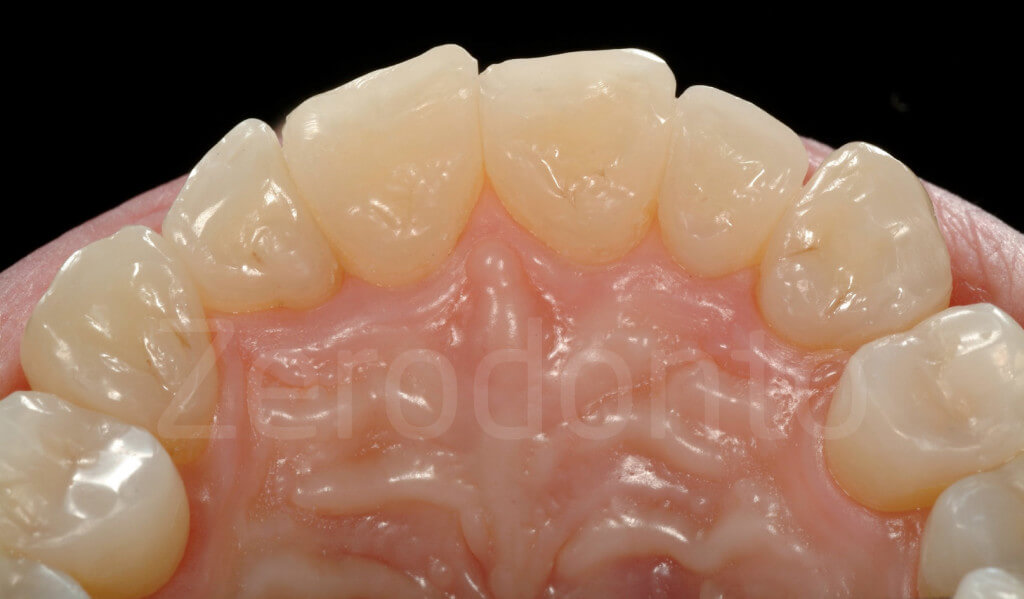
Fig 151-152: Intial status and 6 composite palatal veneers (III clinical step)
Palatal veneers: tooth preparation
In case the indirect approach is selected, the clinician will schedule an appointment to proceed to the preparation for the palatal veneers of the six maxillary anterior teeth. This preparation can be a quite an easy and rapid procedure. In fact, in the case of severe dental erosion, the palatal aspect of the maxillary anterior teeth is generally the most affected of the entire dentition. Under the described circumstances, the erosion and the attrition processes have already created the space necessary for the veneers, and no additional tooth preparation is required once an anterior tooth separation is generated by the increase of VDO.
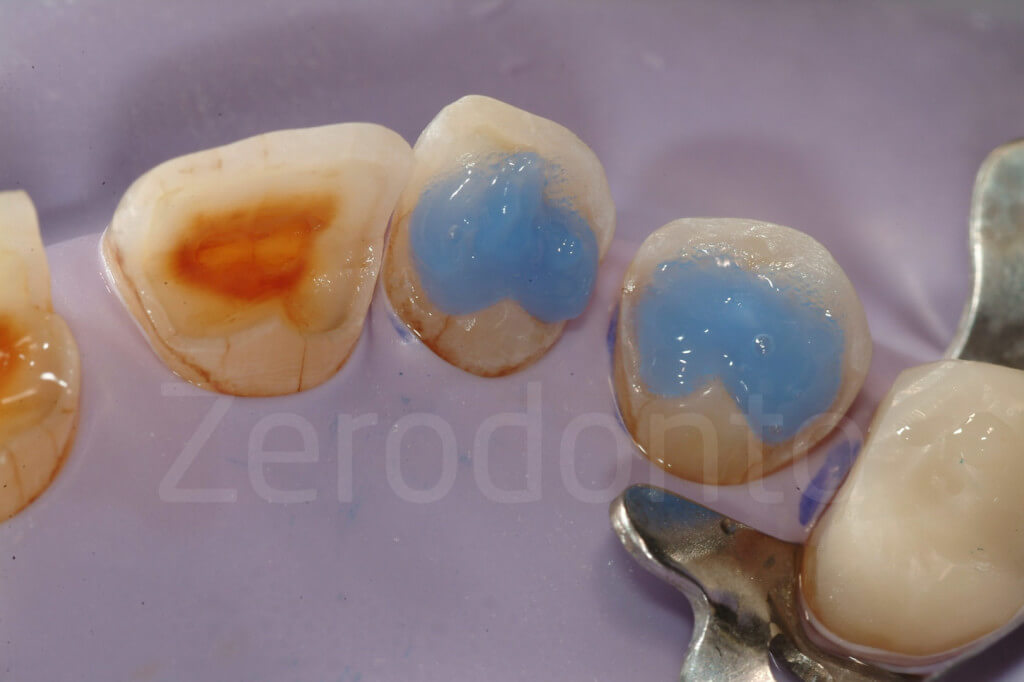
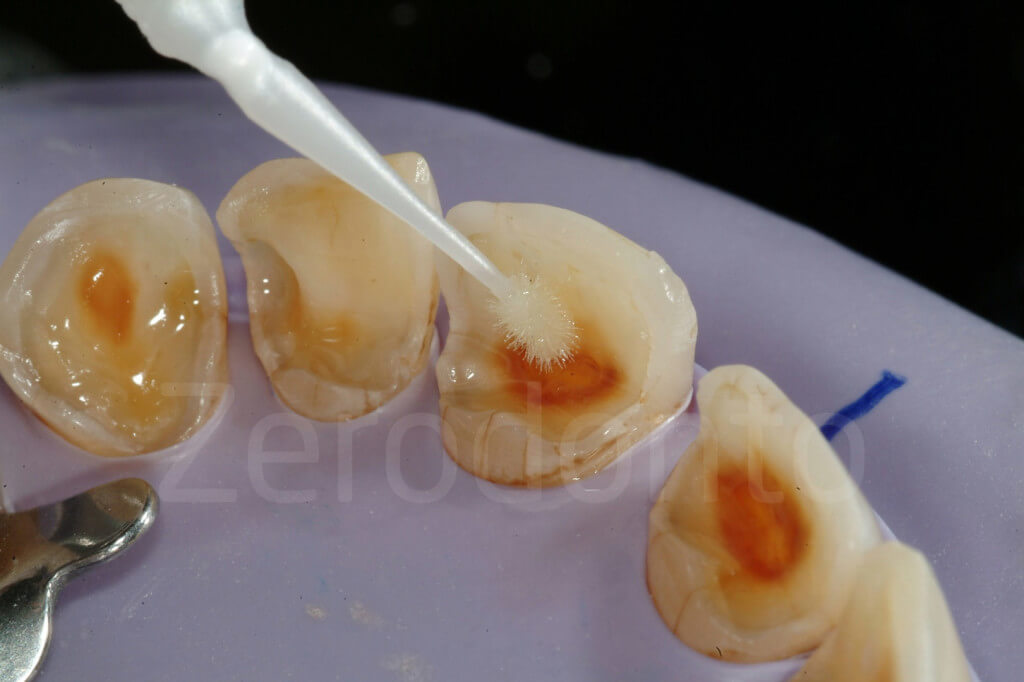
Fig 153-154: The dentin is immediately sealed
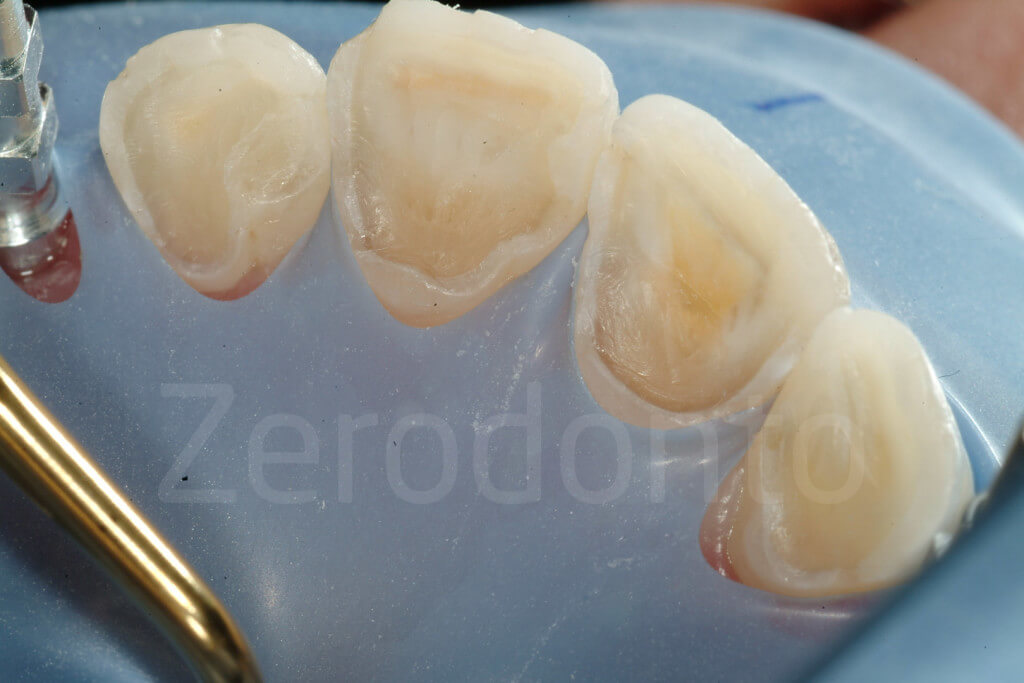
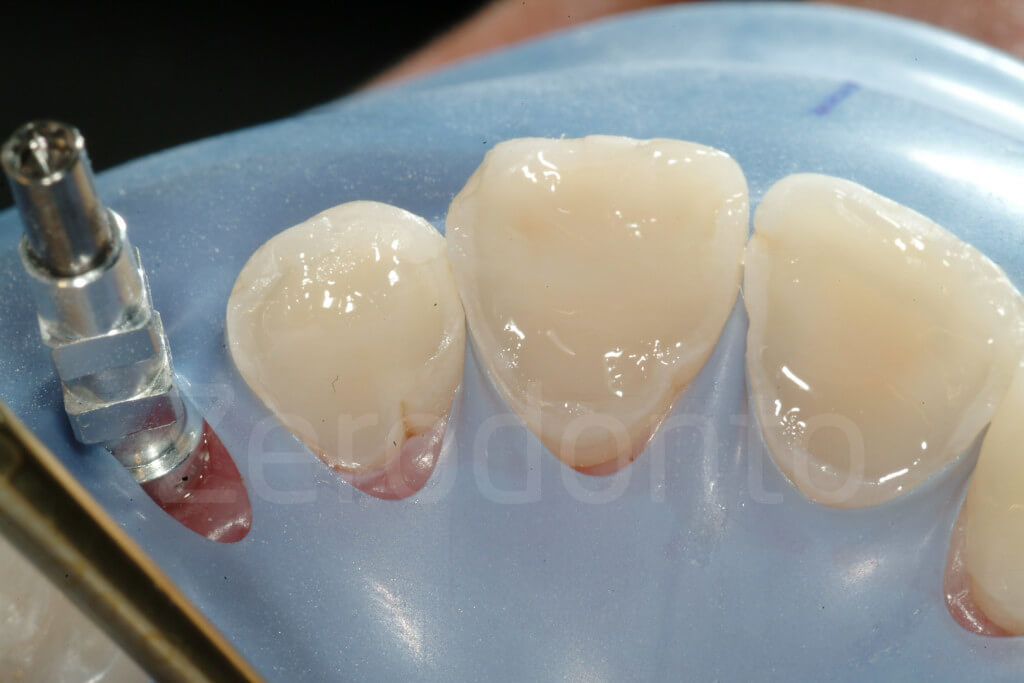
Fig 155-156: When the cincula are not present, the assistant can push the rubber dam, while the dentin is sealed.
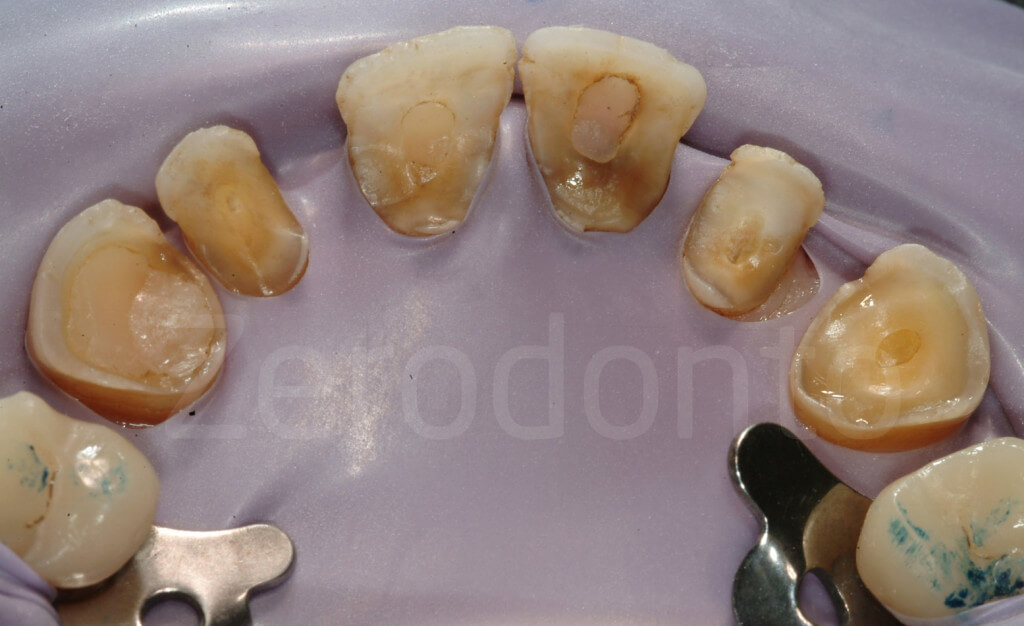
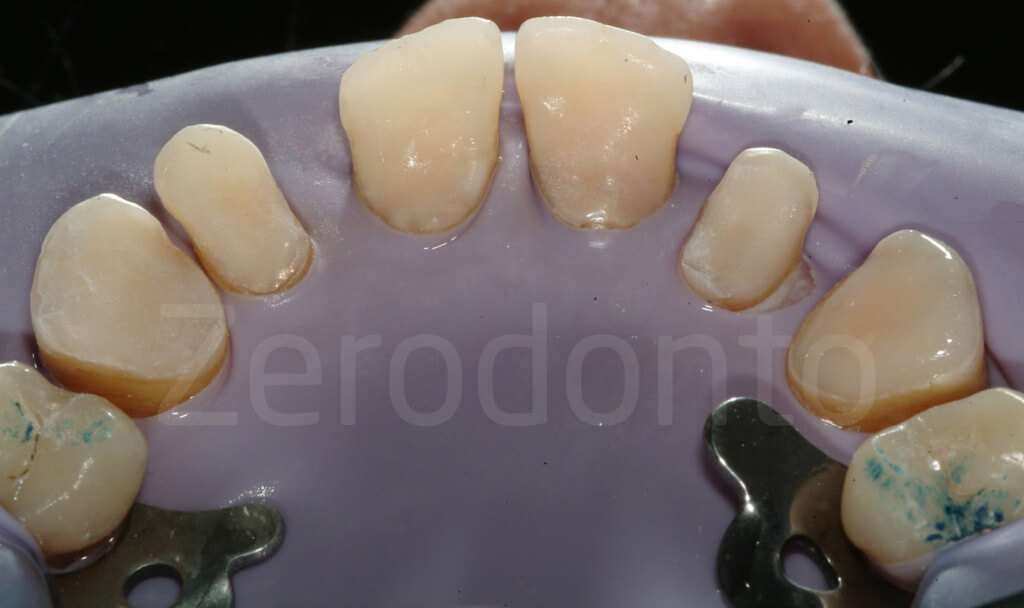
Fig 157-158: Preparations of the dentin for the palatal veneers.
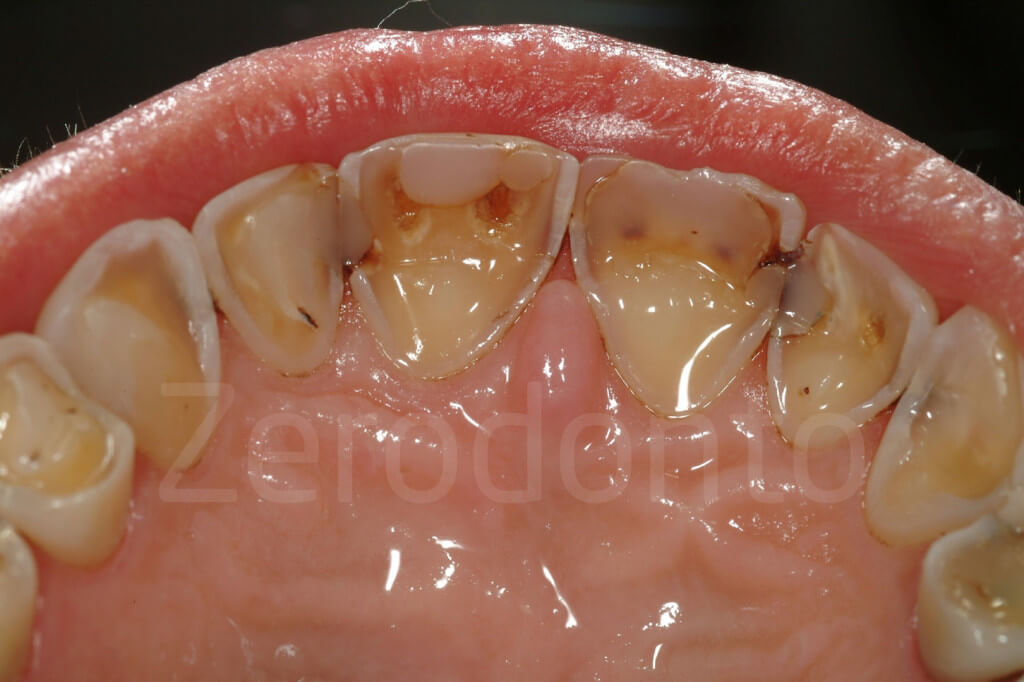
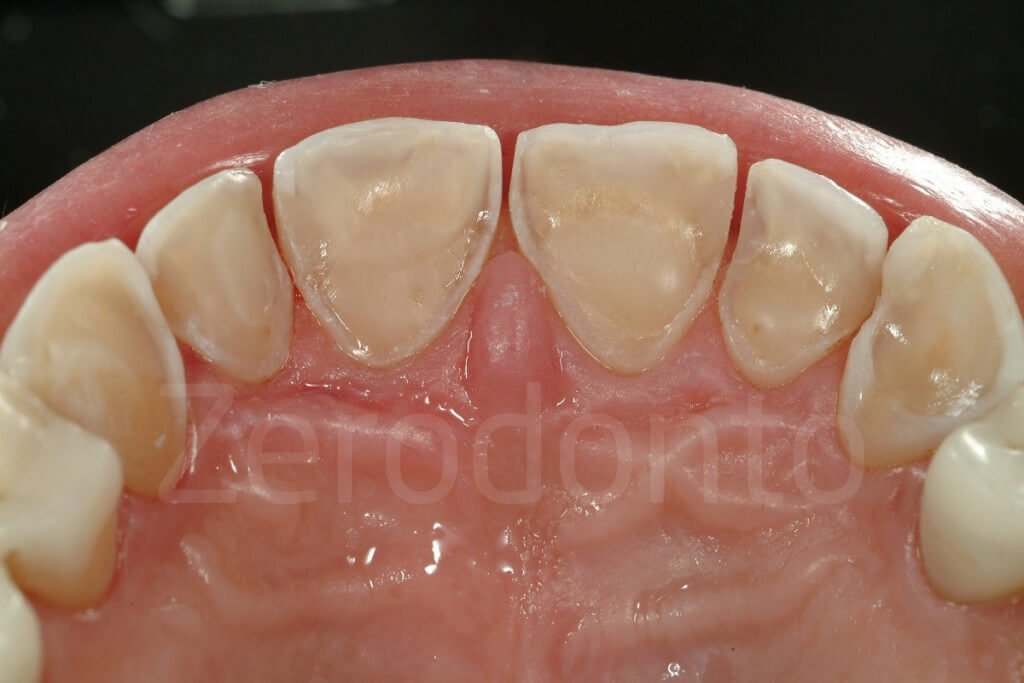
Fig 159-160: If caries or defective restorations are present they will be removed during the palatal preparation.
In addition, at closer observation, the cervical part next to the gingiva frequently, presents a chamfer-like preparation configuration, with a small band of enamel still present. Owing to the buffering action of both the sulcular fluid and the plaque, this thin layer of enamel is often preserved from the acid attack and its presence will provide a superior quality of adhesion. As this chamfer is located supragingivally and there is no need to extend the margins subgingivally, the next restorative steps are also facilitated (e.g. impression-taking and bonding of the final restorations).
The only features required are to slightly open the interproximal contacts between the maxillary anterior teeth by means of stripping if facial veneers are previewed and to smoothen the incisal edges.
The most superficial layer of the exposed dentin is removed with a 100 micron diamond burs.
Owing to this minimal tooth preparation, sensitivity does not develop. Consequently, no provisional restorations are required during the time necessary for the laboratory technician to fabricate the palatal veneers. After the final impression, the appointment is concluded with an anterior bite registration of the patient’s maximum intercuspidation position.
If the mandibular anterior teeth need to be restored it is preferable to do it before the fabrication of the palatal veneers.
Third laboratory step: the fabrication of the palatal veneers
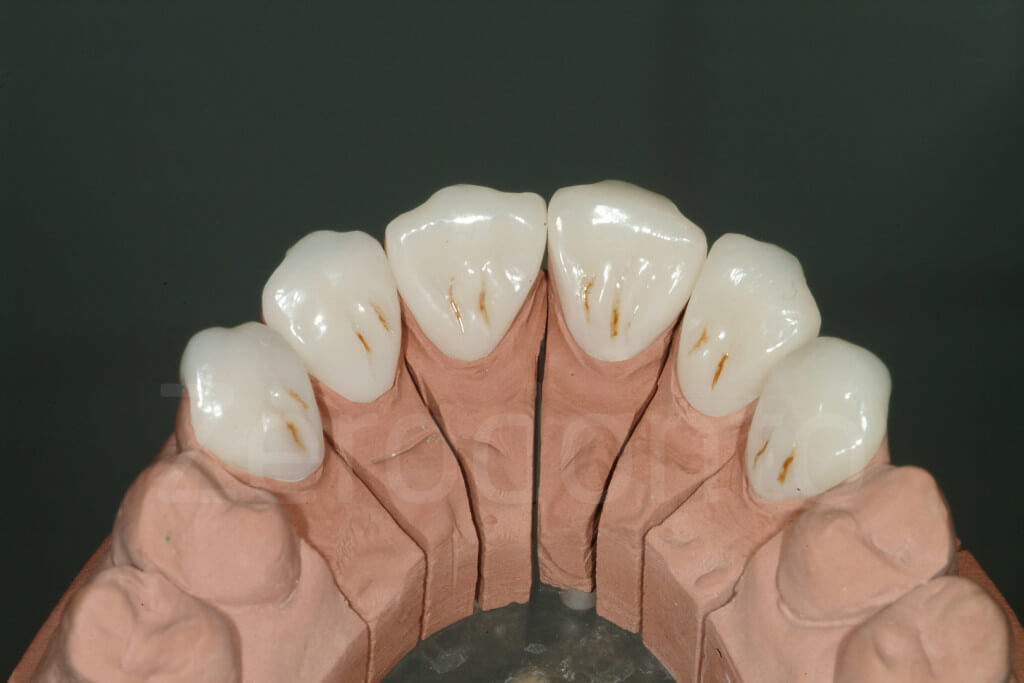
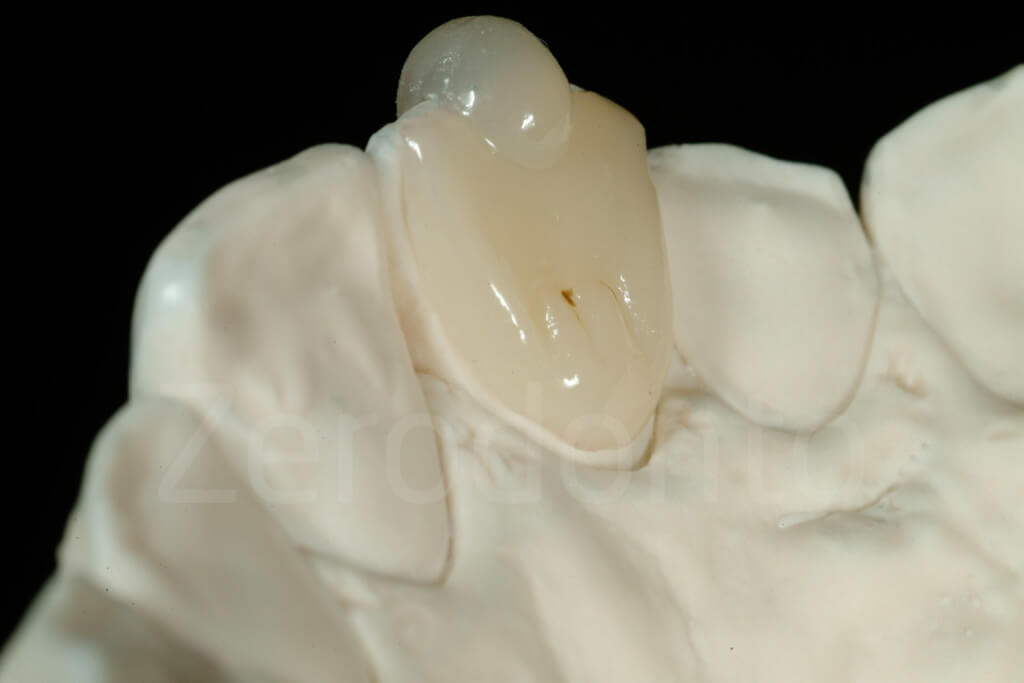
Fig 161-162: Composite palatal veneers
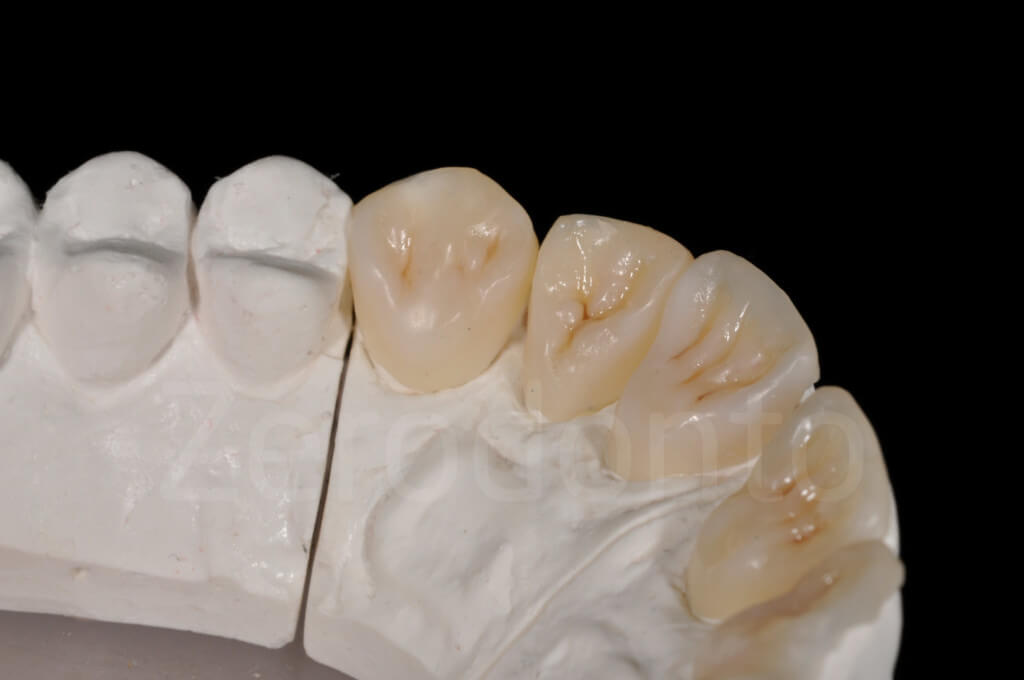
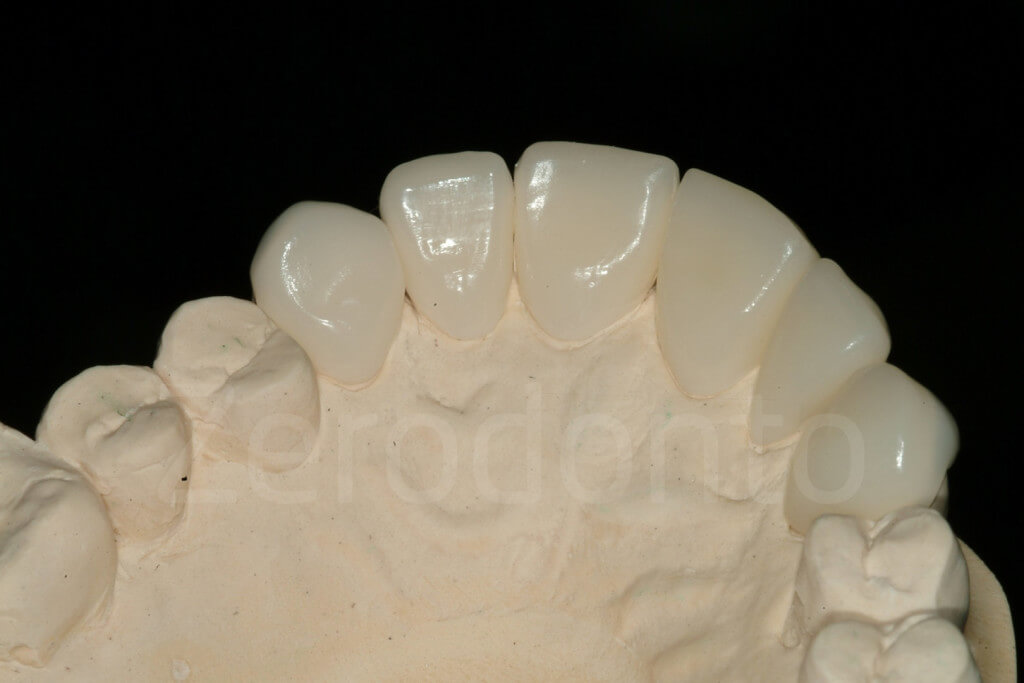
Fig 163-164: Composite palatal veneers. Even though the composite on the left seems more appealing, the ones on the right are more functional and their shape should be preferred.
The maxillary master cast comprising the preparations for the palatal veneers is mounted on the articulator in MIP.
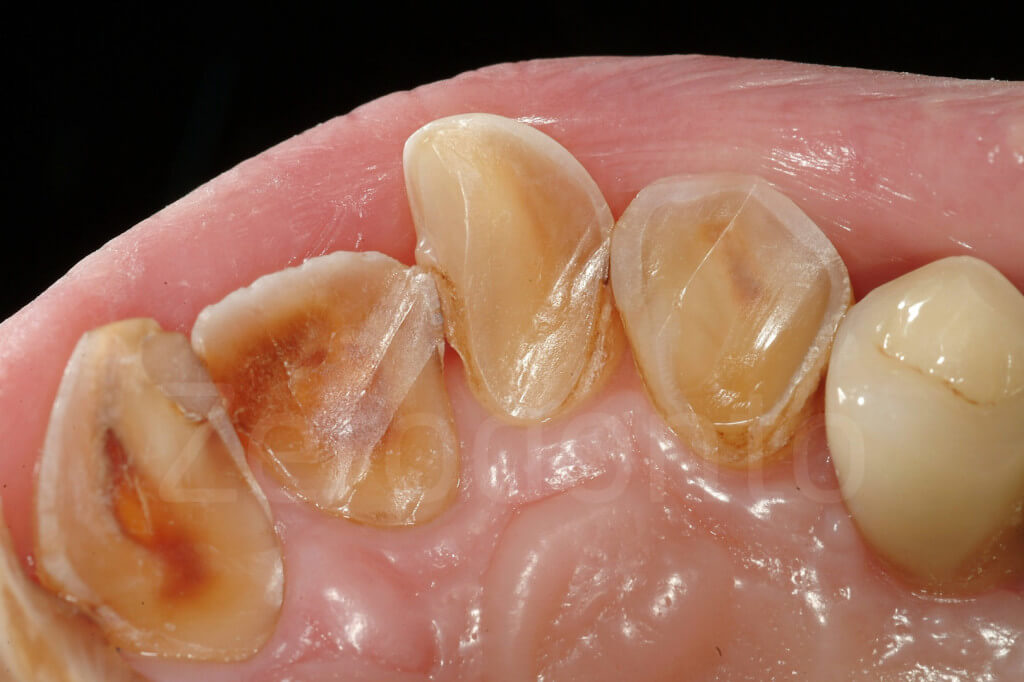
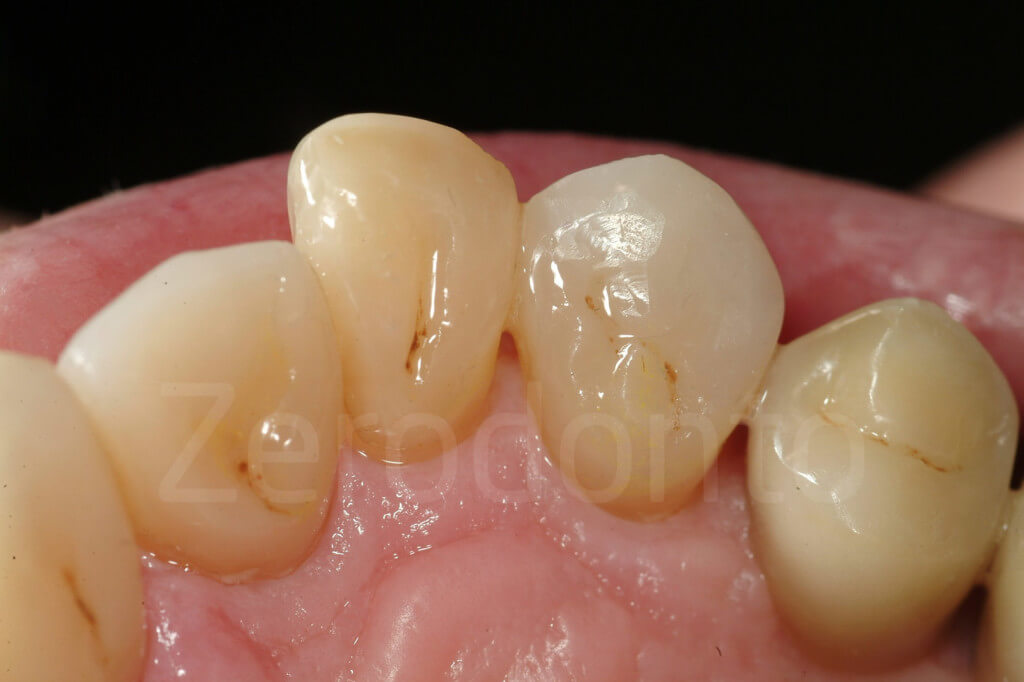
Fig 165-166: Composite palatal veneers
During the fabrication of the palatal resin composites, the technician and the clinician can decide to reestablish the final length of the future veneers or to keep the incisal edges slightly shorter.
In case of severe dental erosion, the facial aspect of the maxillary teeth may also be significantly involved and the layer of enamel thinned, to the point that the teeth appear more yellow – the dentin itself, exposed at the level of the incisal edges, could also be stained. Consequently, patients with advanced dental erosion frequently complain about the color of their teeth, becoming victims – like many other people – of the bleaching obsession of modern times. If one has decided to increase the length of the teeth before the fabrication of the facial veneers by means of the palatal veneers, patients should be in- formed that there may be a possible color mismatch with the vestibular surfaces. The color of the palatal veneers will be different, as it is meant to match the color of the final veneers, instead of the unrestored facial aspect of the teeth.
Generally, patients are so happy to have their anterior teeth lengthened that they do not consider this as a major draw- back.
It is very important that the laboratory technician fabricates a kind of hook at the level of the incisal edge (incisal stop), made of the same material as the restoration, which will help to position and stabilize the veneer during the bonding procedure.
Third clinical step: reestablishment of anterior contacts and the anterior guidance
When an indirect approach is selected, an additional appointment is necessary to deliver the final palatal restorations.
Whereas tooth preparation and final impression for indirect palatal resin composites are simple procedures, bonding of these restorations may be a demanding step, not only for the more difficult visibility of the operating field, but because of the necessity to guarantee moisture control.
The posterior resin composites are provisional restorations and, thus, the use
of rubber dam is not necessary, whereas the palatal veneers are final restorations and the bonding conditions should be optimal.
To ensure the best conditions for the adhesive procedures, after the placement of rubber dam, every veneer is bonded once at the time using hybrid resin composite (e.g. Micernium), following the protocol proposed by P. Magne for ceramic veneers. The only difference is that the intaglio surface of the resin composite palatal veneers is microsandblasted (30 μm Cojet sand, 3M Espe), and not treated with fluoridic acid. To correctly isolate the margins, it is necessary to place a clasp on the tooth receiving the veneer, otherwise the rubber dam would overlap the margins.
Considering that the substrate is mostly sclerotic dentin, and that the length of the final restorations is sometimes double of the original length of the remaining tooth structure, the task requested for the bonding is major.
Success can only be ensured by optimal bonding conditions on the one hand and by the presence of enamel at all margins of each veneer, except, of course, at the incisal level.
Once the tooth is isolated by means of rubber dam, the bonding procedure itself is not complicated, as the incisal stops help to position the palatal veneer, the interproximal contact points are often not a concern, and the margins are supragingival.
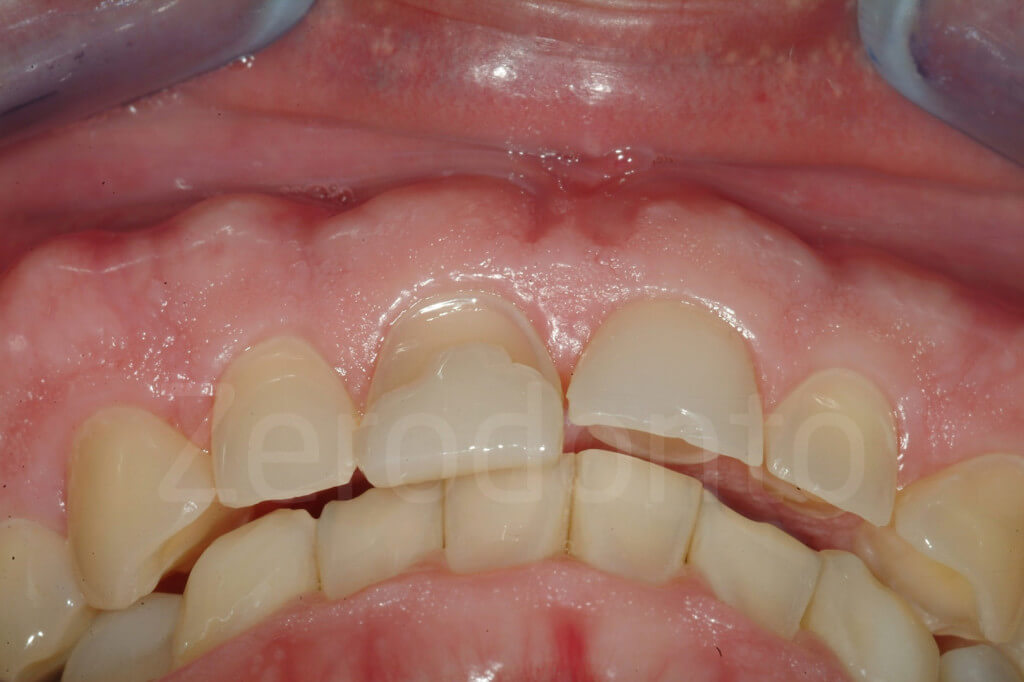
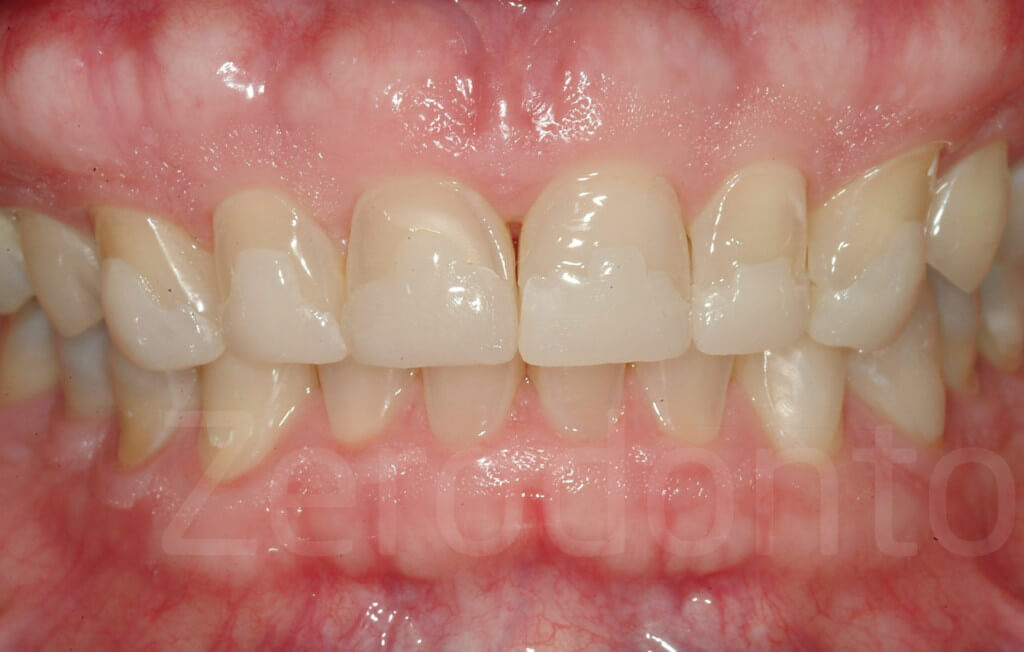
Fig 167-168: Composite palatal veneer try-in.
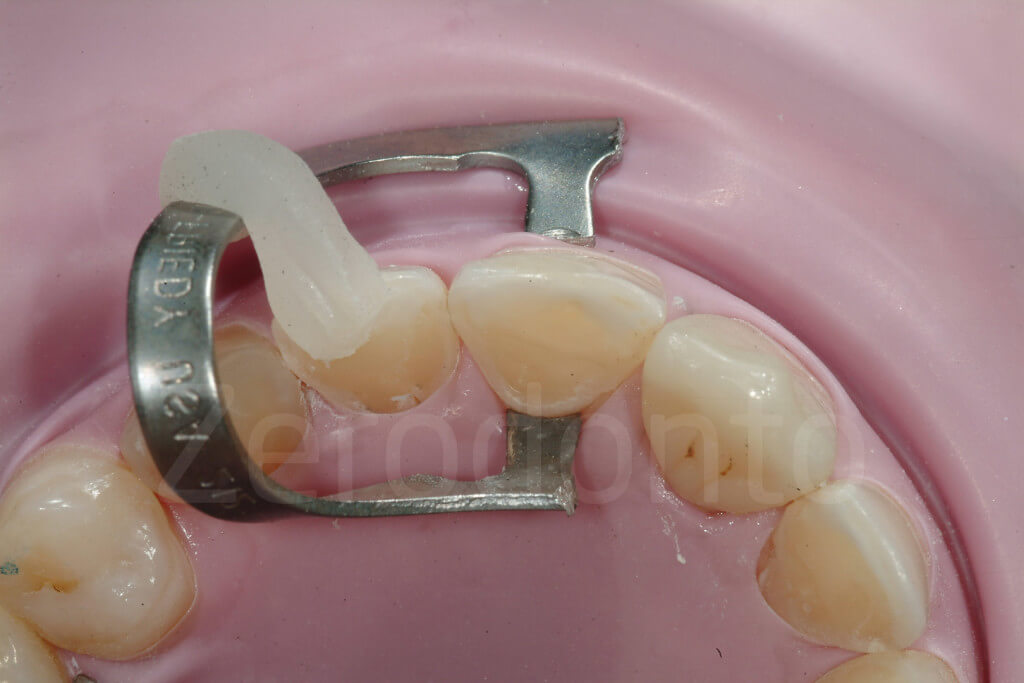
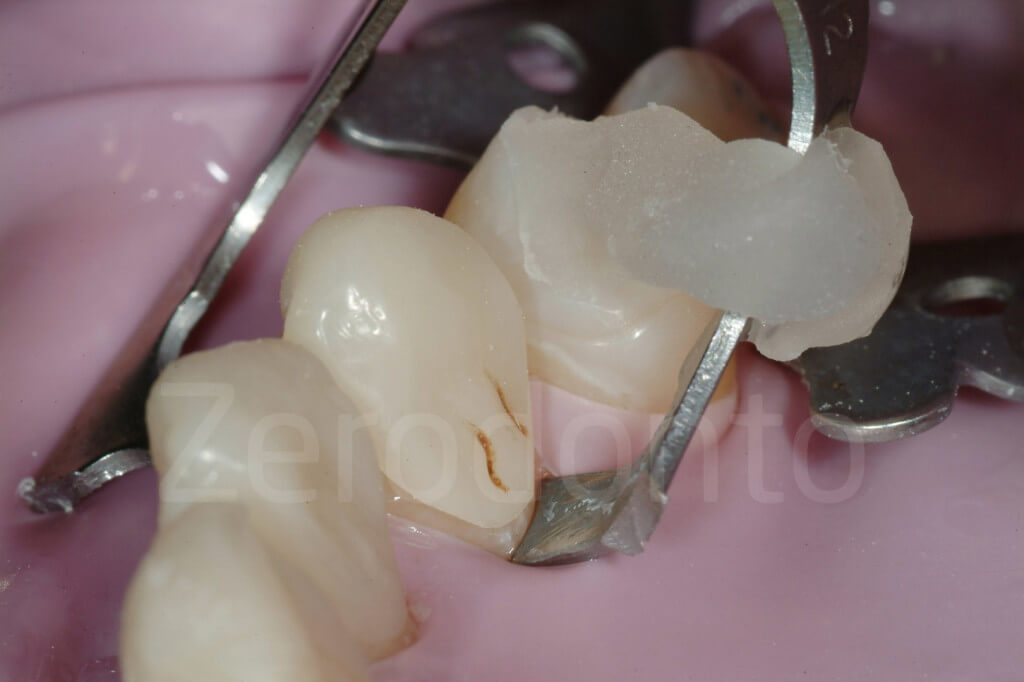
Fig 169-170: Bonding of the composite palatal veneers
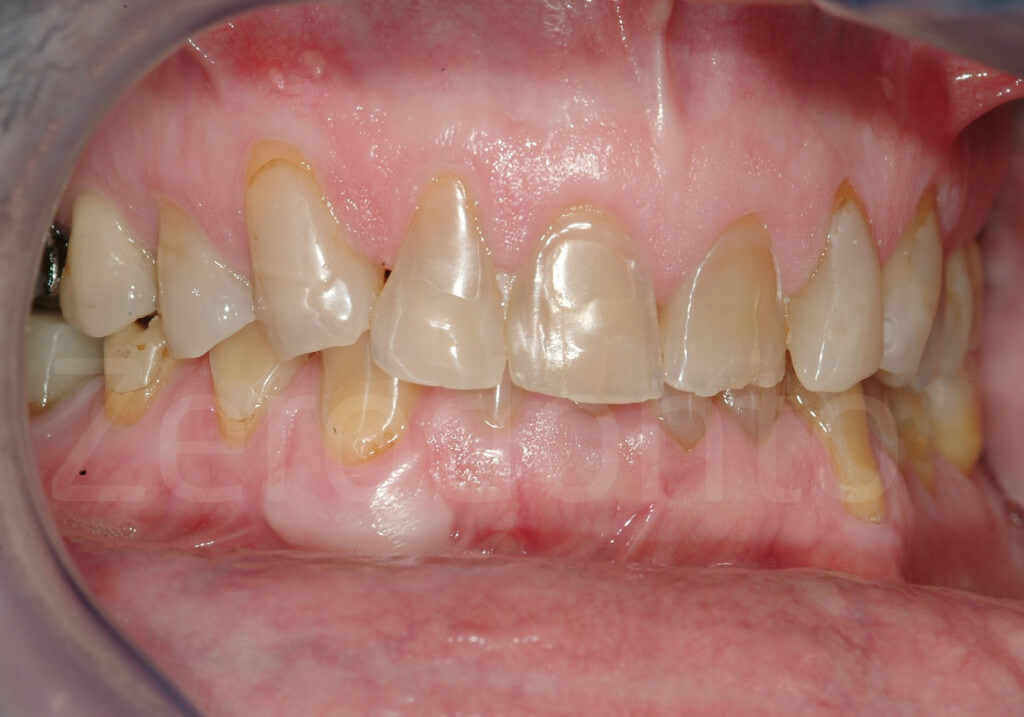
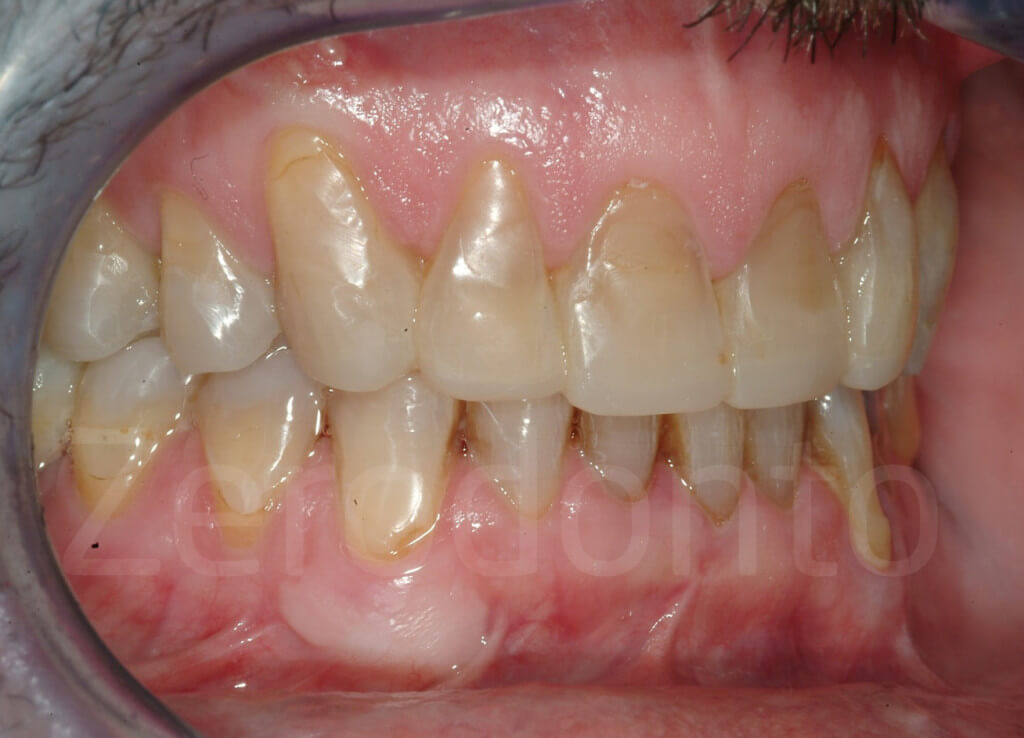
Fig 171-172: Initial status and after the completion of the 3-STEP technique. The patient is ready for the facial ceramic veneers.
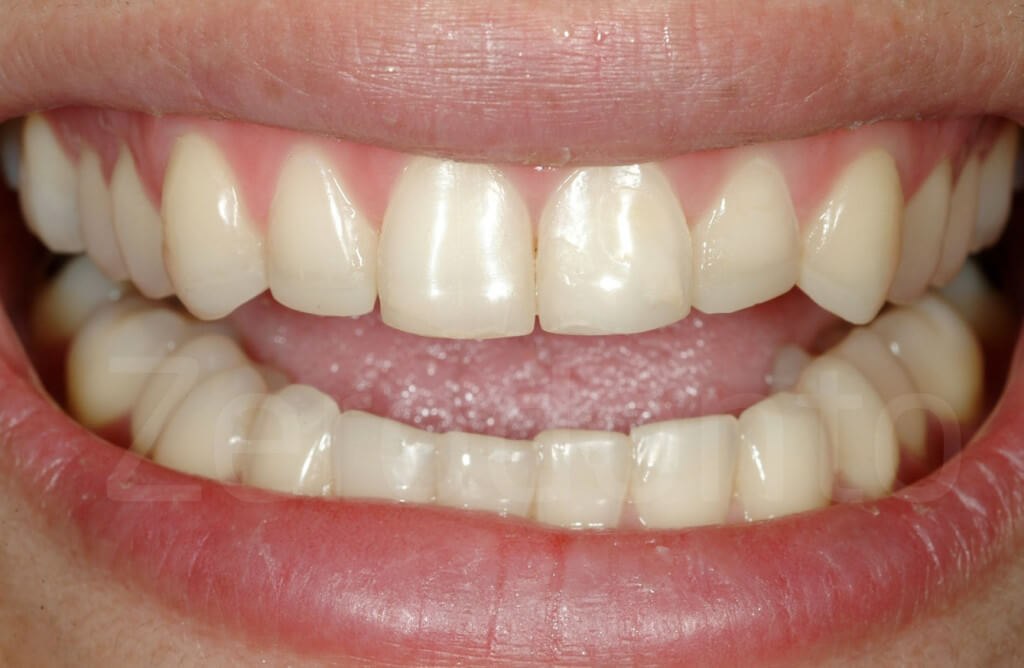
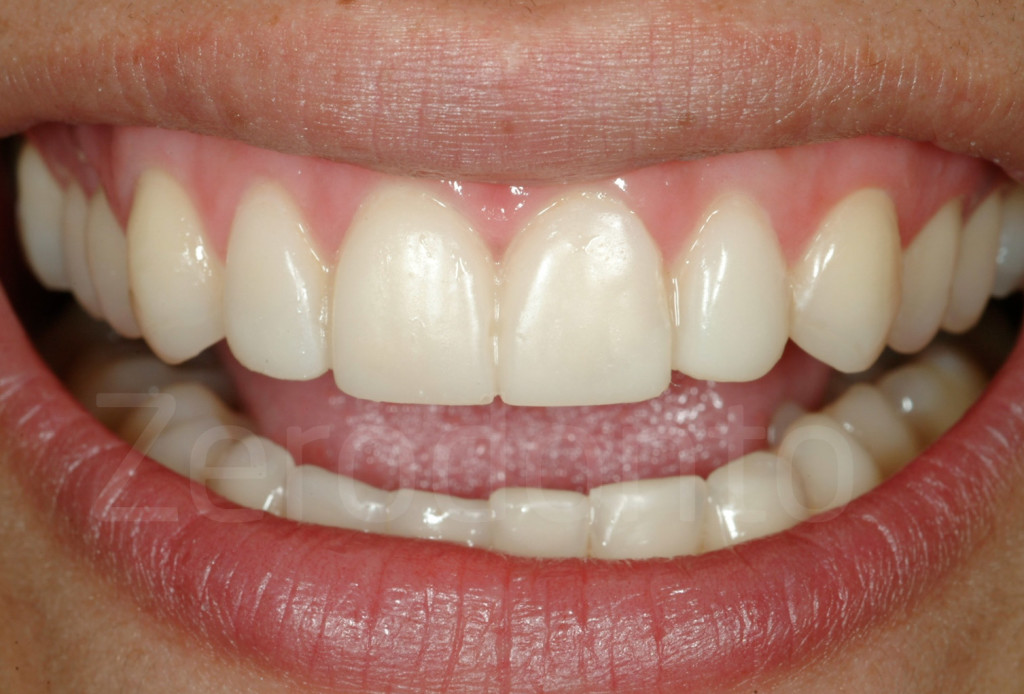
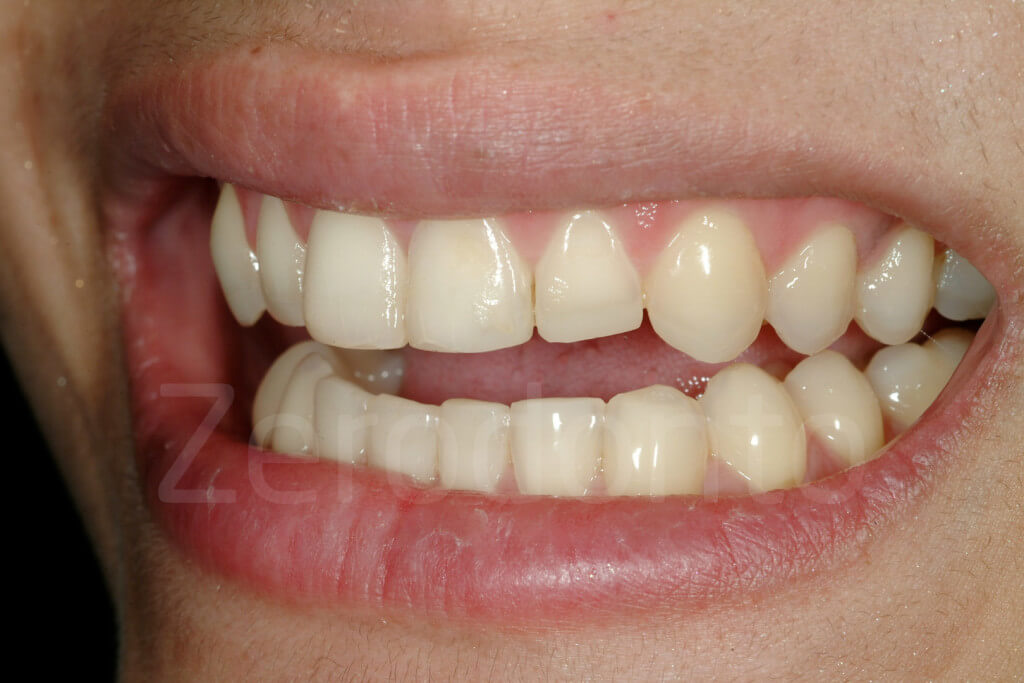
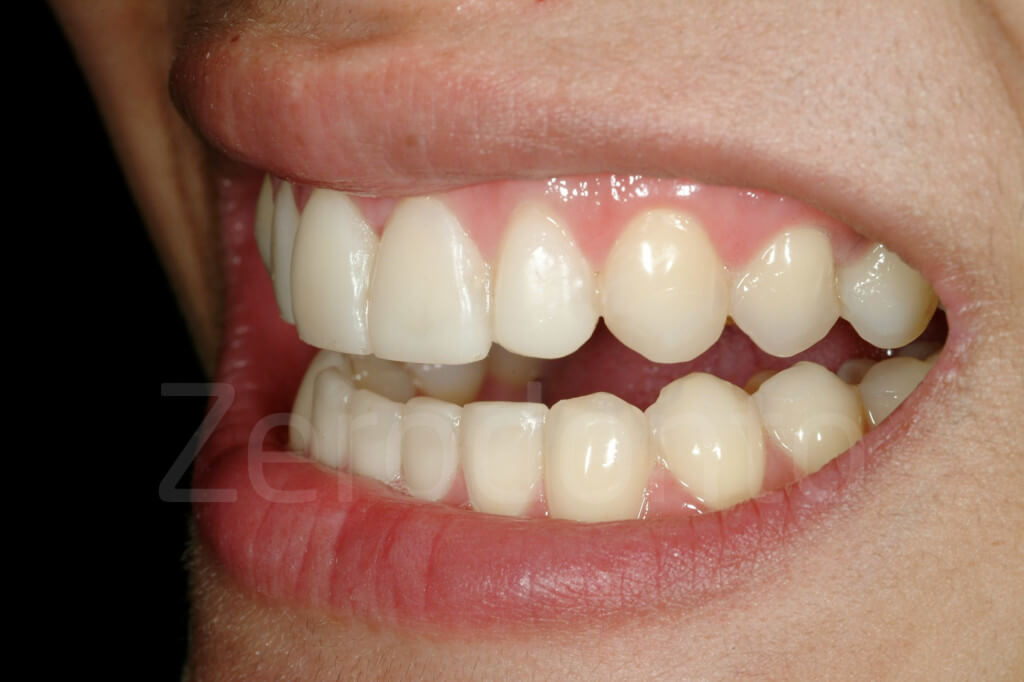
Fig 173-176: After the 3-STEP the esthetic could be not so perfect. The patient is scheduled for a mock-up to evaluate the shape of the future facial veneers.
Facial aspect: ceramic veneers
The restoration of the palatal aspect of the maxillary anterior teeth concludes the 3-STEP technique. At this stage, each patient has reached completely stable occlusal conditions (in the anterior and posterior quadrants) so the clinician can decide, without pressure, on the pace to adopt for the completion of therapy and on the type of restorations. Generally, the mandibular anterior teeth only need minor treatment and can, in most instances, be restored with direct resin composites.
Before replacing the posterior provision- al resin composite restorations with ceramic or resin composite onlays, it is preferable to complete the restoration of the facial aspect of the maxillary anterior teeth.
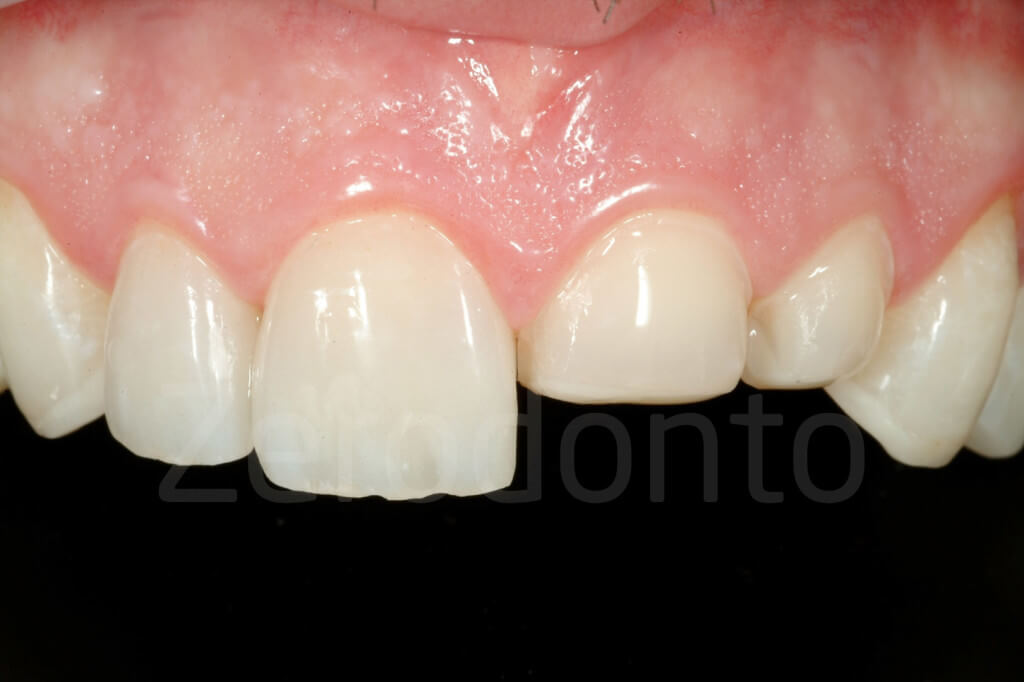
Fig 177: Facial veneer try in.
A second mock-up of the six maxillary anterior teeth (and sometime including the facial aspect of the premolars) is recommended.
While waxing up, the technician should be guided by the maxillary vestibular mock-up done at the beginning of the 3-STEP technique, and adapt it to the new occlusion of the patient.
As the position of the occlusal plane and the increase of VDO may be slightly different from what was initially planned, the length of the maxillary anterior teeth should be reconfirmed during the second mock-up session.
If the patient’s consensus on the final shape of the maxillary anterior teeth is obtained, another two silicone indexes are fabricated based on the wax up, to guide the clinician during veneer preparation (reduction keys).
The veneer preparation follows standard protocols developed and described in detail by other authors.
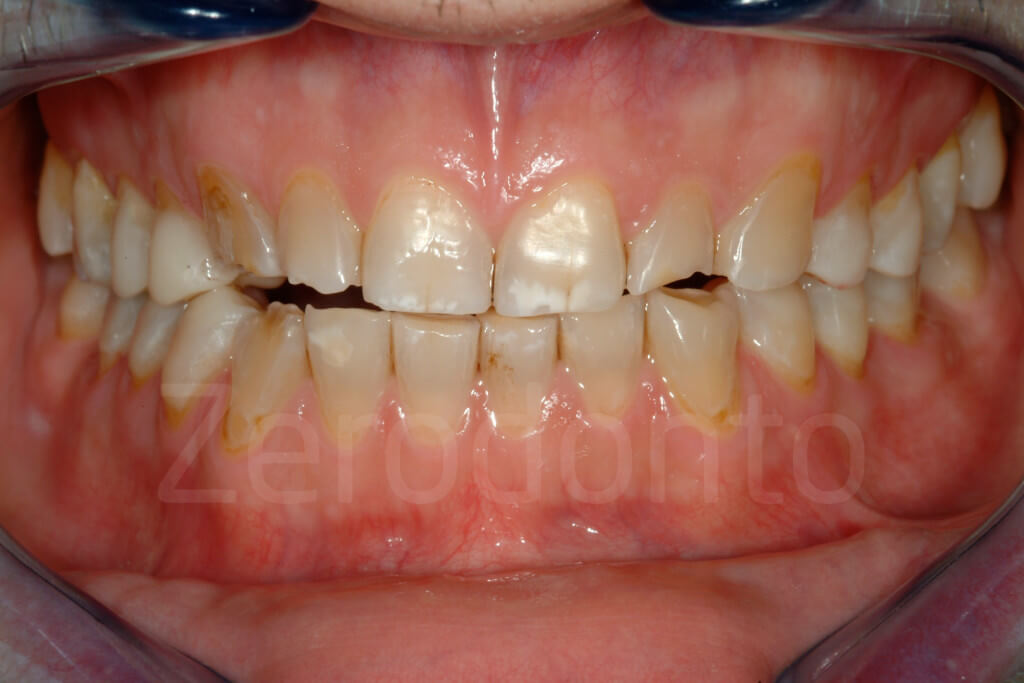
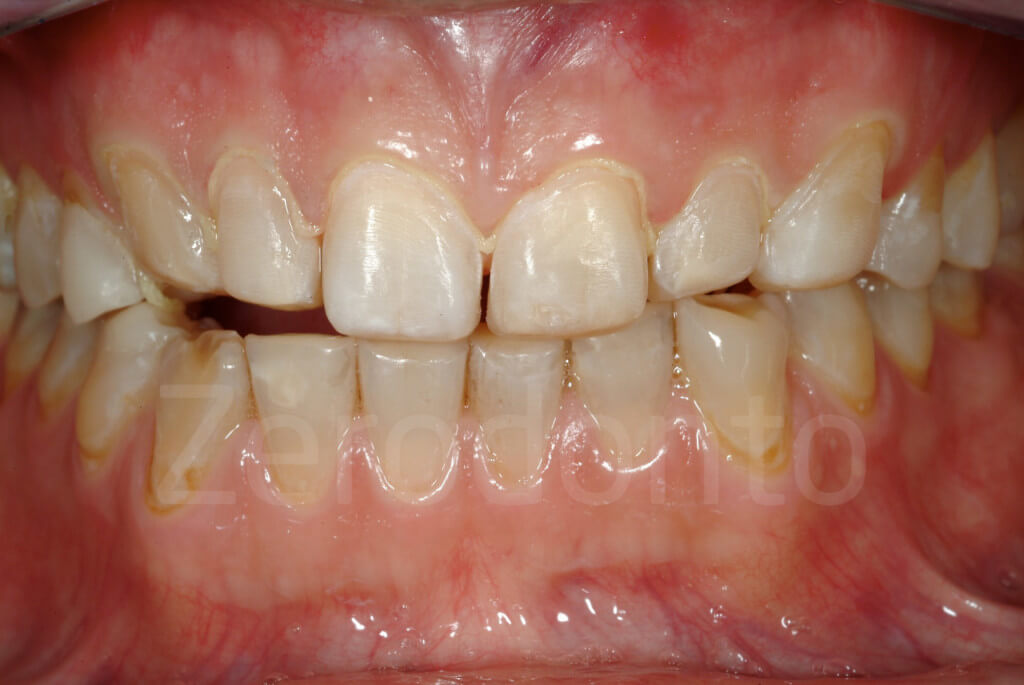
Fig 178-179: Minimally invasive facial veneer preparation after the patient was restored with a 3-STEP. The posterior quadrant are still restored with provisional composite, which will be replaced after the delivering of the facial veneers.
The only difference between this novel concept and a more traditional veneer approach is that the palatal aspects of the maxillary anterior teeth are considered as integral part of the respective teeth and no particular effort is made to place the preparation margins for the veneers on tooth structure. In addition, the described concept comprises an incisal coverage in form of a butt joint, with the ceramic veneer margin placed in the volume of the palatal resin composite veneers
In a situation where the incisal length of the maxillary anterior teeth is severely reduced and the respective tooth volume has been subsequently reestablished by means of palatal veneers, the decision has to be made whether or not to remove the entire length added with the resin composite or to leave part of it before restoring the teeth with the facial veneers.

Fig 180: To restore a tooth with the second facial veneer, there are two choices, total or partial removal related to the desire to leave the contact point on the palatal veneer or on the facial one
After bonding of the maxillary anterior veneers, the rehabilitation can progress with the replacement of the posterior provisional resin composites.
In fact, owing to the presence of a functional anterior guidance and optimized posterior support, the full-mouth rehabilitation can be, from this point on, planned according to a quadrant-wise approach, which simplifies the therapy for both patient and clinician. Based on individual, patient-related criteria, the clinician and the technician can decide at which quadrant to start. Furthermore, having the plane of occlusion established with provisional restorations still allows minor modifications to be made. The vestibular cusps of the posterior provisional resin composites could be lengthened by adding new resin composite, or shortened by grinding.
One of the major advantages of the 3-STEP technique consists of the fact that the opportunity to make modifications is maintained throughout the different treatment phases. Under such conditions it is not a surprise that the final esthetic out- come of this kind of full-mouth rehabilitation is consistently pleasing.
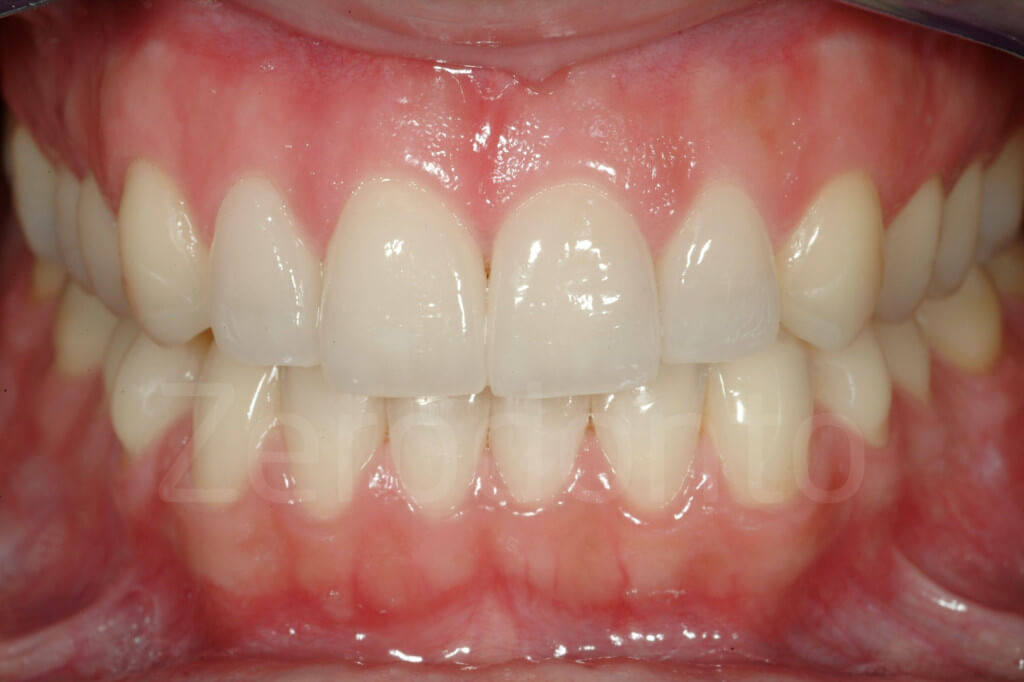
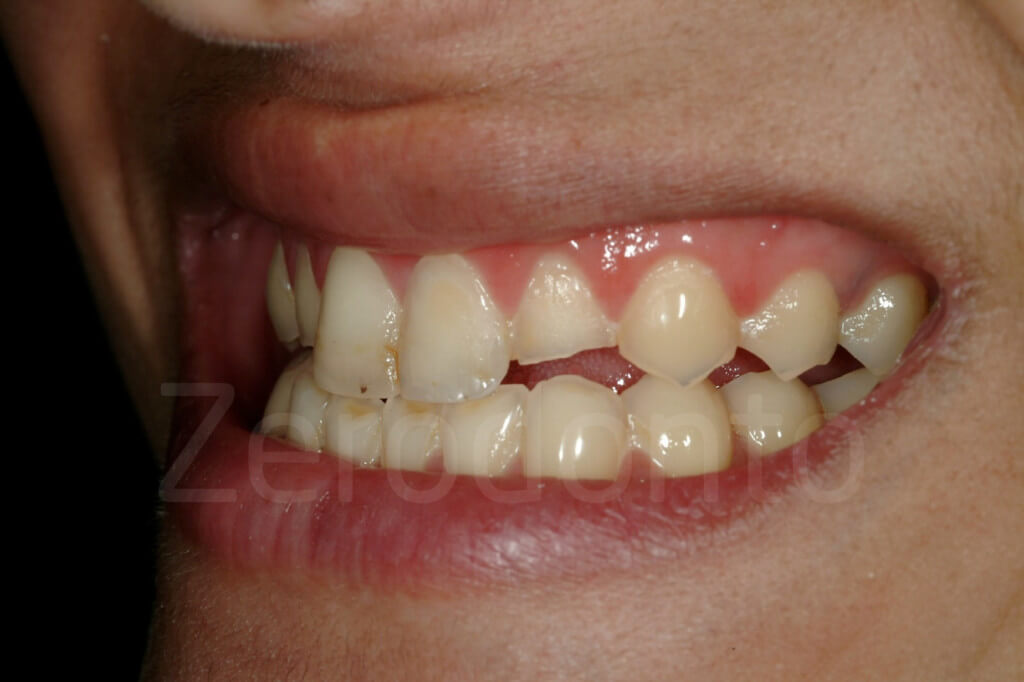
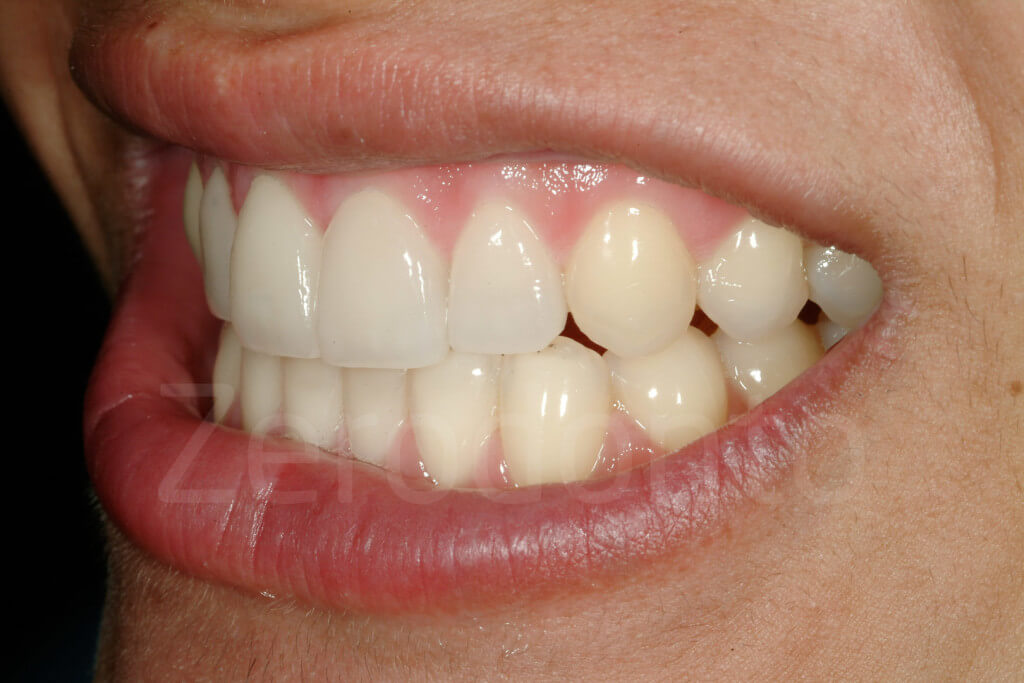
Fig 181: Final additive rehabilitation. Only 4 facial ceramic veneers were delivered.
Conclusions
Dental wear is a frequently underestimated pathology, which affects an increasing number of younger individuals.
Often the advanced tooth destruction is the result, not only of a difficult initial diagnosis (e.g. multifactorial etiology of tooth wear), but also of the lack of a timely intervention.
Traditionally, extensive dental therapies are previewed for these patients, and clinicians often prefer to wait until the tooth tissue loss is more conspicuous before proposing a conventional full-mouth rehabilitation. This hesitation founds its rationale in the aggressiveness of the conventional therapies.
Owing to the described novel and highly conservative approach, the University of Geneva, School of Dental Medicine has become one of the centers of reference especially for patients affected by advanced dental erosion.
In the past few years, a number of patients suffering from severely eroded dentitions have been treated according to this not any longer experimental approach, which basically features minimal tooth preparation and maintenance of tooth vitality.
The new clinical approach (full-mouth ADDITIVE rehabilitation) consists exclusively of posterior onlays and anterior BPRs, and is strategically planned in a way that allows rehabilitating patients quadrant-wise, instead of restoring both dental arches simultaneously
Even though adhesive techniques simplify both the clinical and the laboratory procedures, restoring such compromised dentitions still remains a challenge due to the often advanced amount of tooth destruction. To achieve maximum preservation of tooth structure and the most predictable esthetic and functional outcome, an innovative concept has been developed: the CLASSIC 3-STEP technique.
Three laboratory steps are alternated with three clinical steps, allowing the clinician and the dental technician to constantly interact during the planning and execution of a full-mouth adhesive rehabilitation.
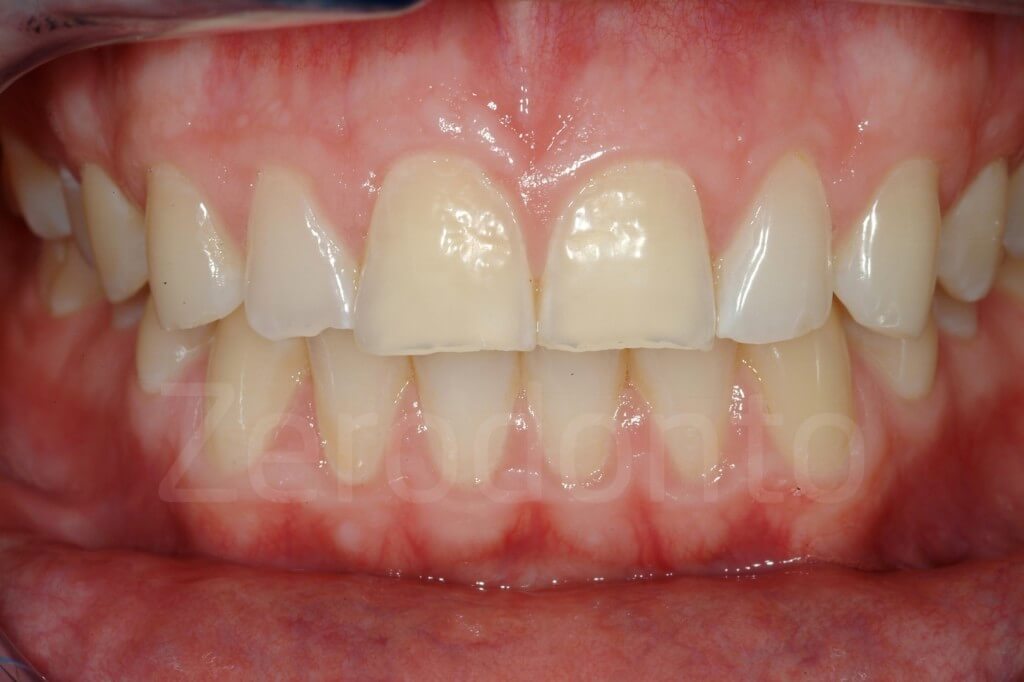
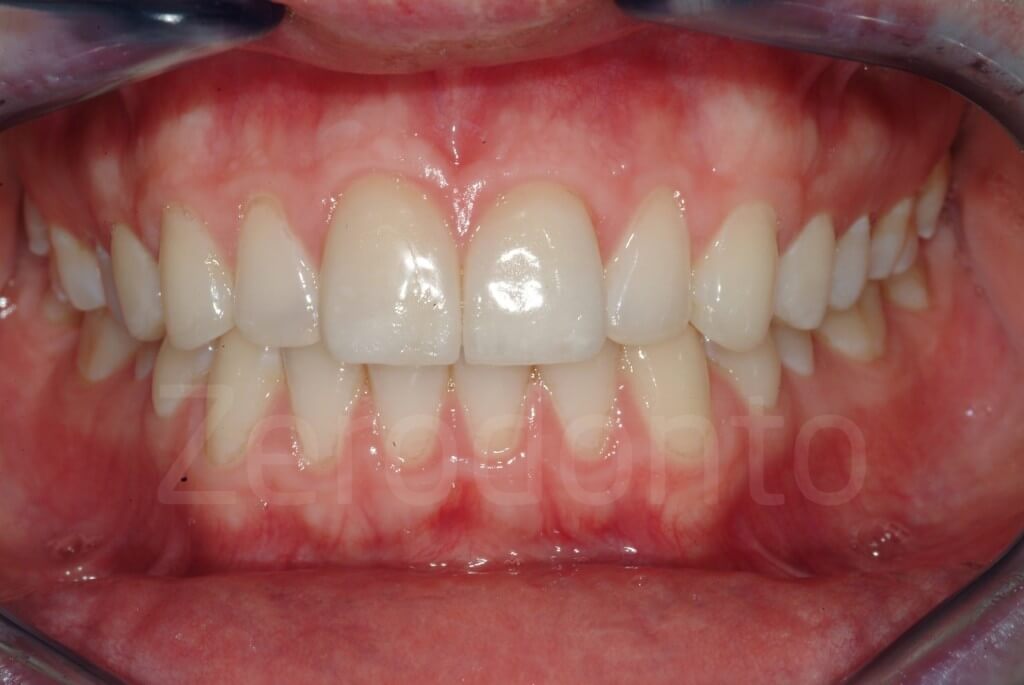
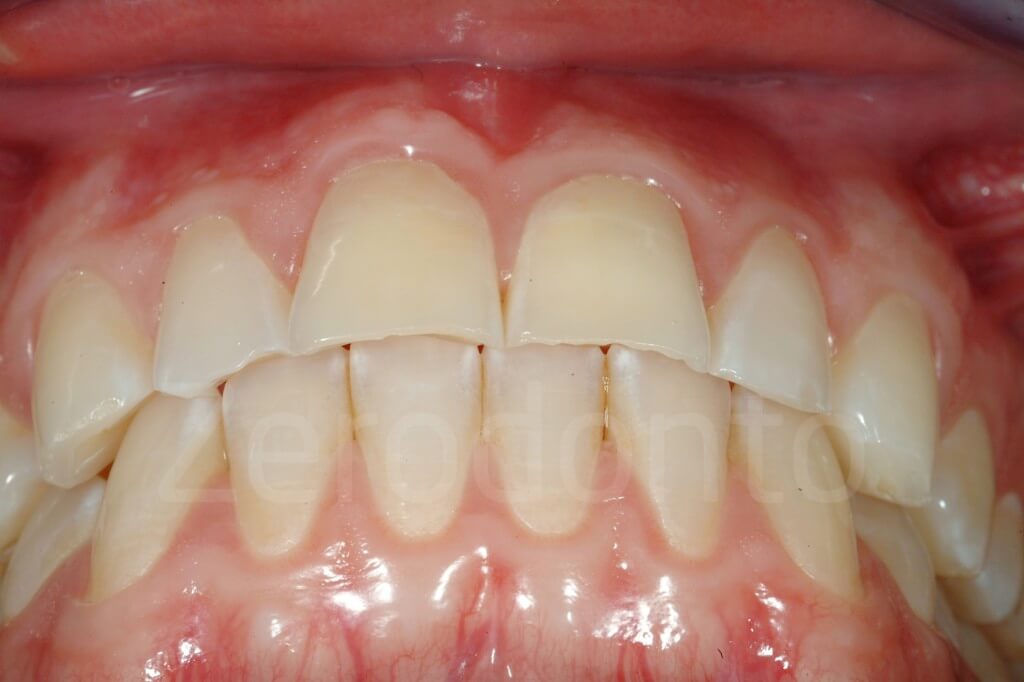
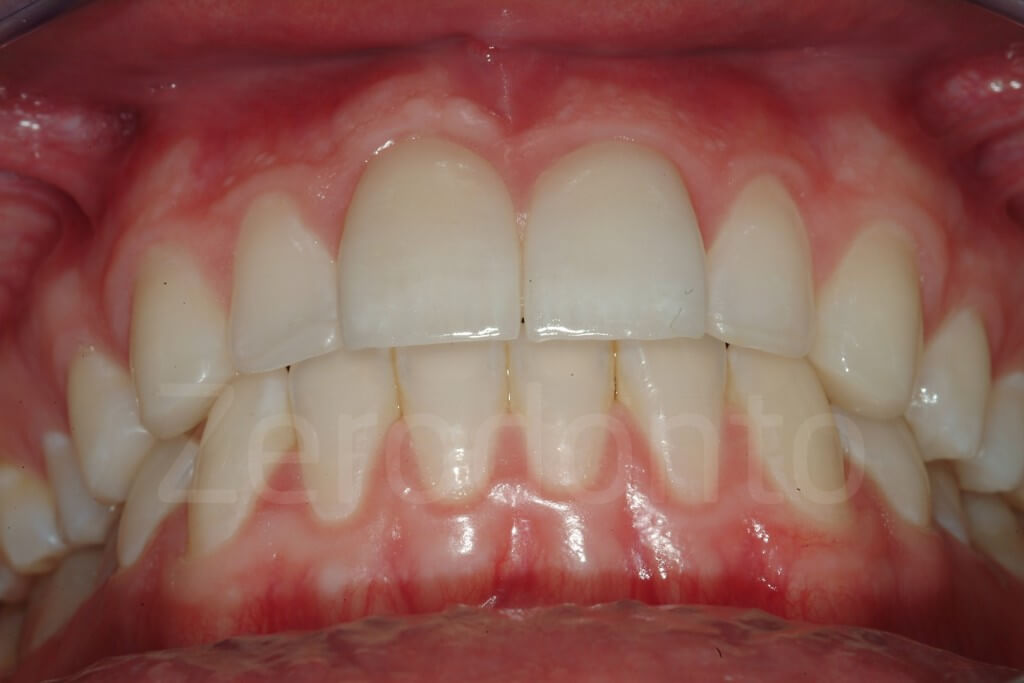
Clinical cases: Before/After
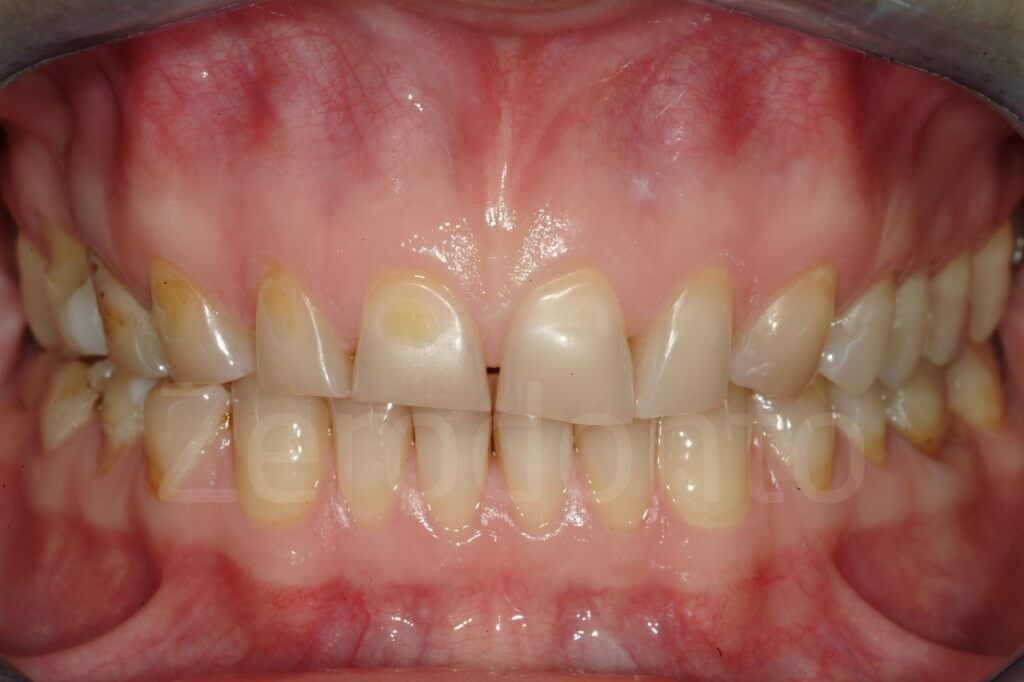
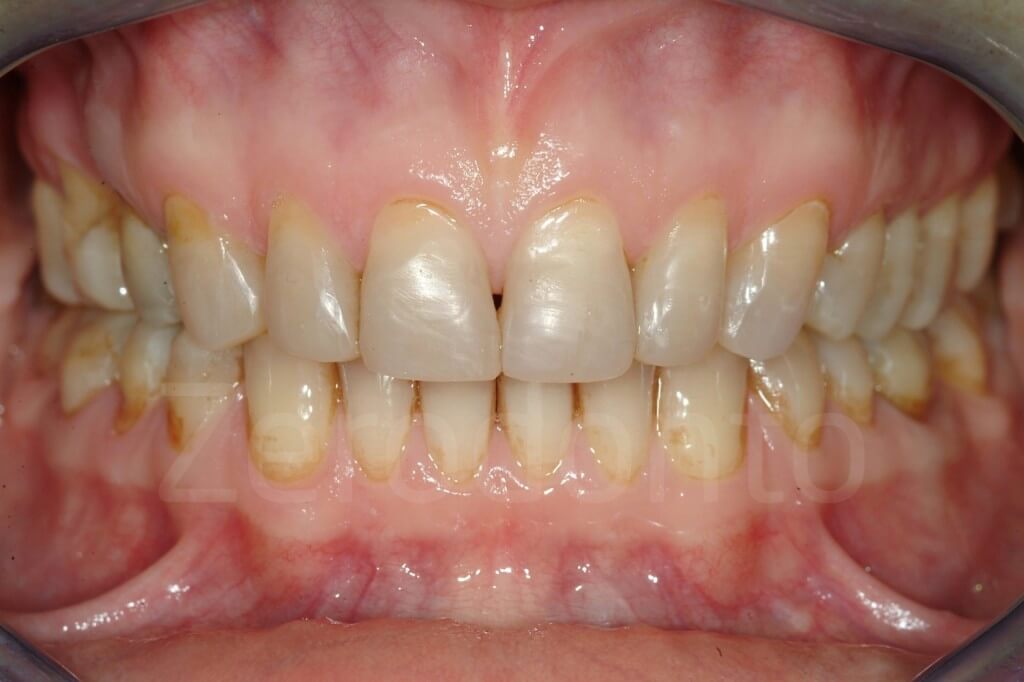
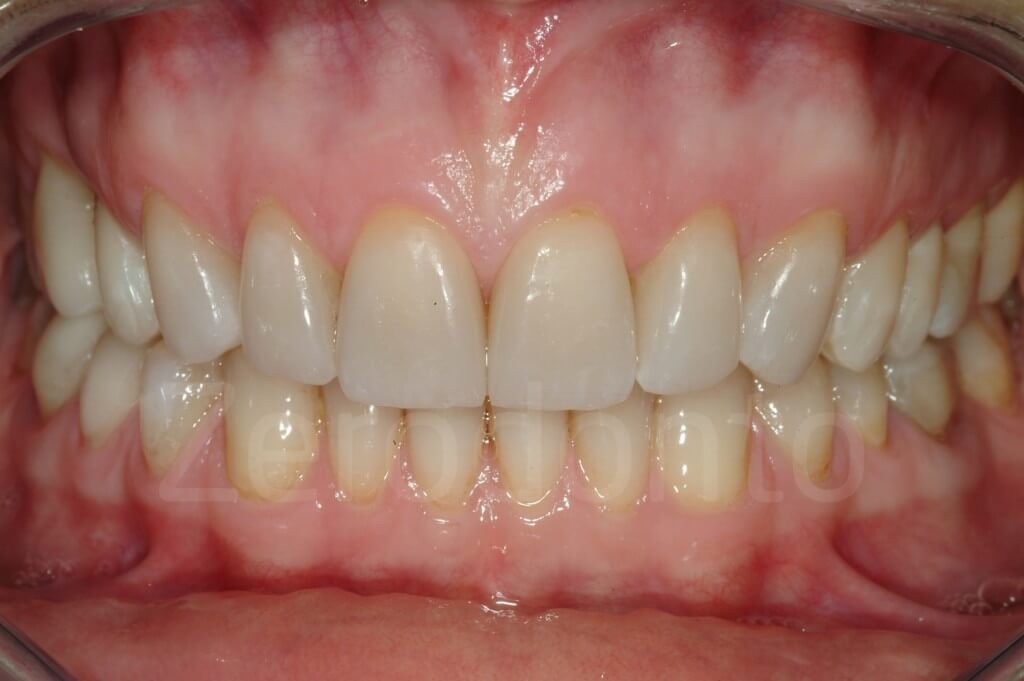
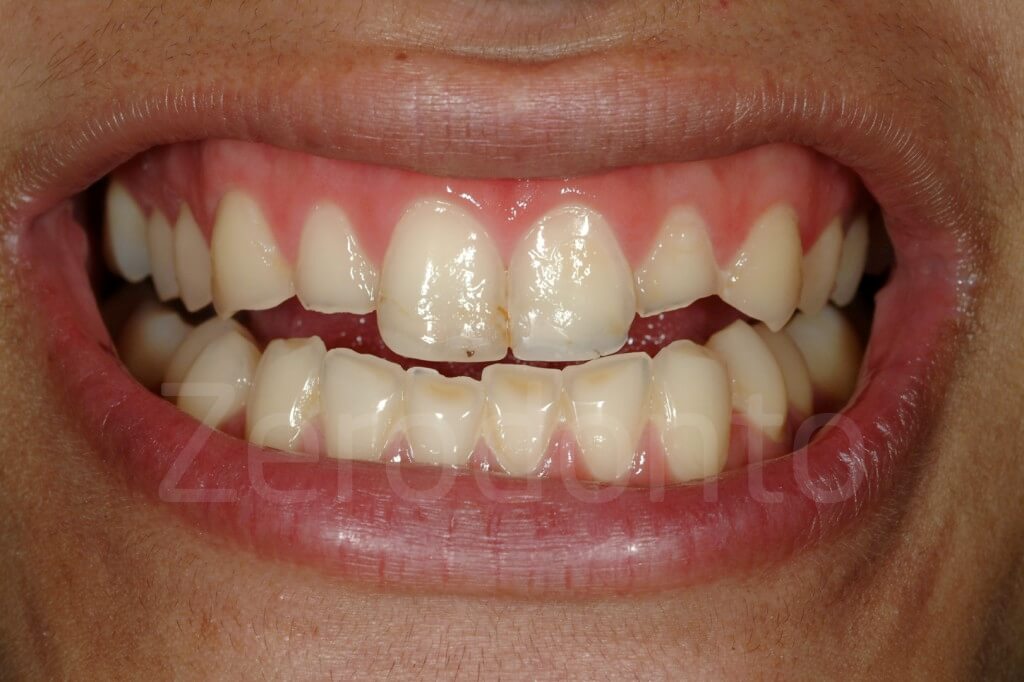
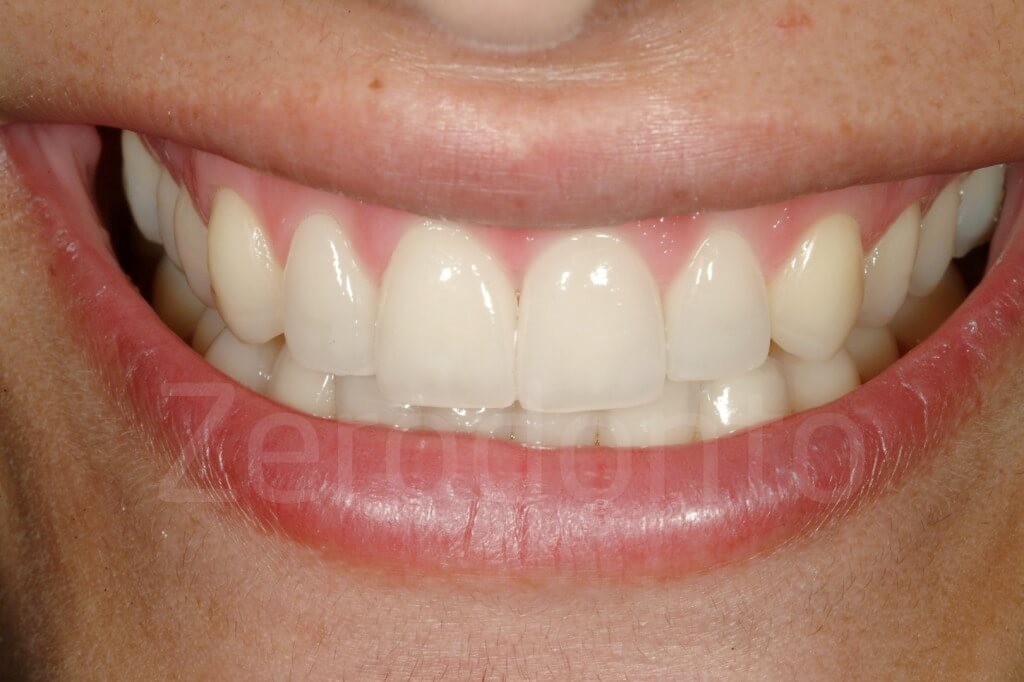


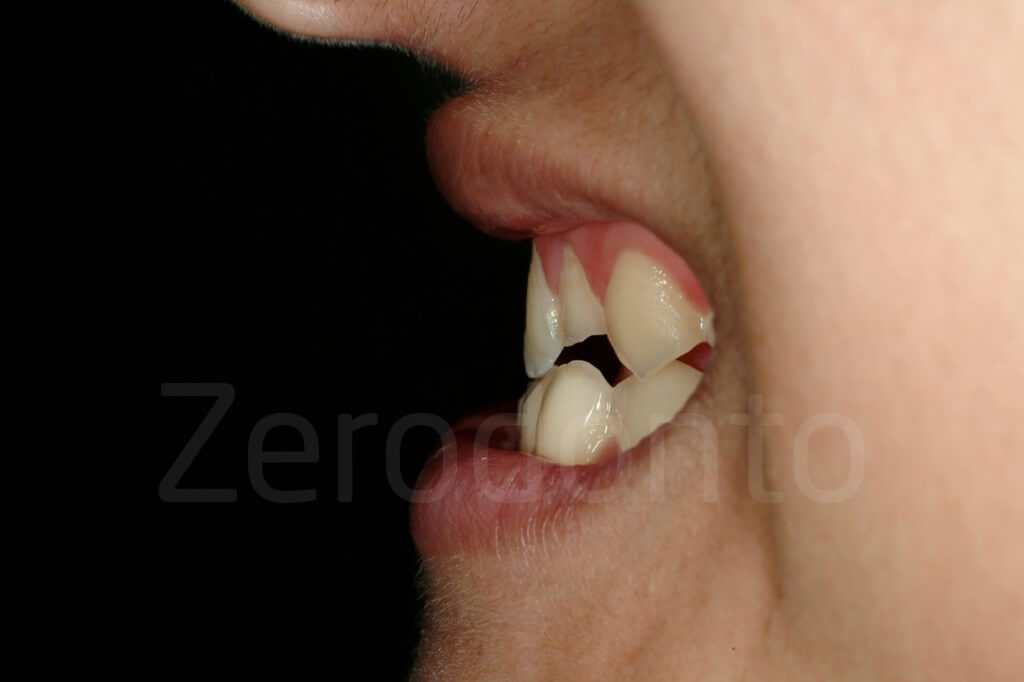
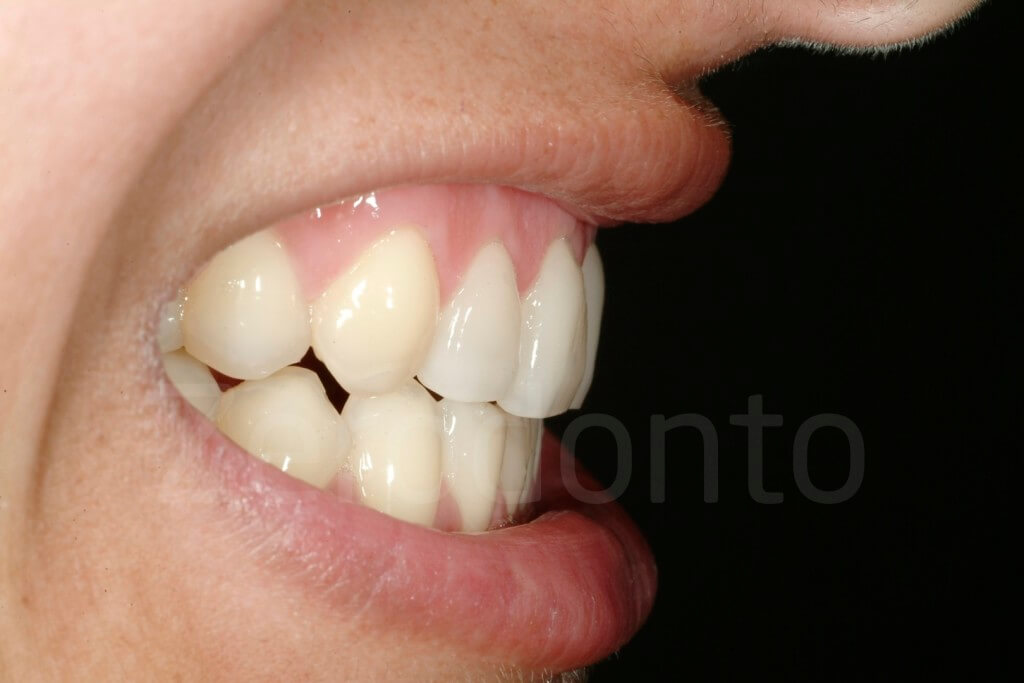
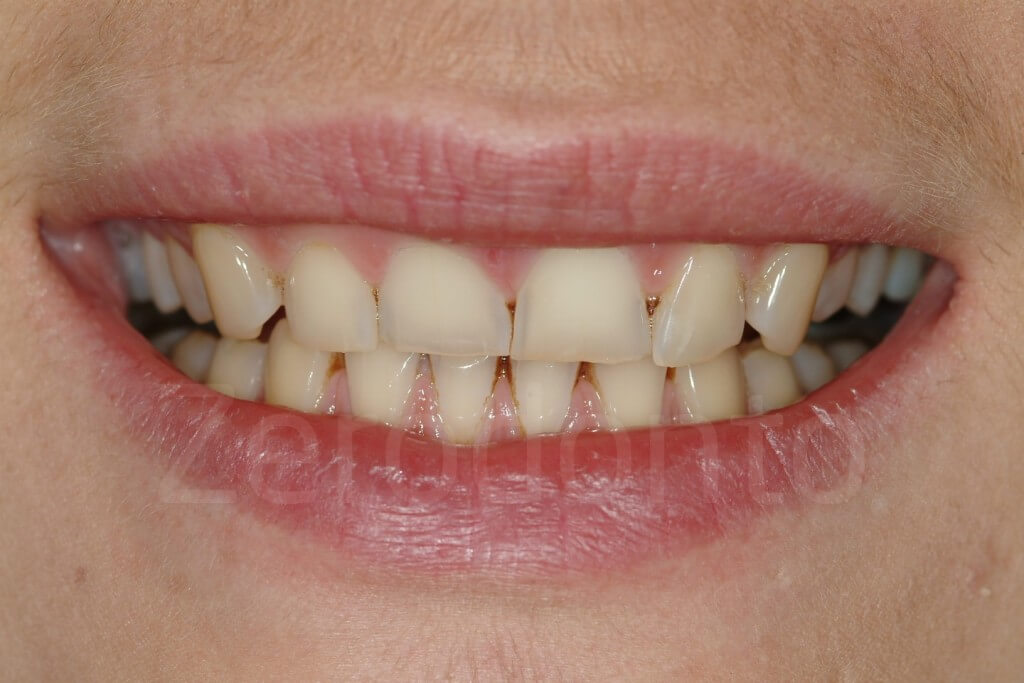
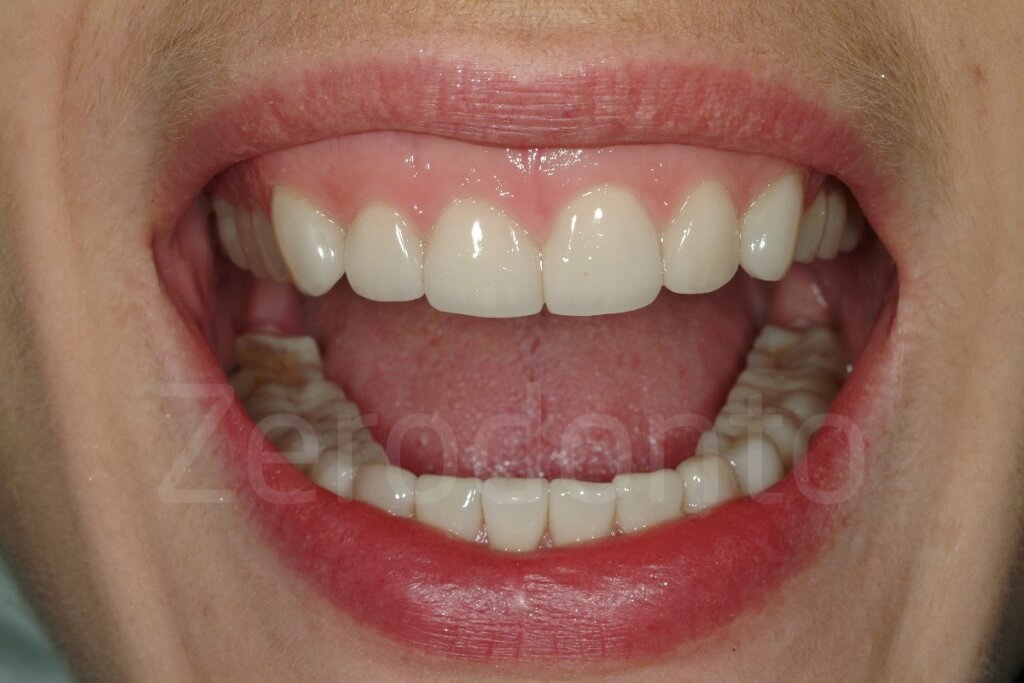
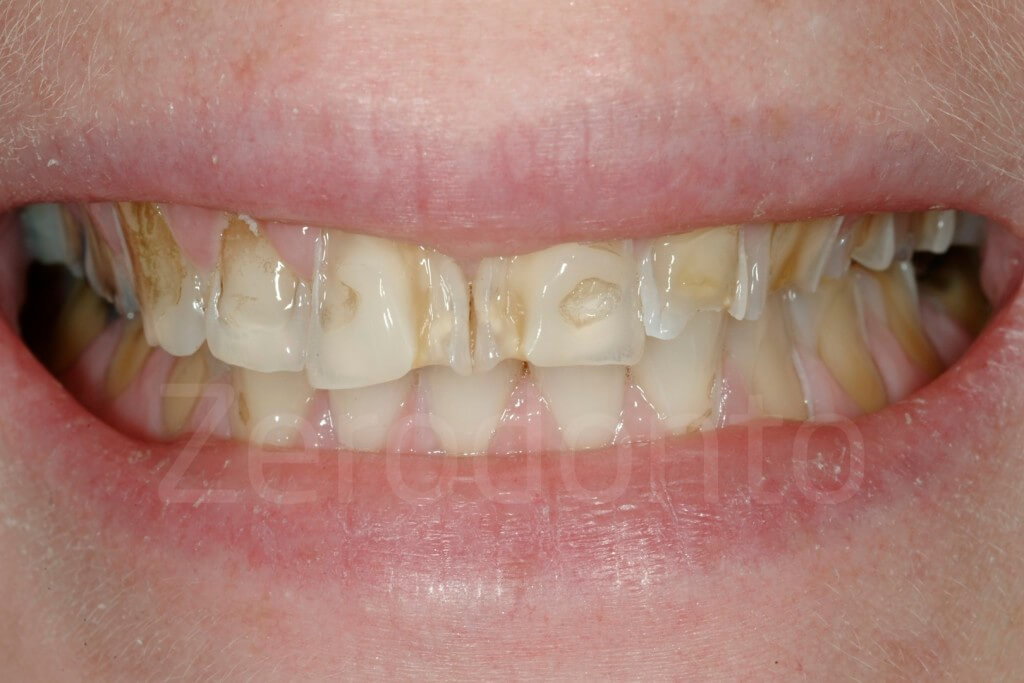
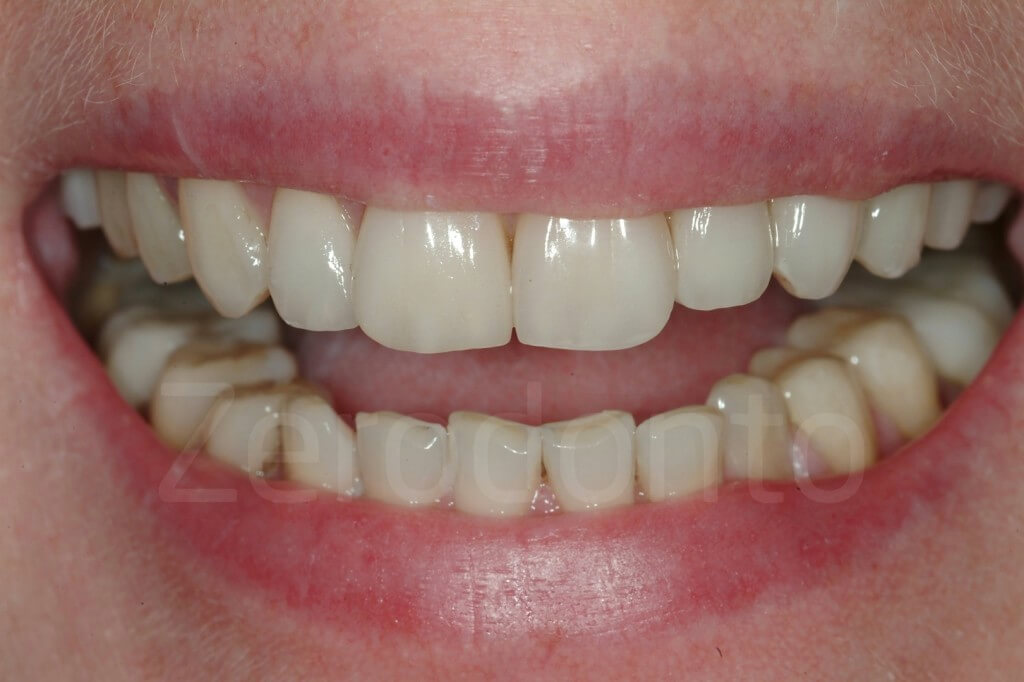
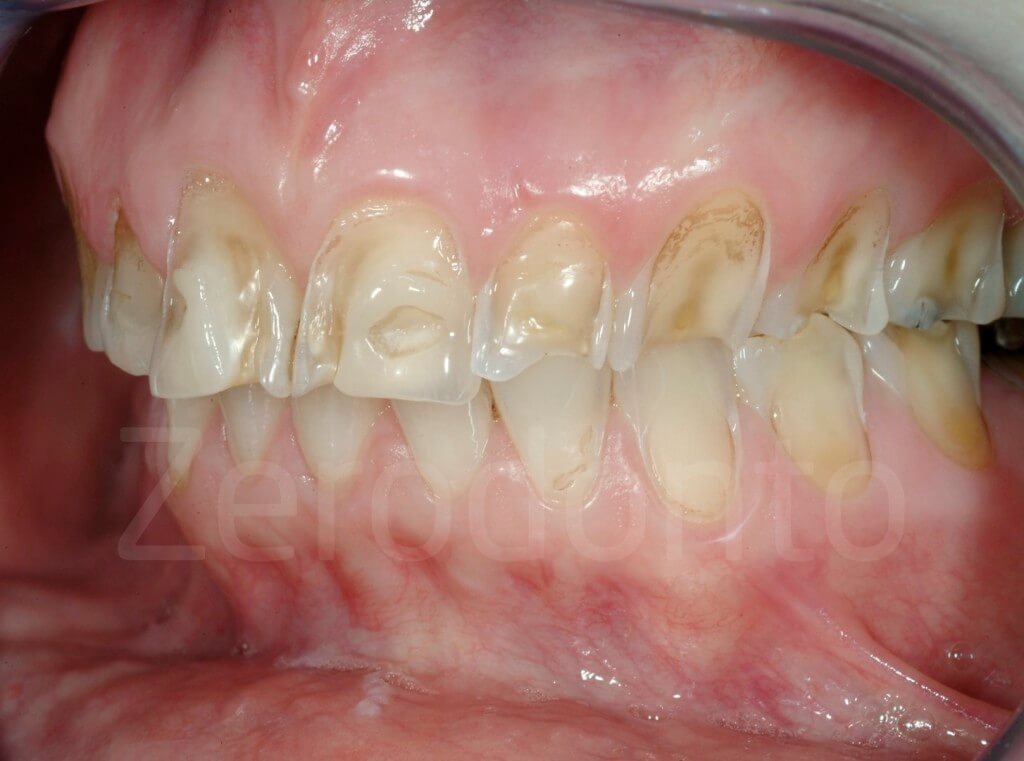
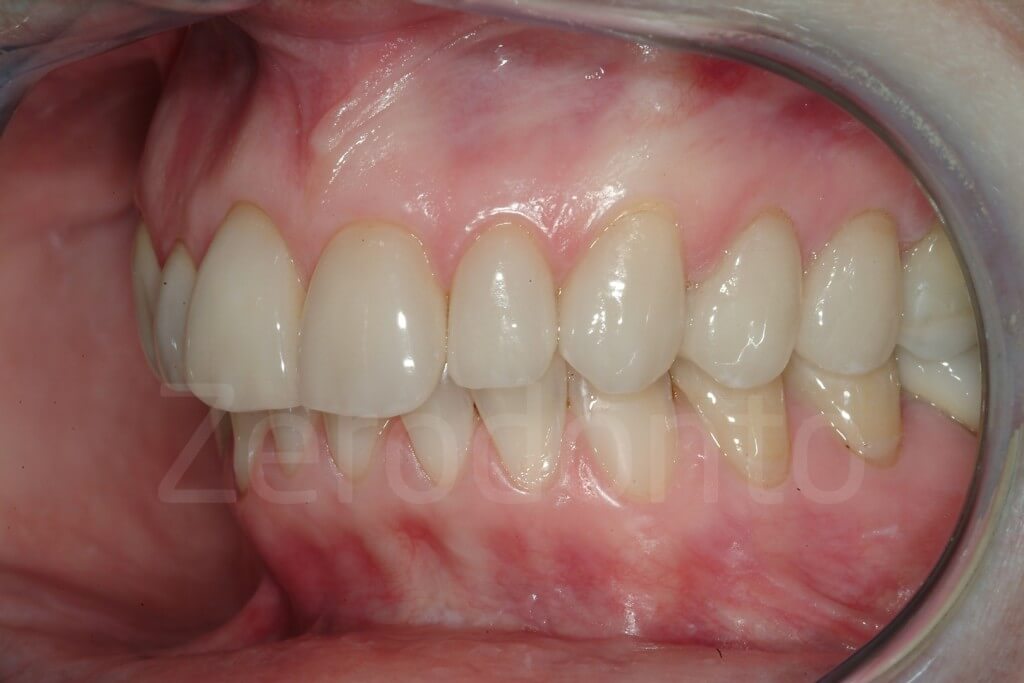
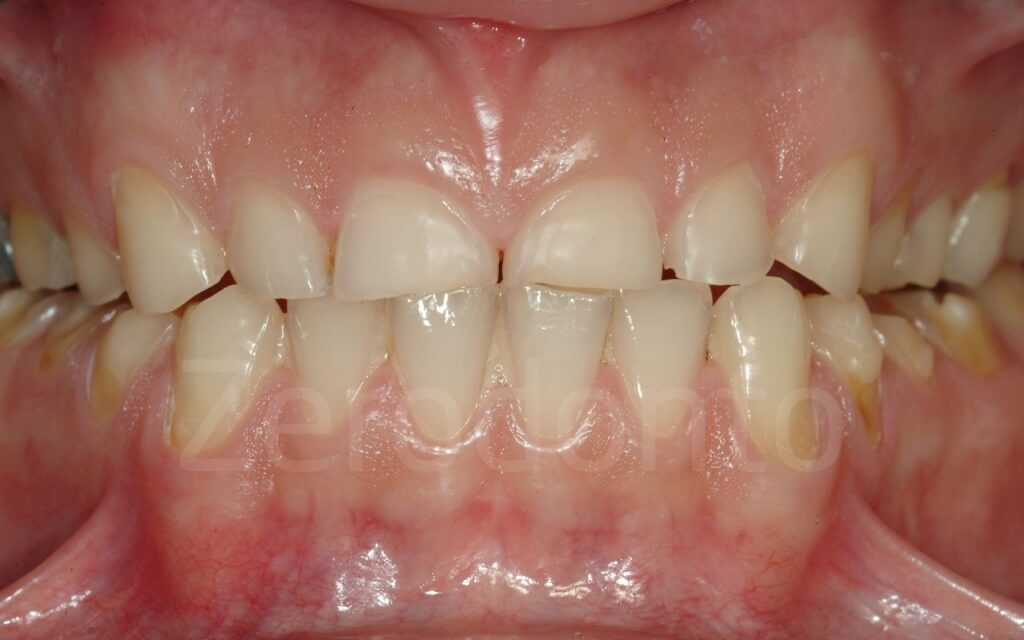
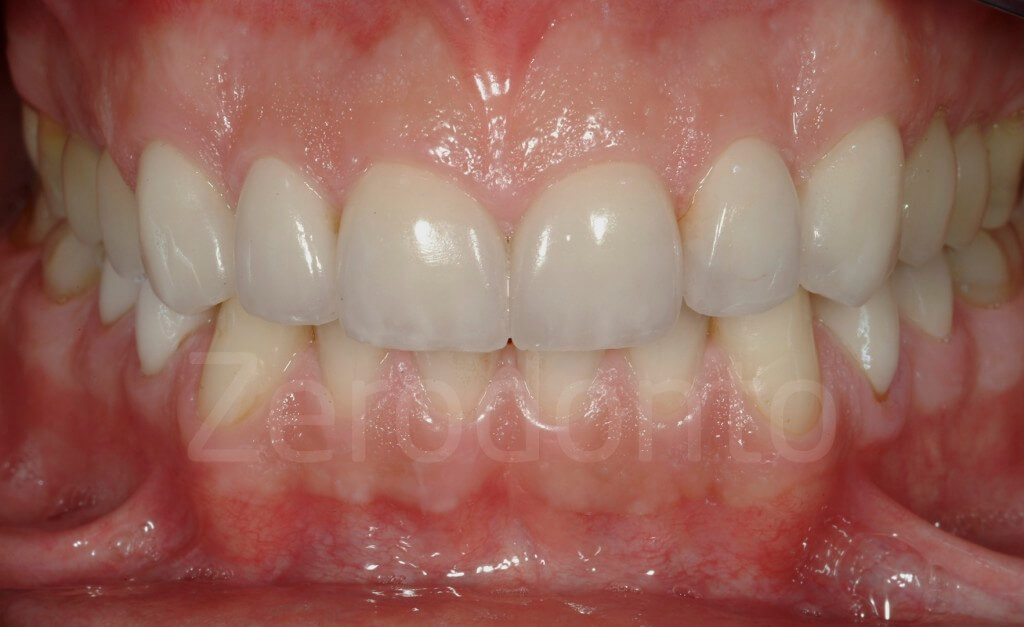
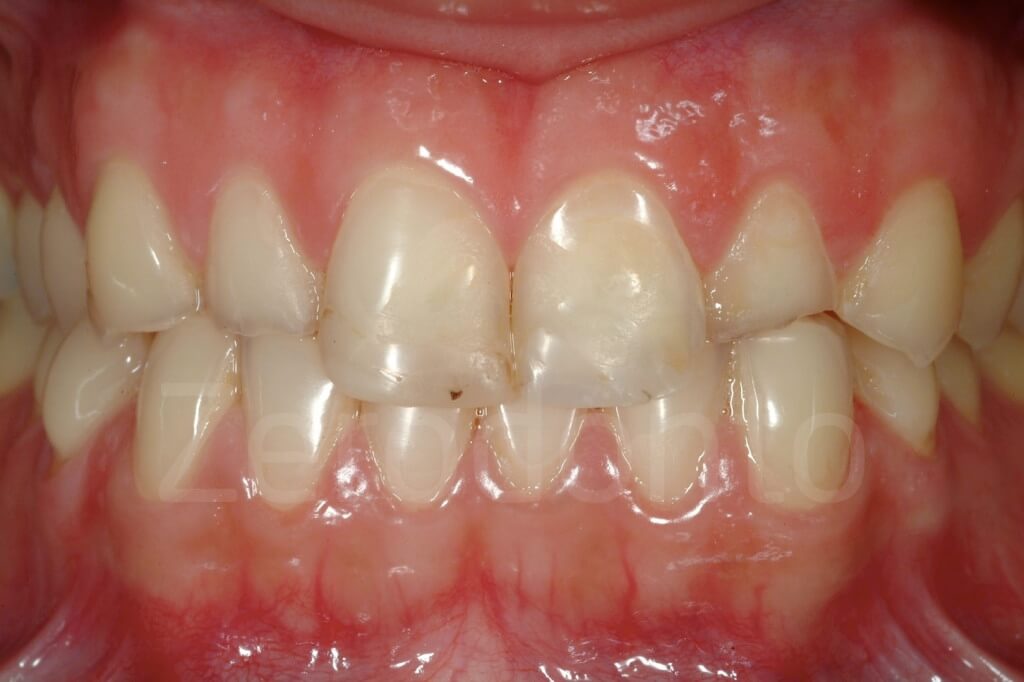
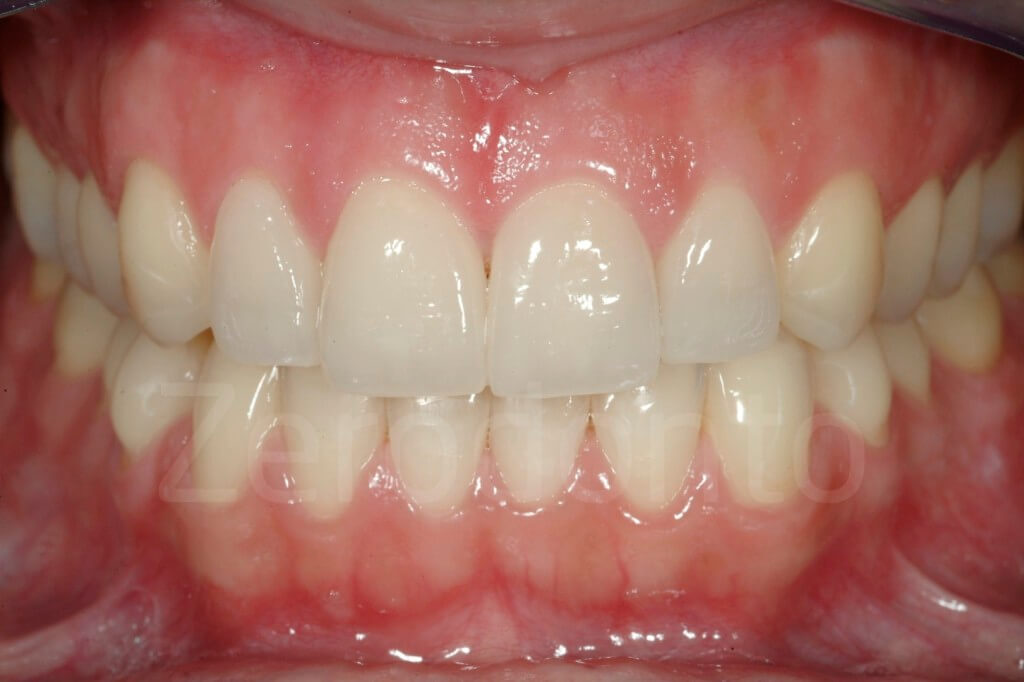
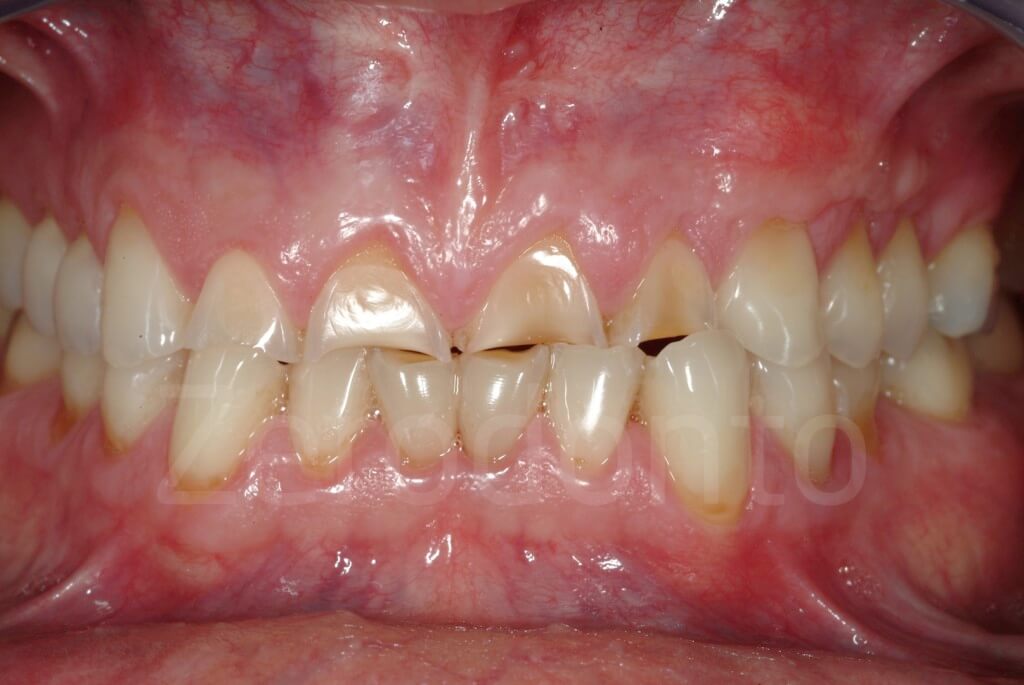
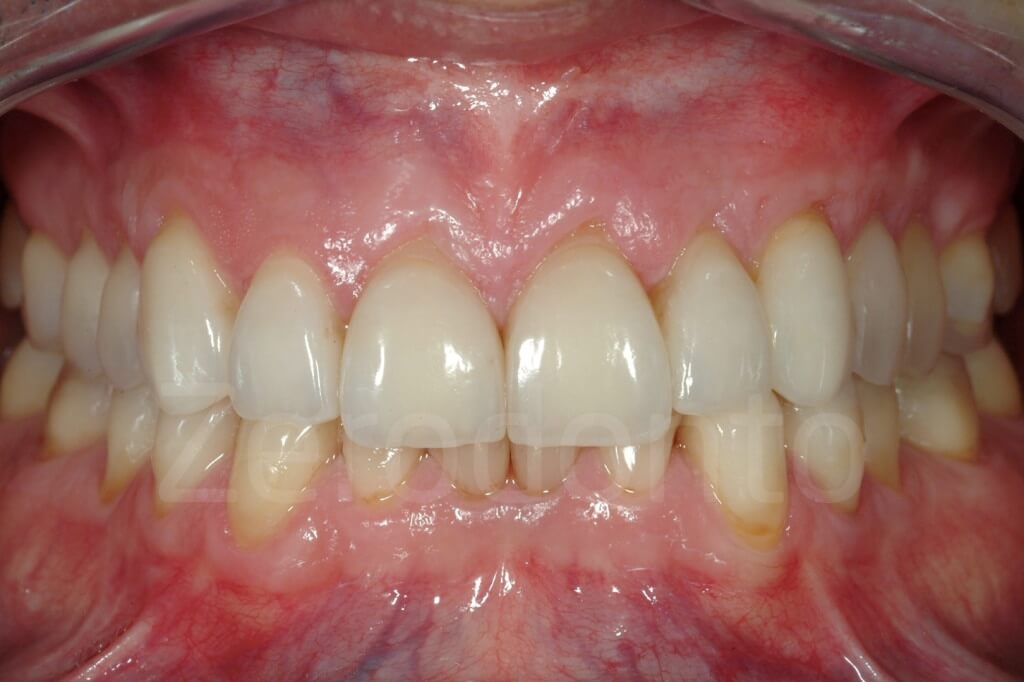
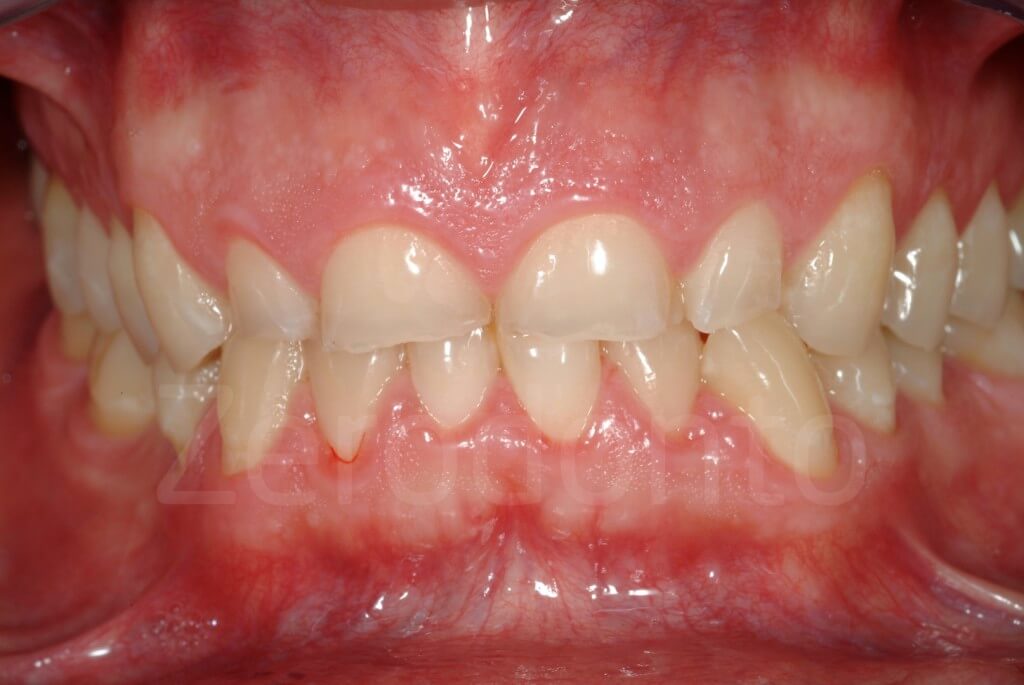
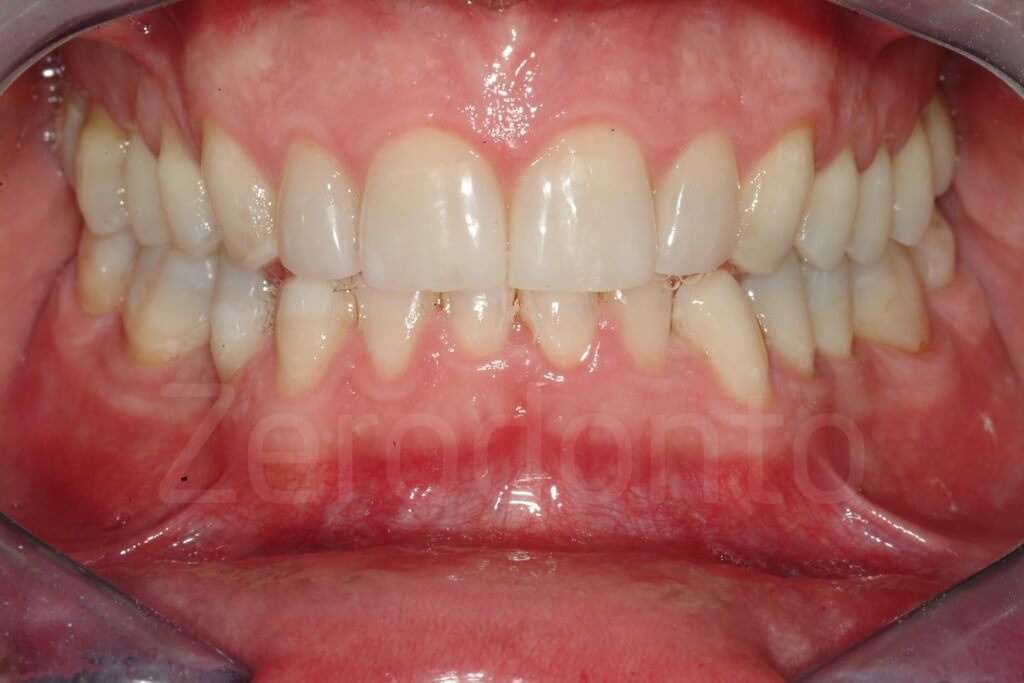
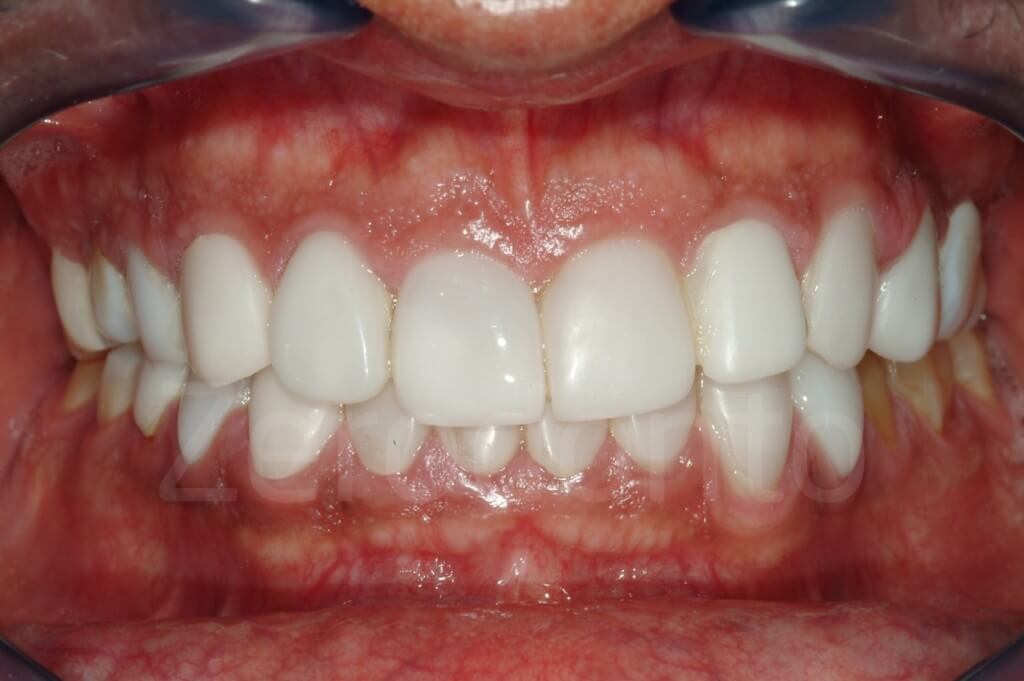

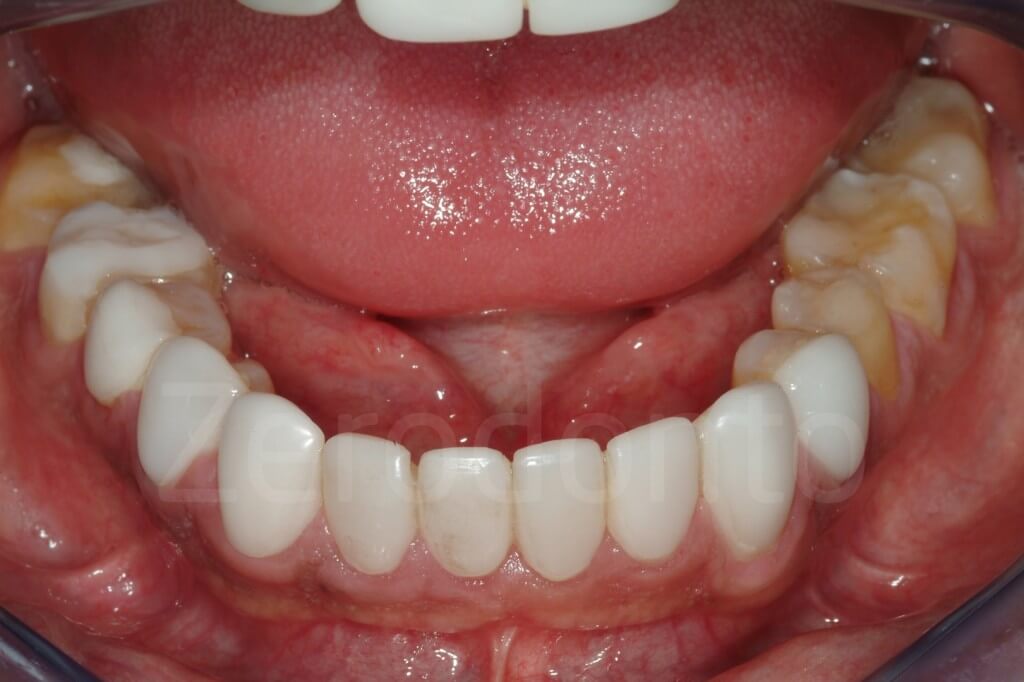
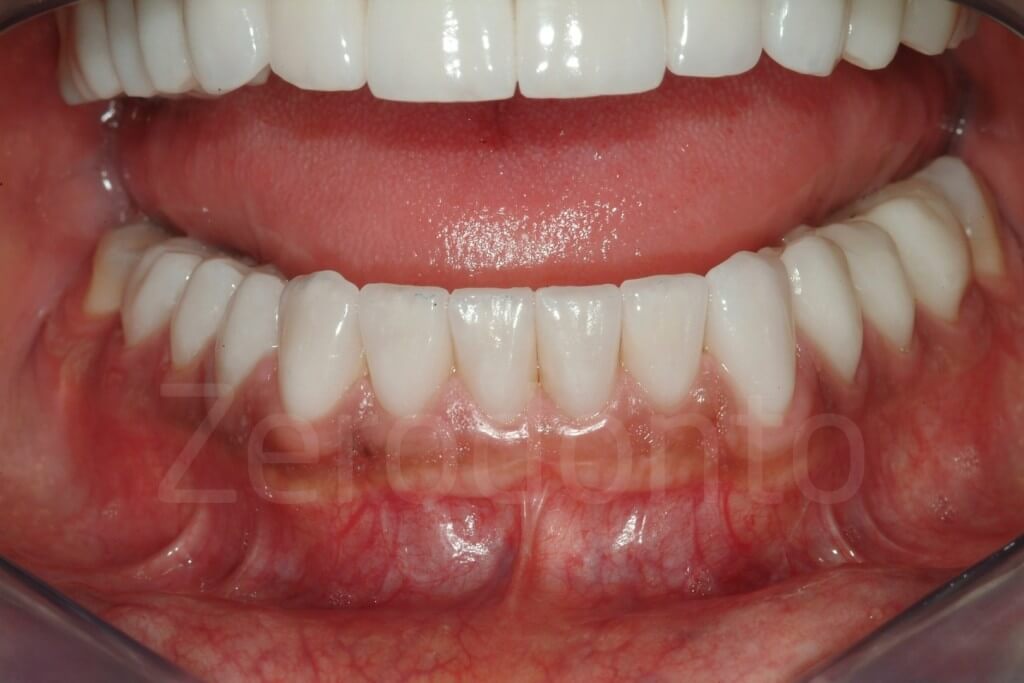
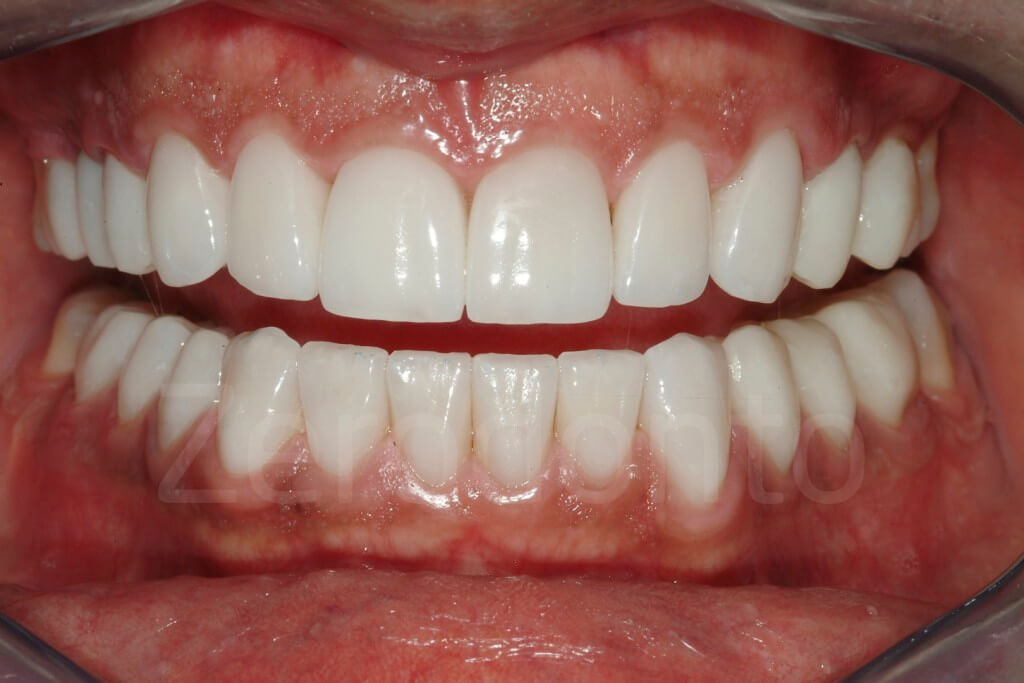
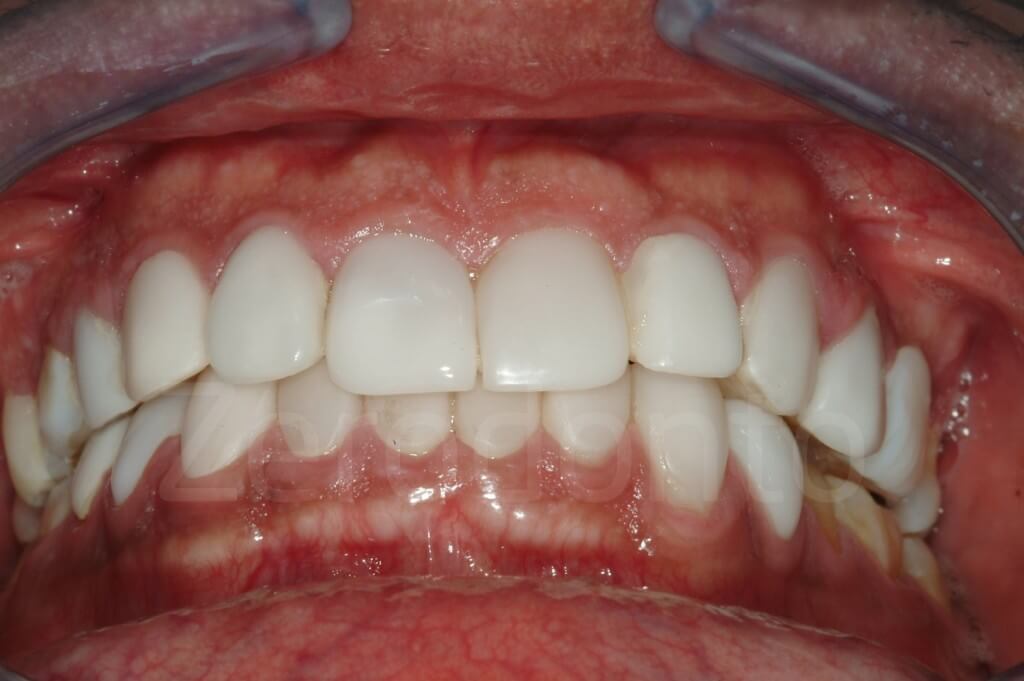
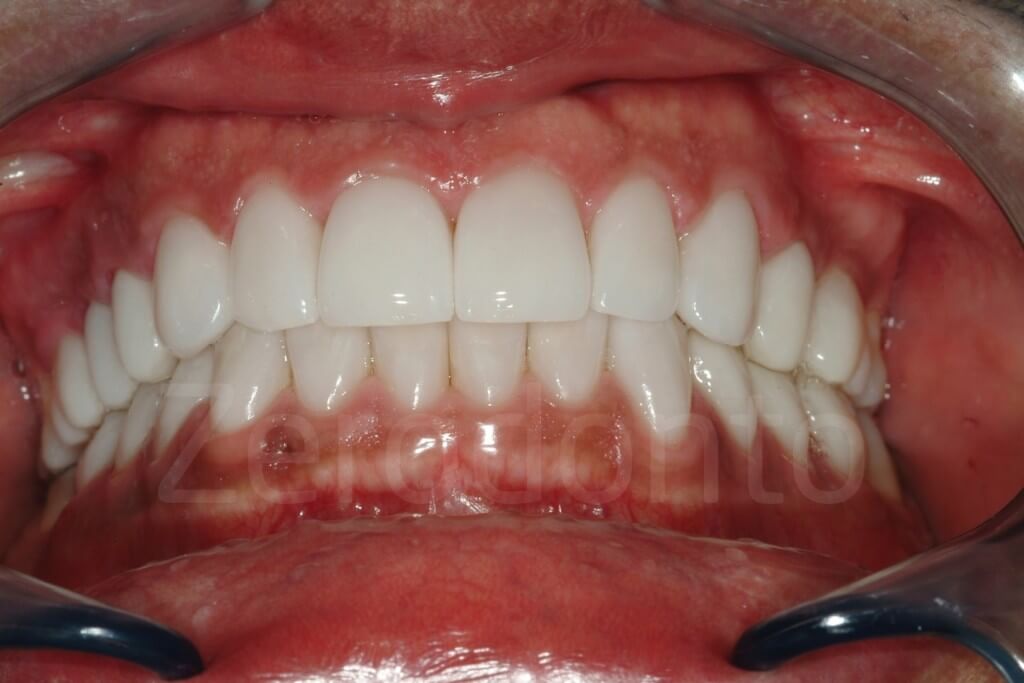
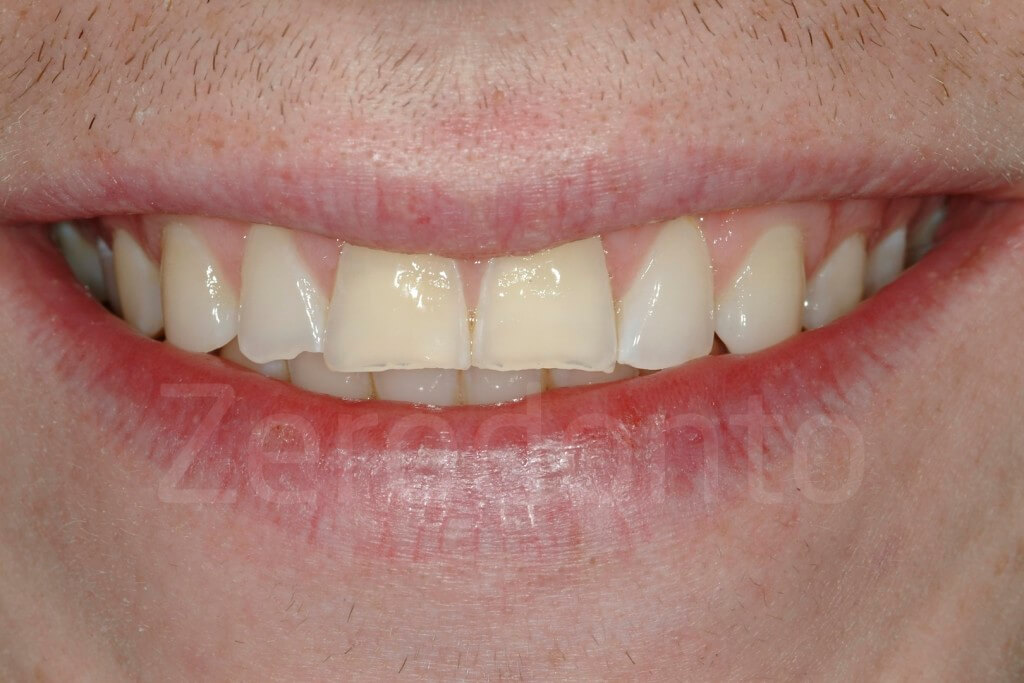
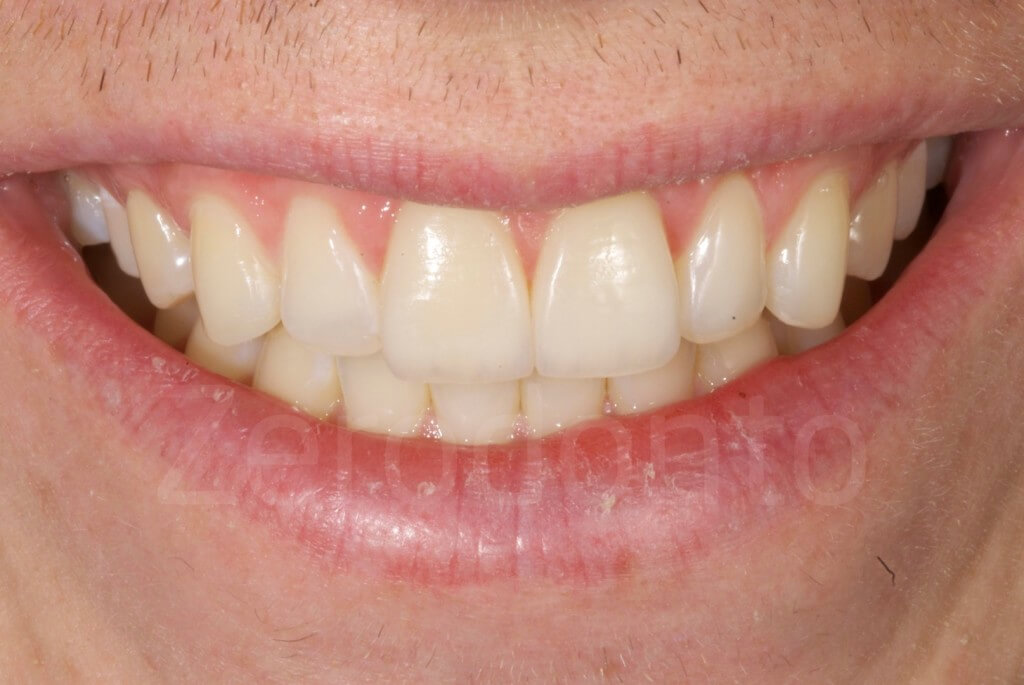
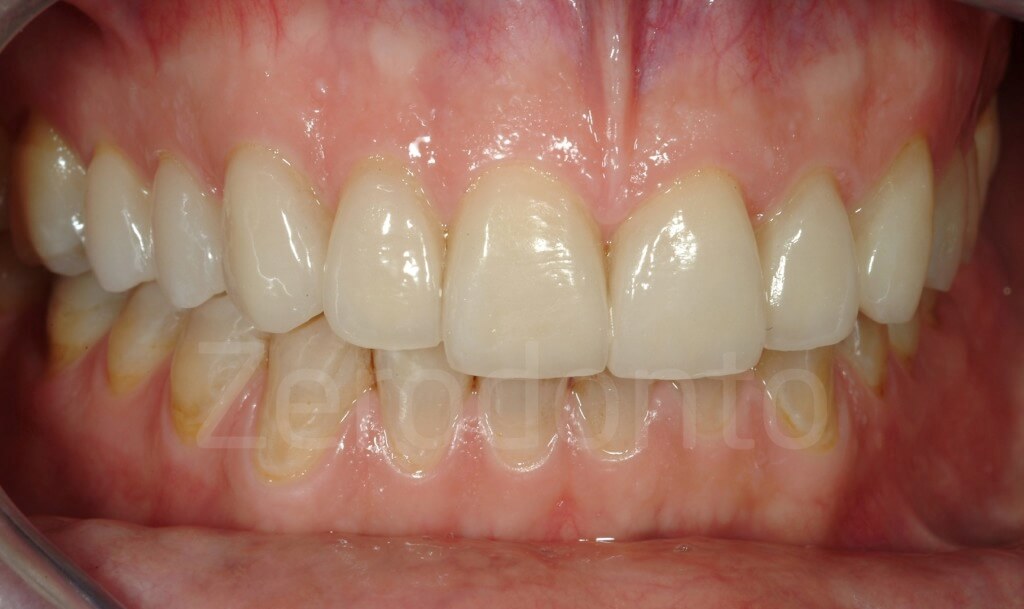
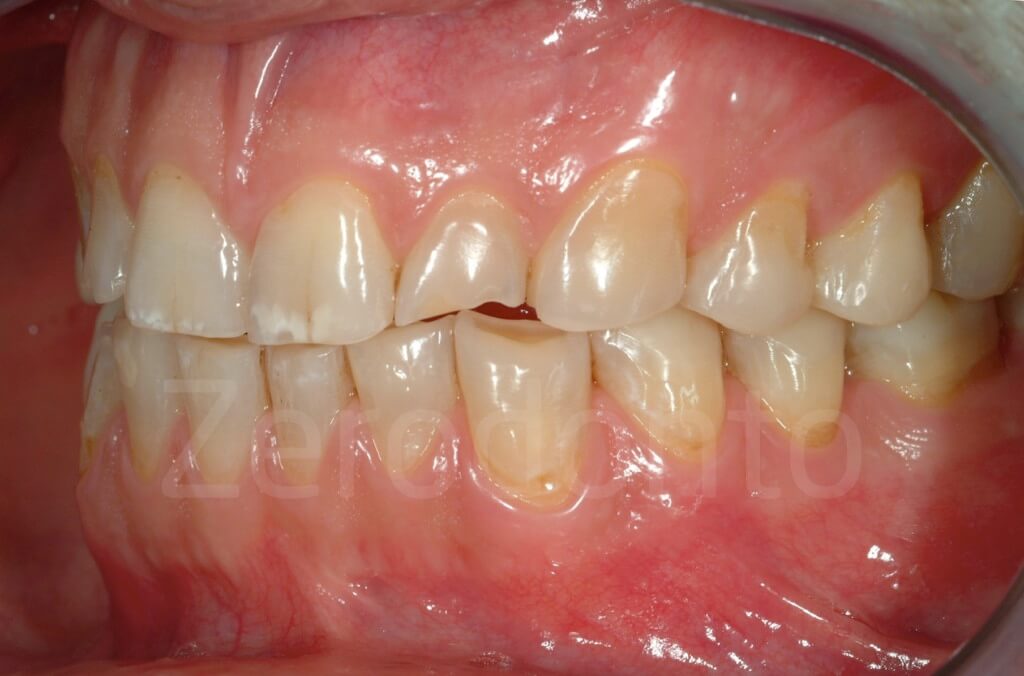
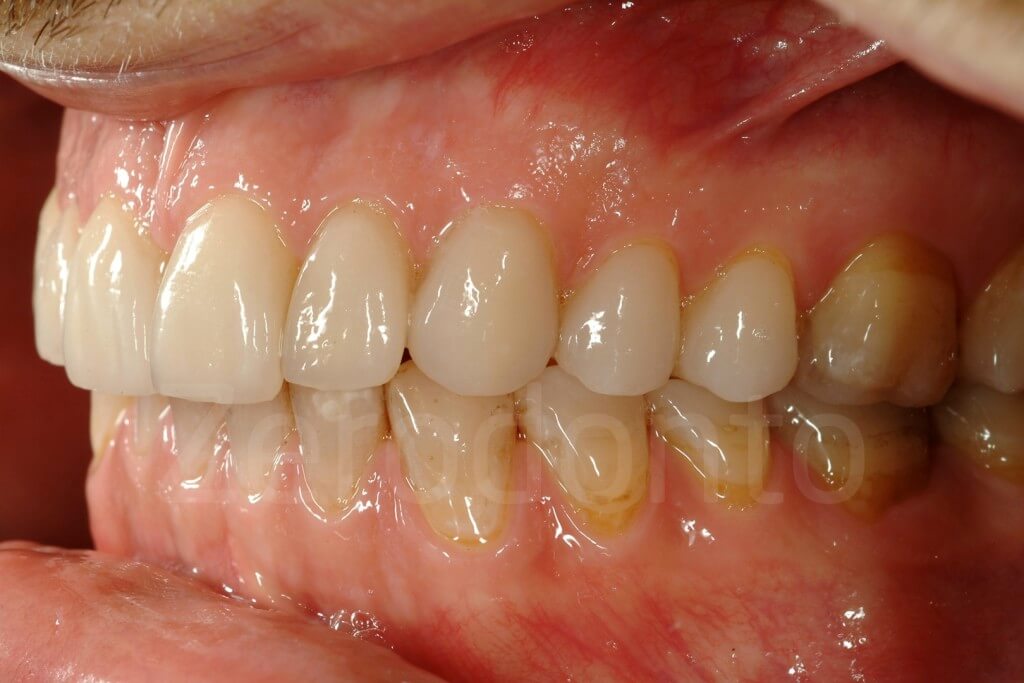
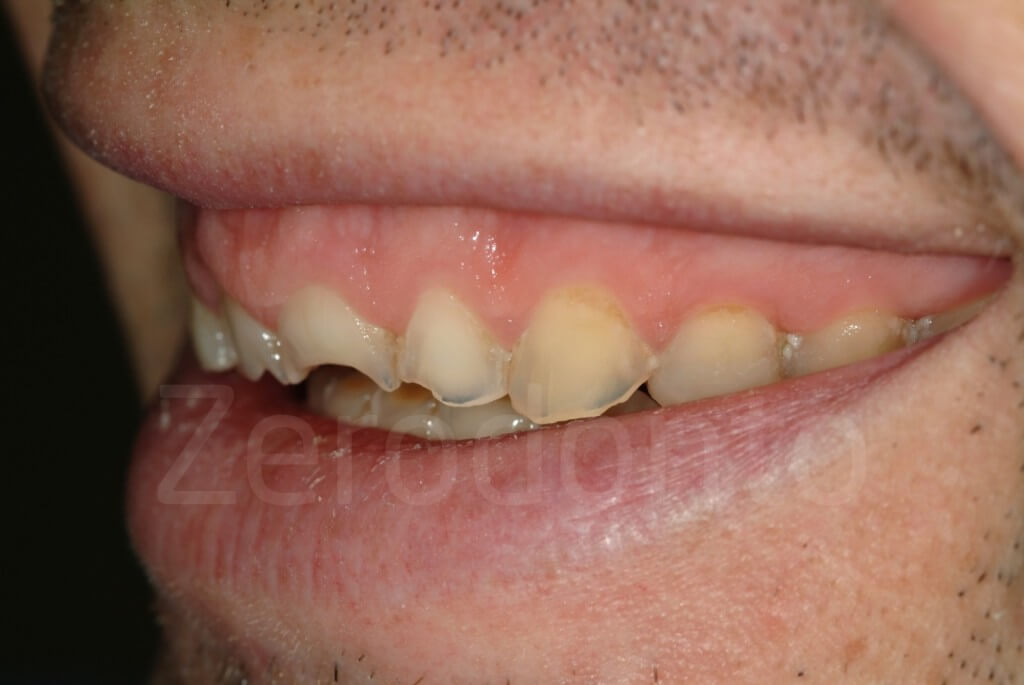
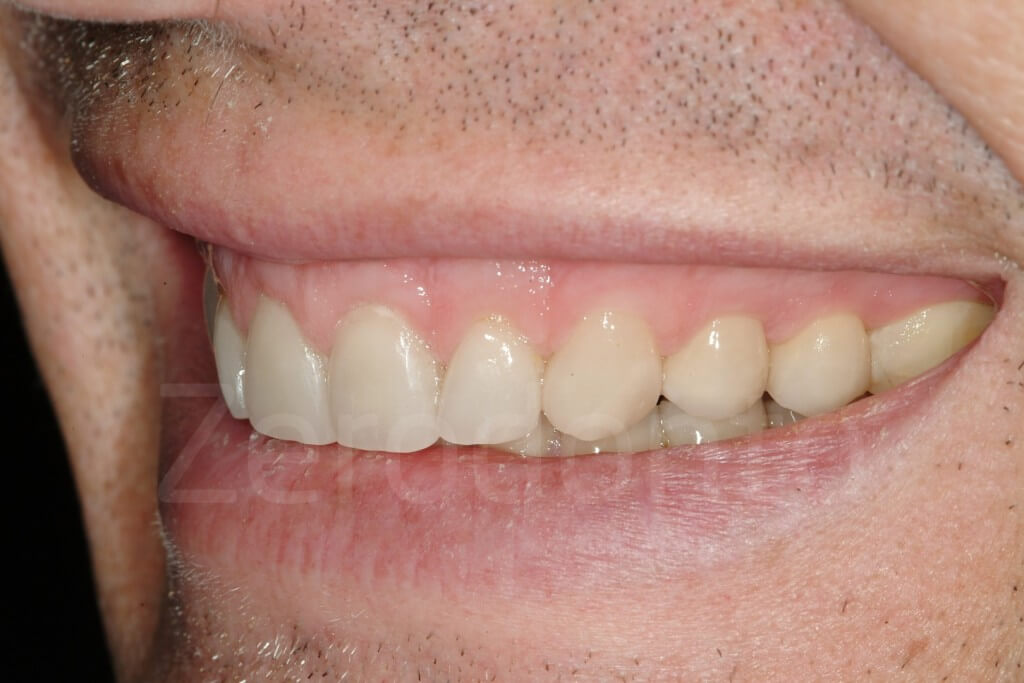
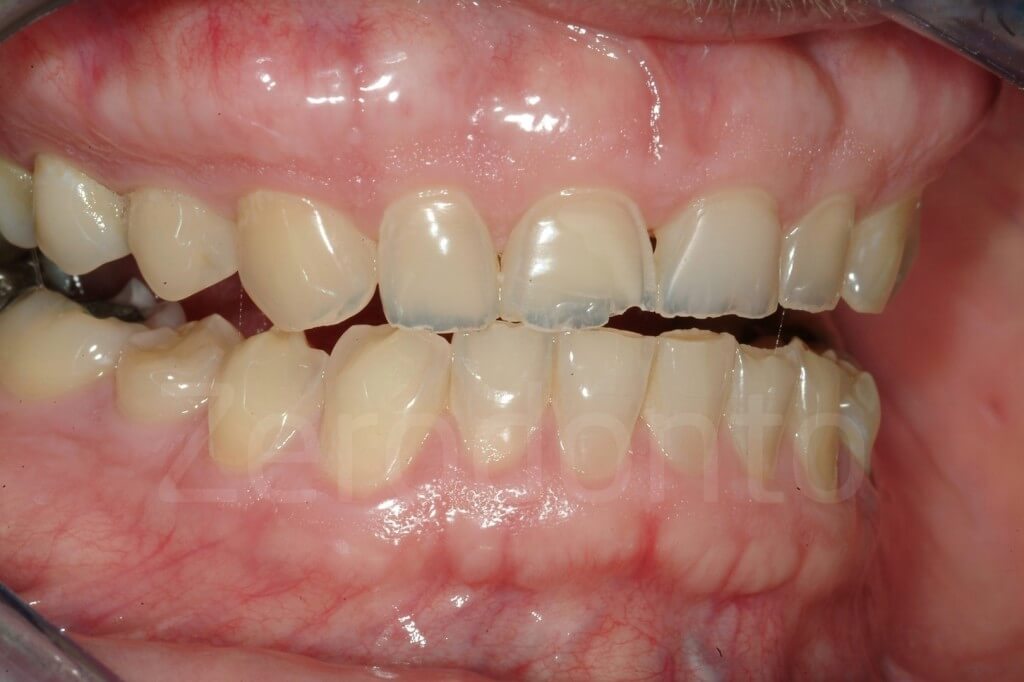
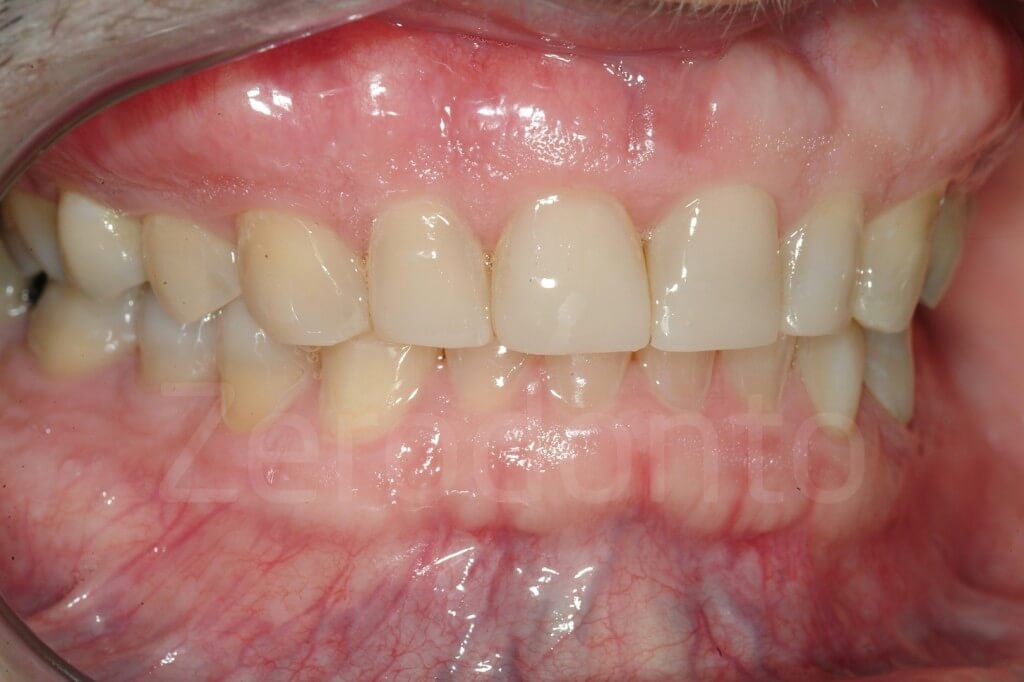
Failing full-mouth adhesive rehabilitation. The 3-STEP was used to stabilize first the patient’s occlusion before progressing to the new full-mouth treatment. The extremely white shade was selected by the patient even though highly discouraged by the clinician.

References
- Vailati F, Belser UC. Full-mouth adhesive rehabilitation of a severely eroded dentition: the three-step technique. Part I. Eur J Esth Dent 2008;3:30–44.
- Vailati F, Belser UC. Full-mouth adhesive rehabilitation of a severely eroded dentition: the three-step technique. Part II. Eur J Esth Dent 2008;3:128–146.
- Magne P, Belser UC. Bonded porcelain restorations in the anterior dentition. A biomimetic approach. Chicago: Quintessence Publishing Co 2002;266–267.
- Panitvisai P, Messer HH. Cus- pal deflection in molars in rela- tion to endodontic and restorative procedures. J Endod 1995;21:57–61.
- Reeh ES, Messer HH, Douglas WH. Reduction in tooth stiff- ness as a result of endodontic and restorative procedures. J Endod 1989;15:512–516.
- Reeh ES, Douglas WH, Messer HH. Stiffness of endodontically treated teeth related to restora- tion technique. J Dent Res 1989;68:1540–1544.
- Pjetursson BE, Sailer I, Zwahlen M, Hämmerle CH. A systematic review of the survival and complication rates of all-ceramic and metal-ceramic reconstructions after an observation period of at least 3 years. Part I: Single crowns. Clin Oral Implants Res 2007;18:73–85.
- Sailer I, Pjetursson BE, Zwahlen M, Hämmerle CH. A systematic review of the survival and complication rates of all-ceramic and metal-ceramic reconstructions after an observation period of at least 3 years. Part II: Fixed dental prostheses. Clin Oral Implants Res 2007;18(Suppl 3):86–96.
- Van Nieuwenhuysen JP, D’Hoore W, Carvalho J, Qvist V. Long-term evaluation of exten- sive restorations in permanent teeth. J Dent 2003;31:395–405.
- Walton TR. An up to 15-year longitudinal study of 515 metal- ceramic FPDs: Part 2. Modes of failure and influence of vari- ous clinical characteristics. Int J Prosthodont 2003;16:177–182.
- Walton TR. A 10-year longitudi- nal study of fixed prosthodon- tics: clinical characteristics and outcome of single-unit metal- ceramic crowns. Int J Prostho- dont 1999;12:519–526.
- Valderhaug J, Jokstad A, Amb- jornsen E, Norheim PW. Assessment of the periapical and clinical status of crowned teeth over 25 years. J Dent 1997;25:97–105.
- Walton JN, Gardner FM, Agar JR. A survey of crown and fixed partial denture failures: length of service and reasons for replacement. J Prosthet Dent 1986;56:416–421.
- Coornaert J, Adriaens P, De Boever J. Long-term clinical study of porcelain-fused-to- gold restorations. J Prosthet Dent 1984;51:338–342.
- Tan K, Pjetursson BE, Lang NP, Chan ES. A systematic review of the survival and complication rates of fixed partial dentures (FPDs) after an observation period of at least 5 years. Clin Oral Implants Res 2004;15:654–666.
- Aquilino SA, Caplan DJ. Rela- tionship between crown place- ment and the survival of endo- dontically treated teeth. J Prosthet Dent 2002;87:256–263.
- Schwartz NL, Whitsett LD, Berry TG, Stewart JL. Unserviceable crowns and fixed par- tial dentures: life-span and causes for loss of serviceabili- ty. J Am Dent Assoc 1970;81:1395–1401.
- Paul JE. Palatal inlays. Br Dent J 1994;177:239.
- Bishop K, Briggs P, Kelleher M. Palatal inlays. Br Dent J 1994;177:365.
- Magne P, Douglas WH. Inter- dental design of porcelain veneers in the presence of composite fillings: finite ele- ment analysis of composite shrinkage and thermal stresses. Int J Prosthodont 2000;13:117–124.
- Magne P, Douglas WH. Cumulative effects of successive restorative procedures on anterior crown flexure: intact versus veneered incisors. Quintessence Int 2000;31:5–18.
- Magne P, Douglas WH. Porcelain veneers: dentin bonding optimization and biomimetic recovery of the crown. Int J Prosthodont 1999;12:111–121.
- Magne P, Douglas WH. Optimization of resilience and stress distribution in porcelain veneers for the treatment of crown-fractured incisors. Int J Periodontics Restorative Dent 1999;19:543–553.
- Dietschi D, Spreafico R. Adhe- sive metal-free restorations. Berlin: Quintessence, 1997.
- Magne P, Belser UC. Novel porcelain laminate preparation approach driven by a diagnostic mock-up. J Esthet Restor Dent 2004;16:7–16.
- Gürel G. The science and art of porcelain laminate veneers. Chicago: Quintessence Pub- lishing, 2003.
- Magne P, Perroud R, Hodges JS, Belser UC. Clinical performance of novel-design porcelain veneers for the recovery of coronal volume and length. Int J Periodontics Restorative Dent 2000;20:440–457.
- Magne P, Douglas WH. Porcelain veneers: dentin bonding optimization and biomimetic recovery of the crown. Int J Prosthodont 1999;12:111–121.
- Magne P, Douglas WH. Additive contour of porcelain veneers: a key element in enamel preservation, adhesion, and esthetics for aging dentition. J Adhes Dent 1999;1:81–92.
- Belser UC, Magne P, Magne. Ceramic laminate veneers: continuous evolution of indications. J Esthet Dent 1997;9:197–207.
- Garber D. Porcelain laminate veneers: ten years later. Part I: Tooth preparation. J Esthet Dent 1993;5:56–62.
- Castelnuovo J, Tjan AH, Phillips K, Nicholls JI, Kois JC. Fracture load and mode of failure of ceramic veneers with different preparations. J Pros- thet Dent 2000;83:171–180.
- Magne P, Belser UC. Bonded porcelain restorations in the anterior dentition. A biomimetic approach. Chicago: Quintessence Publishing Co, 2002;30–37.
- Deery C, Wagner ML, Longbottom C, Simon R, Nugent ZJ. The prevalence of dental erosion in a United States and a United Kingdom sample of adolescents. Pediatr Dent 2000;22:505–510.
- Linnett V, Seow WK. Dental erosion in children: a literature review. Pediatr Dent 2001;23:37–43.

