Dental erosion is spreading rapidly among younger generations of patients. Clinicians often underestimate the extent of this disease and postpone its treatment due to a lack of awareness and/or to uncertainty regarding the proper course of action.
The discussion of when and how to treat young individuals affected by dental erosion has split the dental community into two groups: clinicians who treat eroded teeth excessively and clinicians who do not treat eroded teeth at all.
In this case report, a young adult patient affected by generalized dental erosion was treated even though his tooth degradation was only at an initial stage. The rationale behind this early intervention was that no or minimal tooth preparation would have been required for treatment. In fact, only ADDITIVE adhesive procedures were implemented to replace the missing tooth structure and protect the remaining dentition from further damage.
A 25-year-old male Caucasian patient presented to the School of Dental Medicine at the University of Geneva, Geneva, Switzerland. His chief complaint was the weakening and fracturing of his maxillary incisal edges. During a previous dental consultation, a parafunctional habit (bruxism) was suggested as the main cause of lost tooth structure; however, no occlusal guard had been prescribed. Clinical examination revealed that the patient also showed generalized initial dental erosion.
The patient presented accelerated loss of enamel, especially on the palatal aspect of the maxillary anterior teeth and occlusal surfaces of the premolars. In addition, the mandibular first molars presented concave occlusal surfaces with reduced areas of contact with the antagonistic teeth. Wear facets at the canines were also present, indicating moderate parafunctional habits. The remaining dentition was intact.

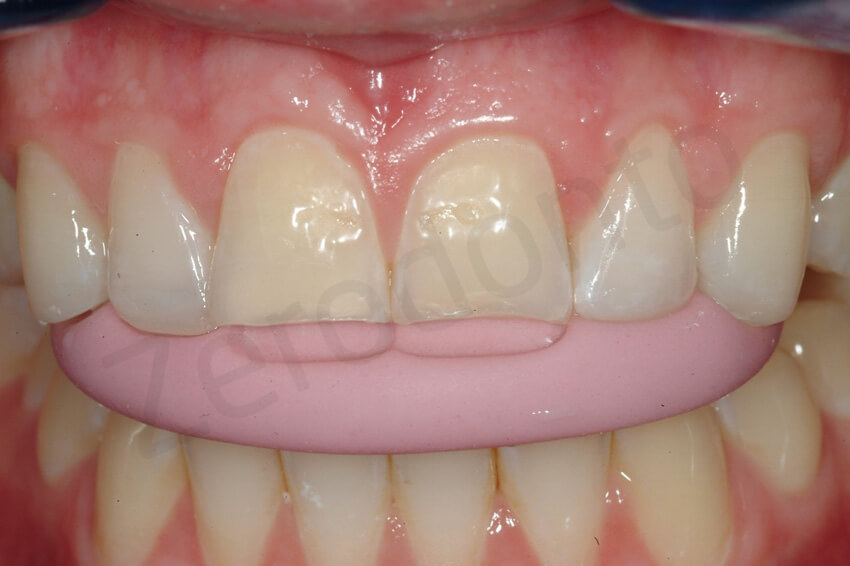
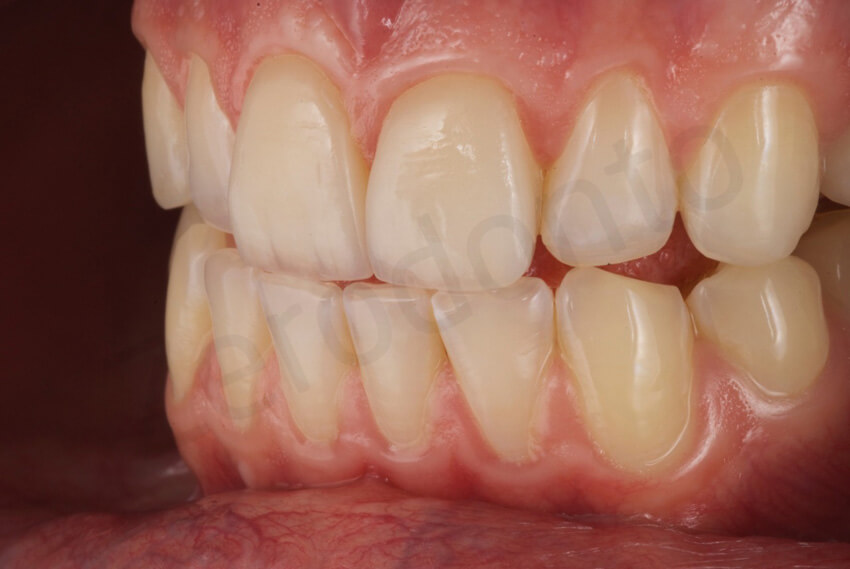
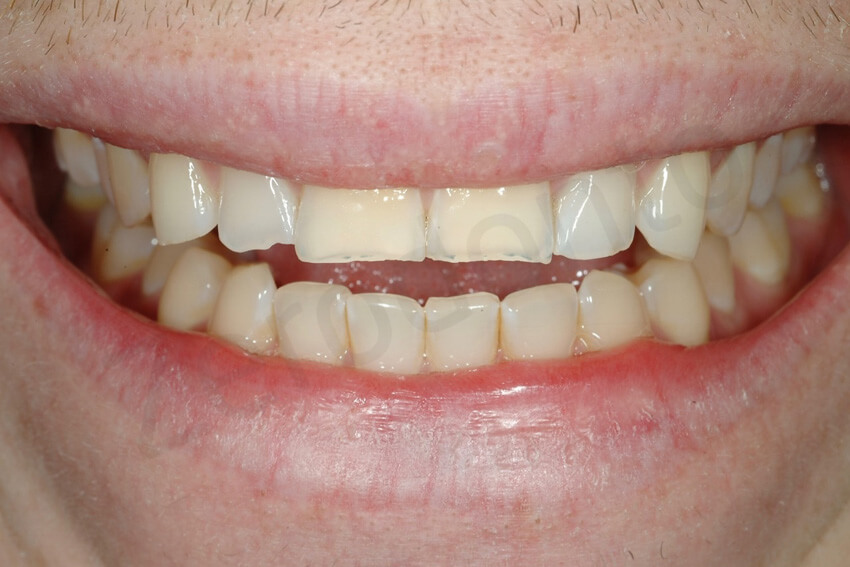
Initial status. The patient’s smile was very conservative, probably related to his insecurity about the esthetic of the fractured incisal edges, and the yellowish colour of the central incisors
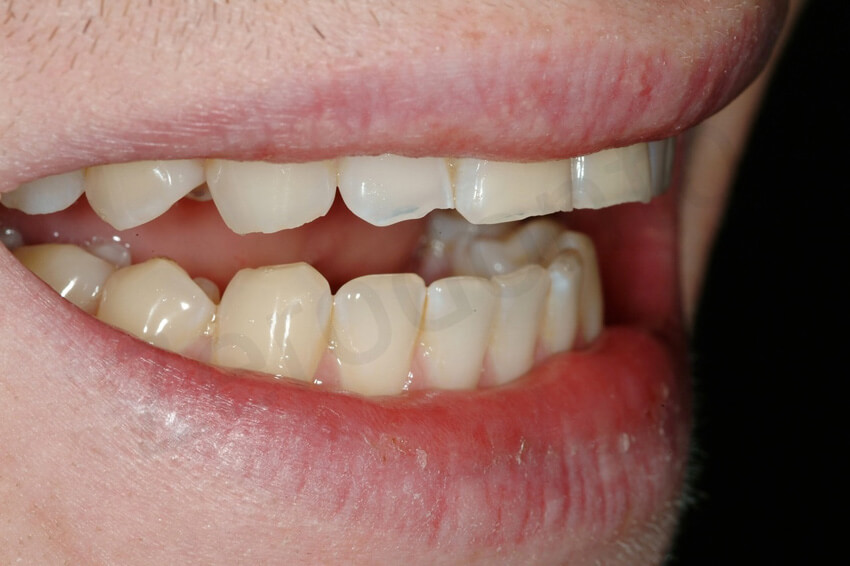
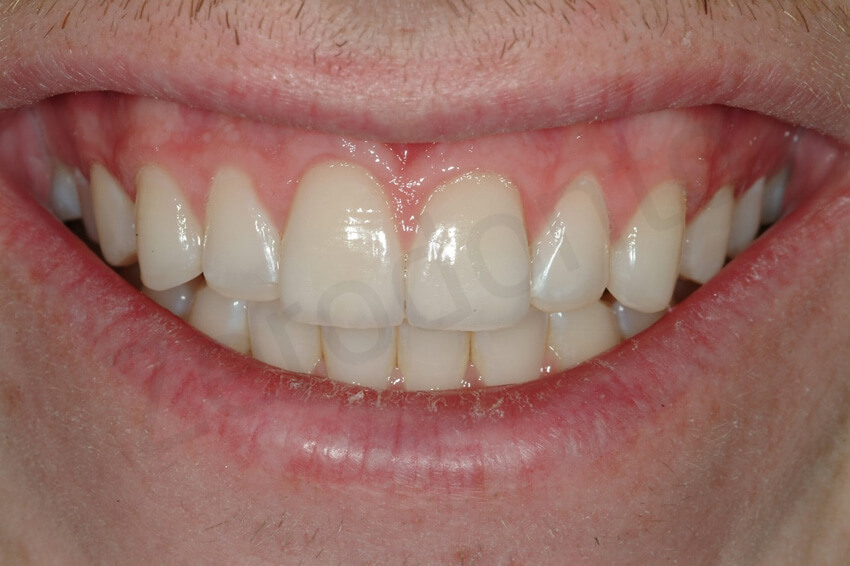
Maximum smile. This patient could not fully relax his lips, because he had learned to smile, while covering as much of his teeth as possible. No gingiva was visible at this time in the maxillary arch. Note the presence of an initial reverse smile, due to the shortening of the incisal edges of the maxillary anterior teeth.
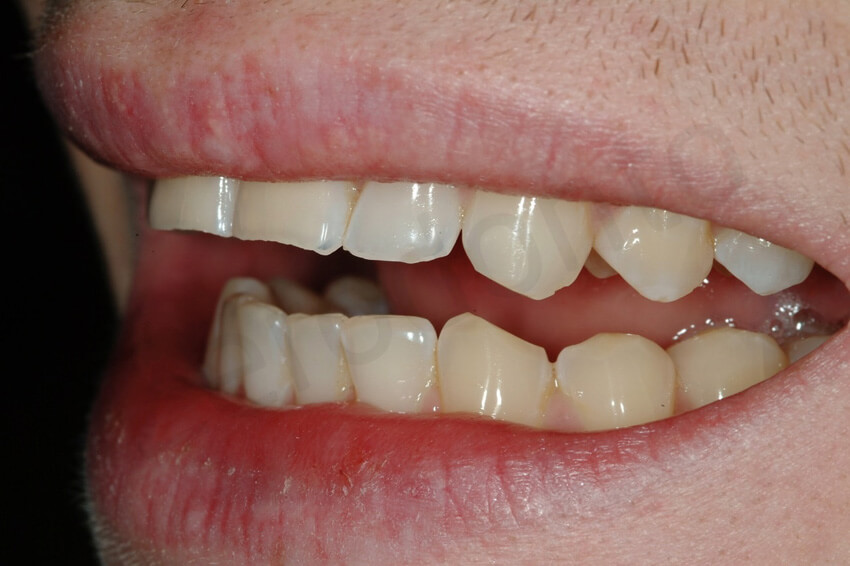

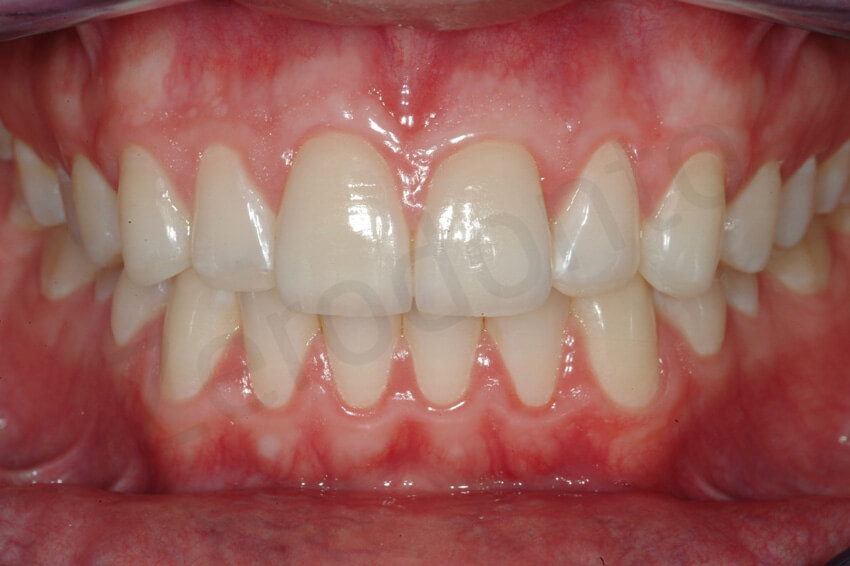
Except for the little damage of the front teeth, the remaining dentition was apparently healthy. At this early stage of dental erosion, the mandibular anterior teeth were not supraerupted, as often occurs in case of more severe dental destruction, and the curve of Spee was only slightly affected.

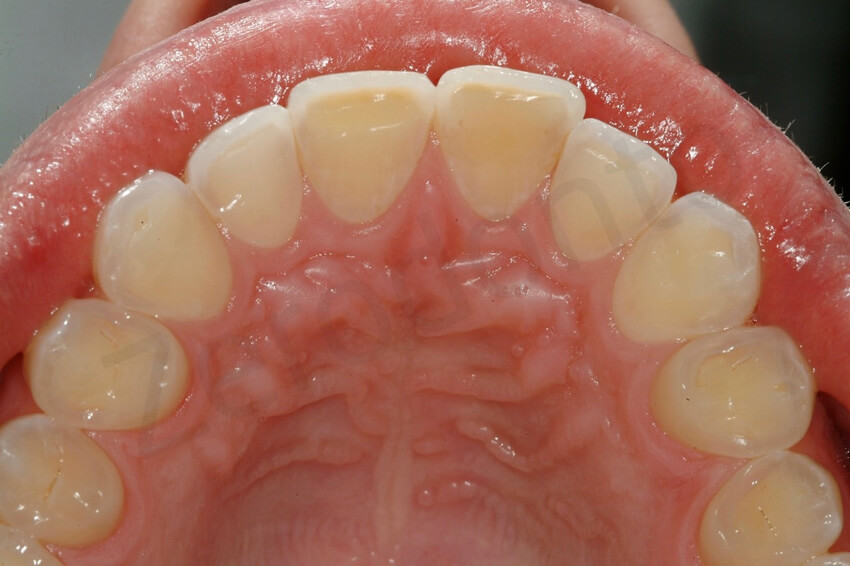
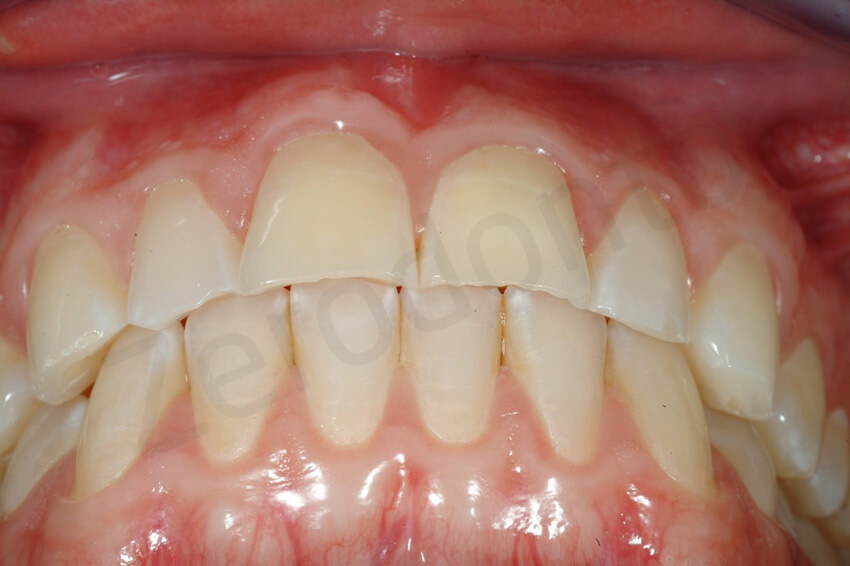
Palatal view, which shows the thinning of the palatal enamel and the localized exposure of the dentin.

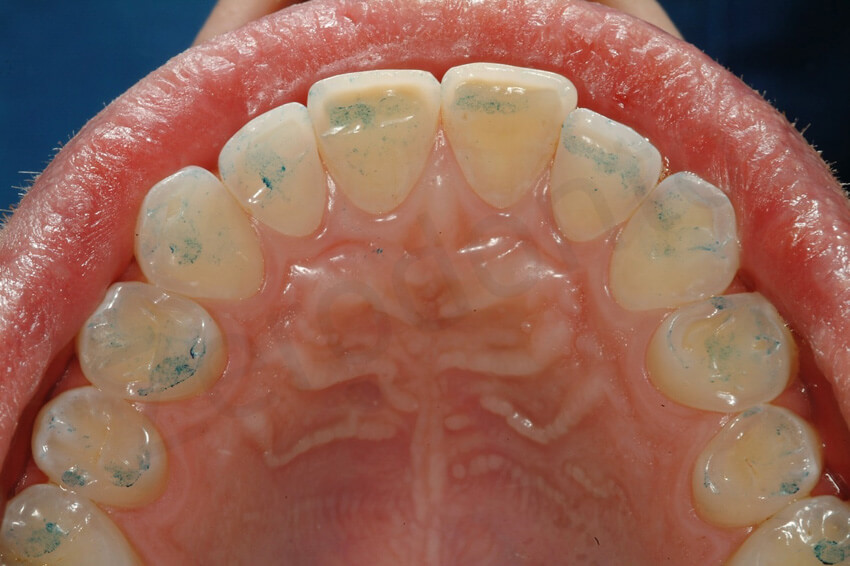
Occlusal view and contact points. The dentin was exposed at the level of the contact points, and the incisal edges were very weak. The antagonistic mandibular teeth were instead intact.


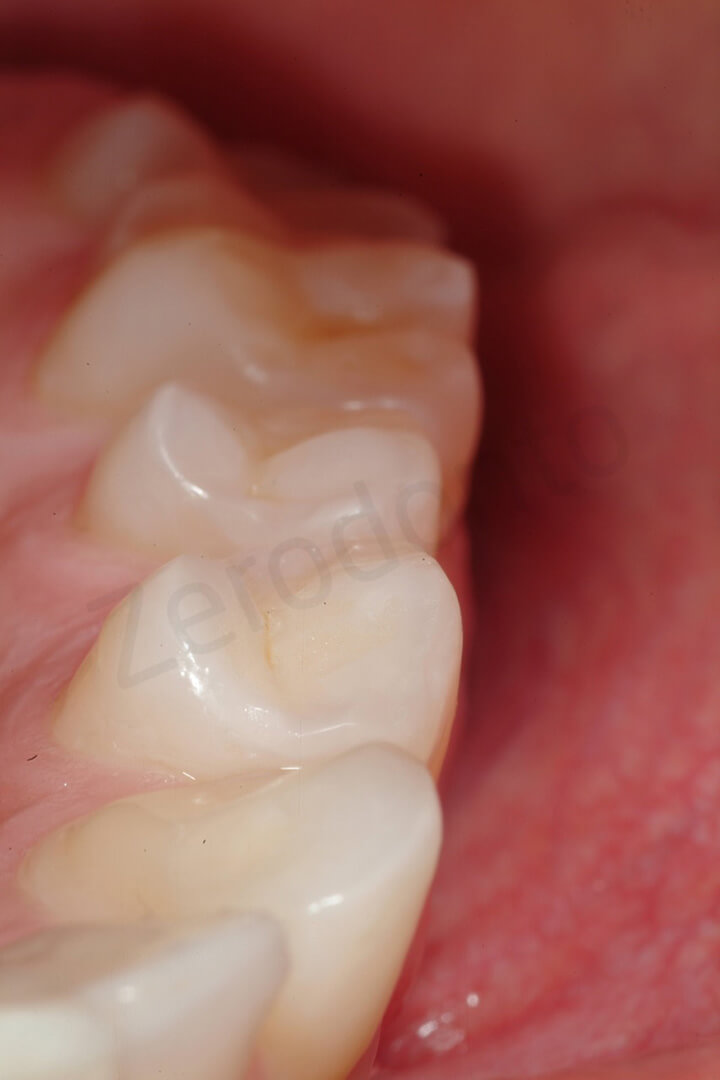
At an attentive exam, the asymptomatic posterior teeth presented thinning of their enamel and more concave occlusal surfaces especially the first mandibular molars. No cold sensitivity was present

The maxillary premolars presented also thinning of the enamel and small areas of exposed dentin

Only the canines showed minor signs of wear related to parafunctional habits
The patient was questioned regarding the possible etiology of the dental erosion, and he denied any excessive consumption of acidic beverages or food. The clinician recommended further investigation of a possible intrinsic origin of the acid (e.g, gastric reflux) through a visit to a gastroenterologist. However, the patient did not comply with this suggestion, and the etiology of the dental erosion remained unknown.
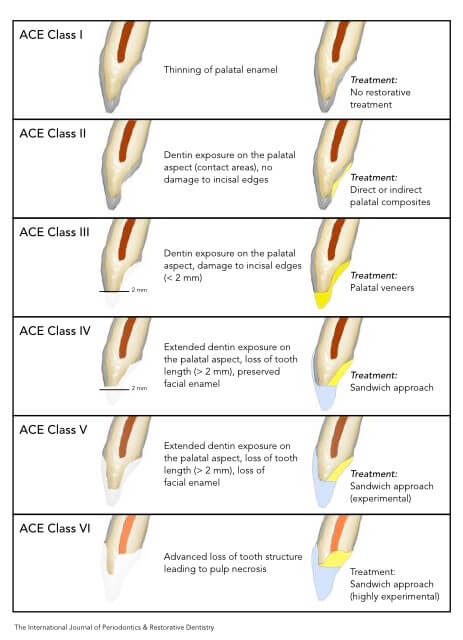
Anterior erosive classification (ACE)1 was used to determine the extent of erosion. Following the examination, the patient’s erosion was classified as ACE class III because the palatal dentin was exposed at the level of the contact points with the antagonistic mandibular teeth and the incisal edges were starting to fracture (loss of less than 2.0 mm of the original tooth length). Since reduced vertical overlap (overbite) was a risk factor for accelerated damage of the incisal edges and the etiology of the problem was still unknown, the potential for a higher ACE classification was a concern.
The benefits of early intervention were discussed, with special consideration paid to the young age of the patient. It was decided to restore the patient’s affected teeth with no or minimal tooth preparation following exclusively adhesive principles.
ACE class III maxillary anterior teeth can be restored using only palatal veneers. To obtain the necessary interocclusal space to deliver the restorations without tooth preparation, an increase of the vertical dimen-sion of occlusion (VDO) should be considered as long as no orthodontic measures are implemented. Since the posterior teeth also showed signs of dental erosion, it was decided to increase the VDO by restoring the posterior teeth as well.
In addition to the loss of tooth structure related to dental erosion, the patient presented esthetic problems at the maxillary central incisors. Even though the facial aspect of these teeth was intact (except for their incisal edges), their coloring was darker compared to the rest of the dentition. Several unsuccessful attempts at external bleaching had been made in the past. The central incisors had changed color following prior trauma to the anterior teeth. At the radiographic examination, both pulp chambers were obliterated, and the vitality test was negative. However, neither radiographic signs of periapical lesions nor symptoms related to a loss of vitality were evident. The percussion test was also negative. After consultation with an endodontist, it was decided to maintain the status quo without performing elective endodontic therapy until signs or symptoms of pulp necrosis arose. Consequently, two facial veneers were also planned to mask the discoloration.
Delivering two veneers, one palatal and one facial, to restore a single tooth is called the “sandwich approach,” which has been proven to be the most conservative treatment for ACE class IV to VI anterior teeth. However, in this ACE class III patient, the sandwich approach was dictated more by the patient’s esthetic demands than by loss of tooth structure.
MODIFIED 3 STEP Technique
Generally, patients affected by dental erosion are treated following the 3 STEP technique.2–4 Due to the early detection of the erosion, this patient did not require full-mouth rehabilitation. Thus, a MODIFIED 3 STEP technique was used.
The typical first step (the maxillary vestibular mock-up) was not necessary because the esthetic occlusal plane did not required major alteration and the shape of the maxillary anterior teeth needed only minor modification (lengthening of the incisal edges of few millimeters). Instead, treatment began directly with the increase of the VDO and creation of anterior open bite (step 2). Due to the minimal increase of the VDO, no provisional restorations were necessary to test the increase of VDO. Consequently, instead of the posterior provisional stage in the CLASSIC 3 STEP technique, final restorations for the posterior teeth were fabricated.
During the first visit, two alginate impressions were taken, and casts were mounted on a semi-adjustable articulator using a face bow in maximum intercuspal position (MIP). The VDO was arbitrarily increased to obtain the space necessary to restore the occlusal surfaces of the posterior teeth and the palatal aspect of the maxillary anterior teeth.
The space gained in the posterior quadrants by the increased VDO was shared between the maxillary premolars and mandibular molars. Posterior support at the increased VDO was obtained only by insertion of the eight ceramic onlays for the premolars. The remaining posterior teeth were not involved in the restorative treatment.
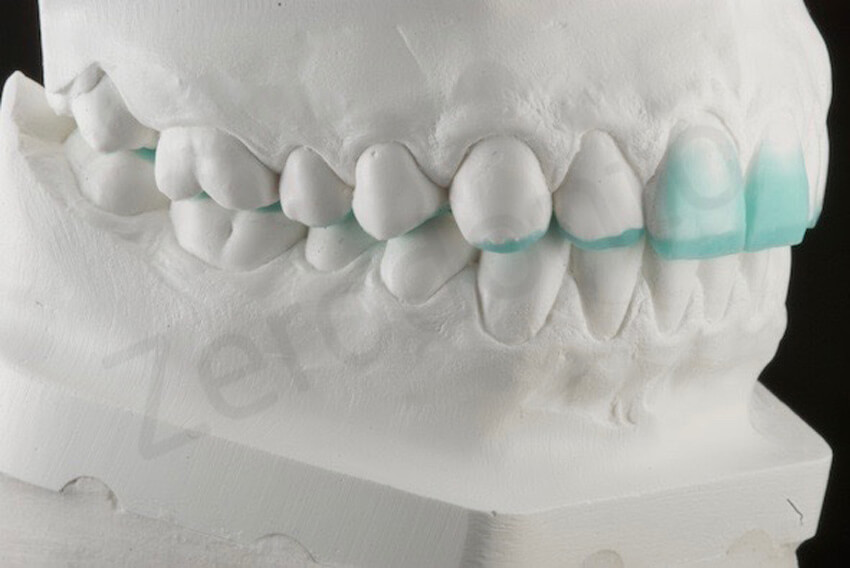
A diagnostic ADDITIVE wax-up was done to decide on the increase of VDO. The incisal edges were only minimal lengthened. The esthetic occlusal plane was not changed. A mock-up to test the new shape of the teeth was not necessary.


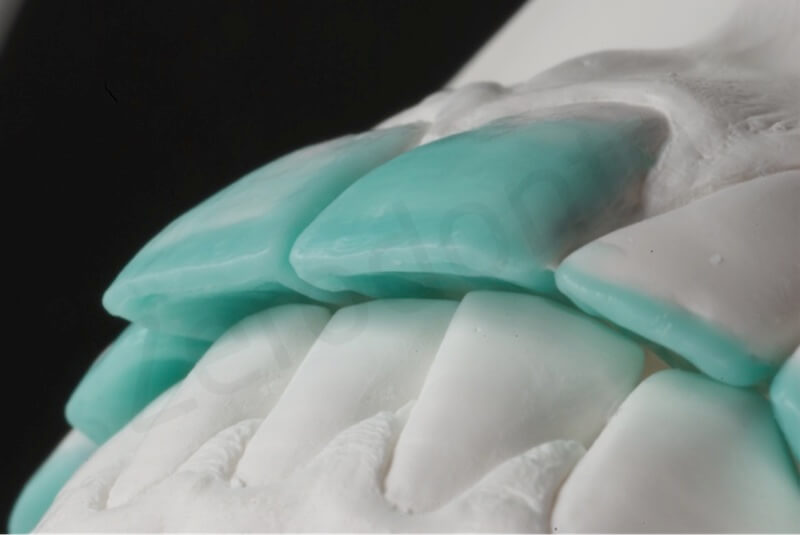
Close view of the reconstructed incisal edges.
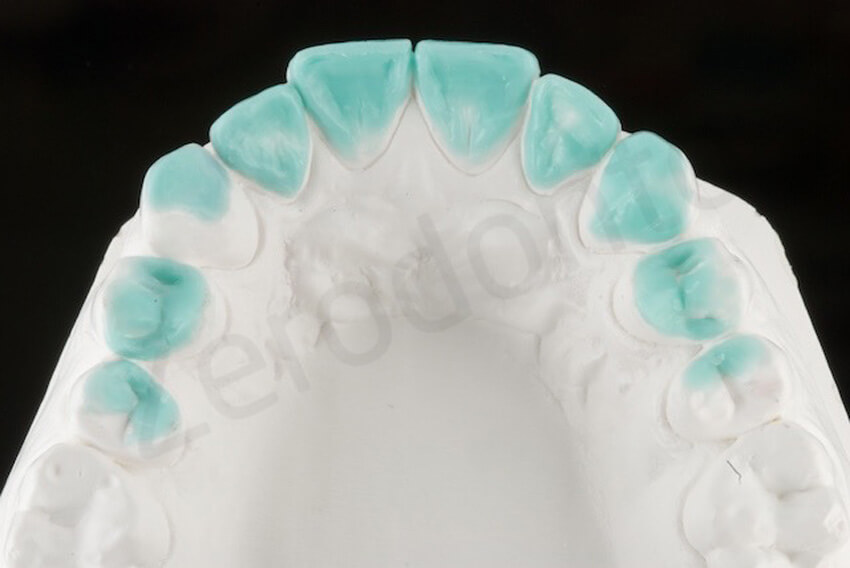
After reconstructing the palatal aspect of the anterior teeth, due to the minimal space available, a MIXED distribution was selected where not all the posterior teeth would have been involved in the rehabilitation. The 4 interocclusal space obtained at the level of the posterior quadrants was in fact shared only between the mandibular molars and maxillary premolars.

Once this stage of treatment was finalized, the patient was scheduled for another appointment. The final impression of the maxillary and mandibular arches was made using polyvinyl siloxane to fabricate the working casts.
POSTERIOR CERAMIC ONLAYS
An ADDITIVE diagnostic wax-up was used as the starting point for fabrication of exceptionally thin and highly conservative posterior lithium disilicate ceramic onlays. Developing thin occlusal ceramic onlays while simultaneously providing adequate occlusal function is a complicated procedure. Conventional ceramic on-lays require a minimum thickness of 1.5 to 2.0 mm, whereas thin occlusal ceramic onlays have a maximum thickness ranging from 0.5 to 0.6 mm. These highly conservative restorations can be produced with mini-mal or no tooth reduction and are highly indicated to restore eroded posterior teeth.
Thin occlusal ceramic onlays are very fragile and may fracture during waxing or fabrication procedures. The first step is to make the investment casts. The working casts must be duplicated in the investment. The working casts are painted with die spacer (Color Spacer, Yeti Dental, Engen, Germany) and then duplicated using polyvinyl siloxane (Zhermack Elite, Zhermack, Badia Polesine, Italy) and phosphate-bonded investment material (IPS Press Vest Speed, Ivoclar Vivadent)

To fabricate pressed ceramic extremely thin onlays one of the problems is the removal of the waxed onlays from the model to invest and press them which could lead to their distortion. To avoid this step, an innovative approach was invented to keep the wax in place and still press the ceramic. To do so, the preoperative casts were duplicated using the investment material.

The wax-up of the occlusal onlays must be made directly on the investment replica following the morphology obtained in the wax-up. Waxing directly to the investment is a far more delicate procedure than waxing directly on the microstone. Since investment material is less rigid than stone, contact of the hot waxing instrument on the investment may damage its surface, resulting in permanent distortion.

On the duplicated model, made of investment material, the laboratory technician waxed up the shape of the posterior onlays. Since the investment material was more fragile than the cast stone, attention was made to never touch the models with the hot waxing instrument
Correct placement of the sprue is crucial during the fabrication of thin occlusal ceramic onlays. An inadequate placement and amount of wax for the sprue may result in loss of the ceramic onlay’s peripheral contour. A solution for this drawback is to wax the sprue directly over the investment. This procedure allows better contour and marginal fit without removing the wax before investment into the cylinder. Once the restorations are waxed with the correctly located sprue, the investment material surrounding the restorations is carefully trimmed, leading to individual waxed invest-ment dies. Trimming the investment around the waxed tooth facilitates positioning into the investment ring. However, before positioning the whole set into the investment ring, the investment dies should be soaked in alcohol to prevent them from absorbing moisture from the investment coating too quickly.
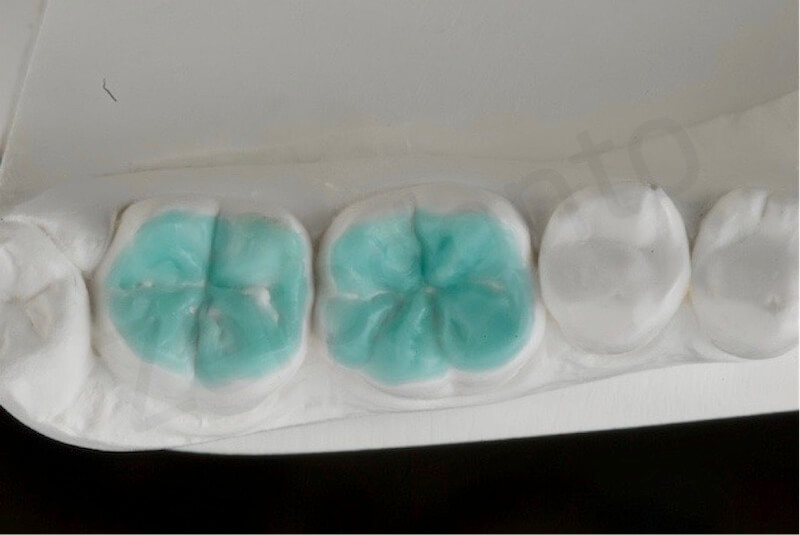
Close view of the duplicated casts, made of investment material, before and after applying the wax. Note that interdental spaces were kept free of wax during the wax-up procedures.
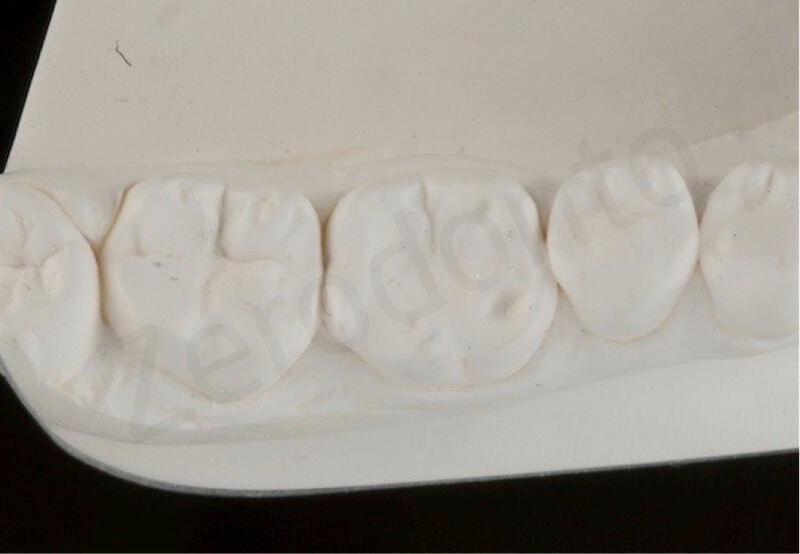

Close-up view of the waxed restoration; the investment surrounding the wax-up was carefully trimmed, since both the trimmed cast and the wax would have been placed in the cylinder and invested.


Correct placement of the sprues in case of very thin pressed ceramic restorations

Thanks to this new investment technique, thin occlusal onlays could be pressed even on top of retentive areas; thin occlusal onlays just pressed. The cast teeth were removed at the same time of the rest of the investment material.

The thin occlusal onlays were made with a highly opalescent shade ingot (Impulse 01, IPS e.max Press, Ivoclar Vivadent) to match the natural teeth.
According to the manufacturer, opal ingots can be used as enamel replacements because of their optical properties and adequate strength. To provide suitable optical properties, the maximum thickness of the opalescent ingot must not exceed 0.5 to 0.6 mm. Thicker restorations often result in an undesirable increase in value. The final step is to glaze the restorations as recommended by the manufacturer.

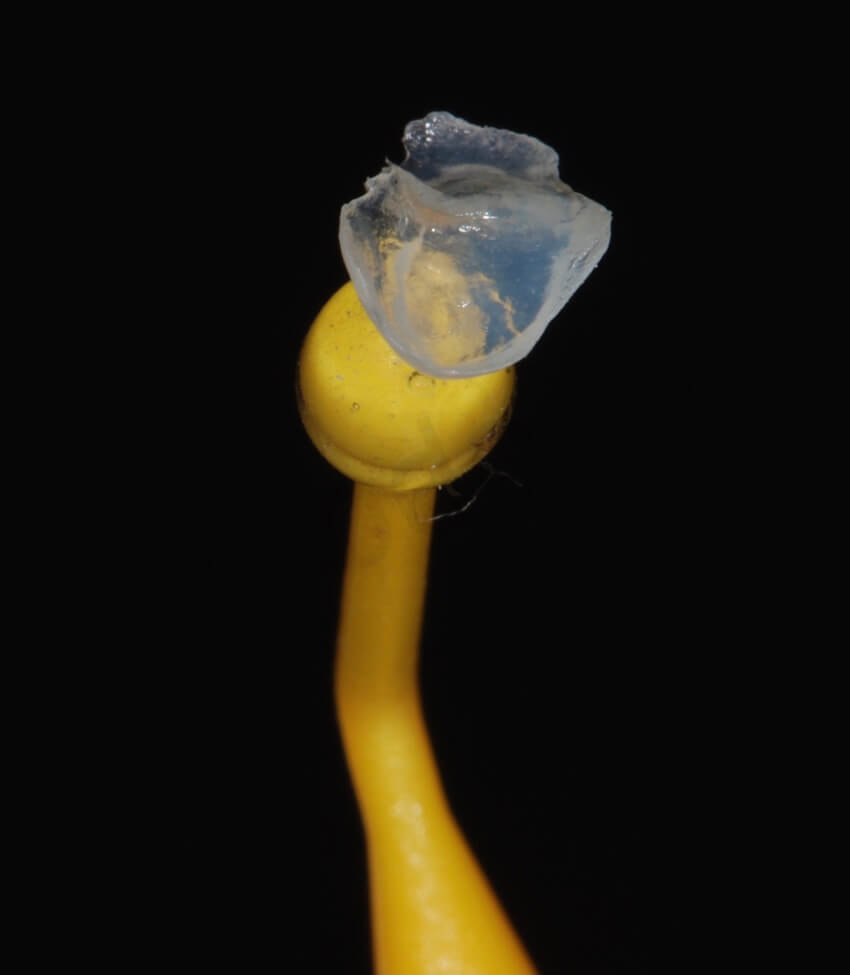
Highly opalescent ingots used for the posterior restorations. Considering the reduced thickness, in this patient all the restorations were monolithic

Occlusal view of the thin onlays adjusted to the master cast

0.6-mm-thin occlusal onlays


Occlusal view of the thin occlusal onlays after adjustment on the master cast. Each restoration could have been inserted without any interference with the closed interproximal contact points
The patient was informed that the third appointment would have been a long one since the eight ceramic on-lays had to be inserted in the same visit. No anesthesia was required, and the field was isolated with rubber dam. Figures 16 to 23 demonstrate the placement procedures. Enamel was etched (37% phosphoric acid) for 30 seconds, and the adhesive resin (Optibond FL, Kerr, Orange, California, USA) was applied on the teeth and left unpolymerized.
The pressed lithium disilicate glass-ceramic onlays were etched with hydrofluoric acid for 20 seconds and cleaned in alcohol in an ultrasonic bath. Three coats of silane were applied (Monobond Plus, Ivoclar Vivadent) to the intaglio surfaces of the restorations, and a final layer of the adhesive resin was added without curing.
A microhybrid composite resin (Enamel plus, Micerium, Avegno, Italy) was heated and applied to the restorations before they were placed on the teeth and light polymerized. The challenge was to bond the ceramic onlays while maintaining the original interproximal contacts. In addition, the extremely thin onlays required additional attention to avoid fracture during the bonding procedure.

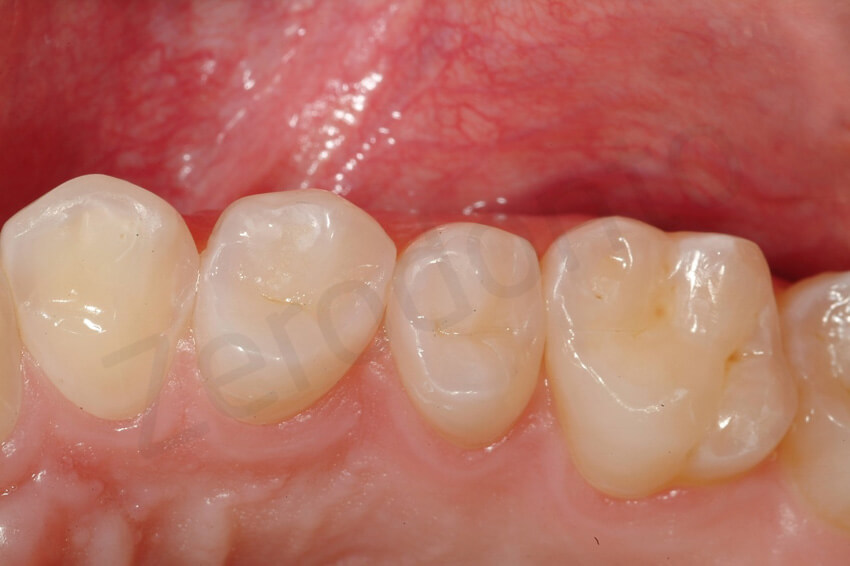
Mandibular molars ready to be restored. No tooth preparation had been done before the impression. The occlusal surfaces were almost entirely made by enamel, essential condition to deliver such an extremely thin ceramic onlays

Try-in of the two onlays on the mandibular molars before bonding them. Metal matrices were used to push the teeth apart and to isolate the operatory field

It was possible to insert each restoration without interfering with the closed interproximal contact points.
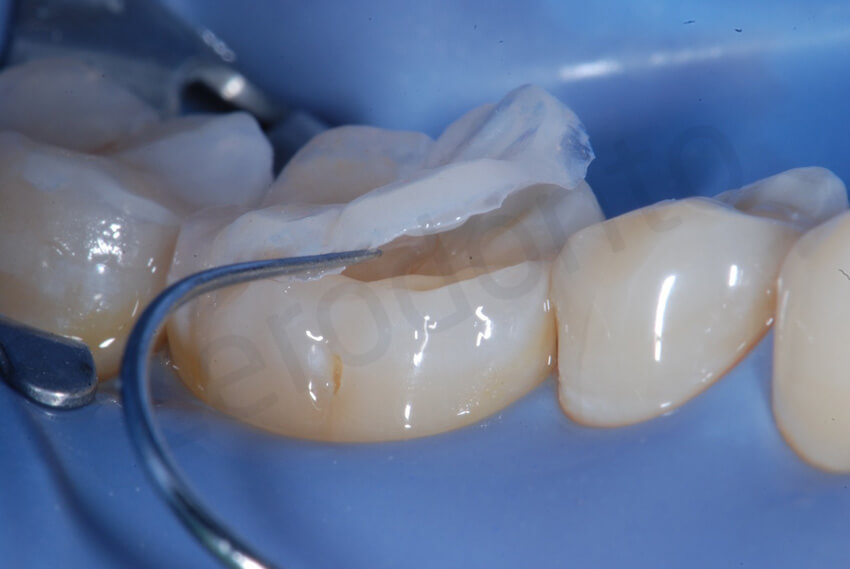
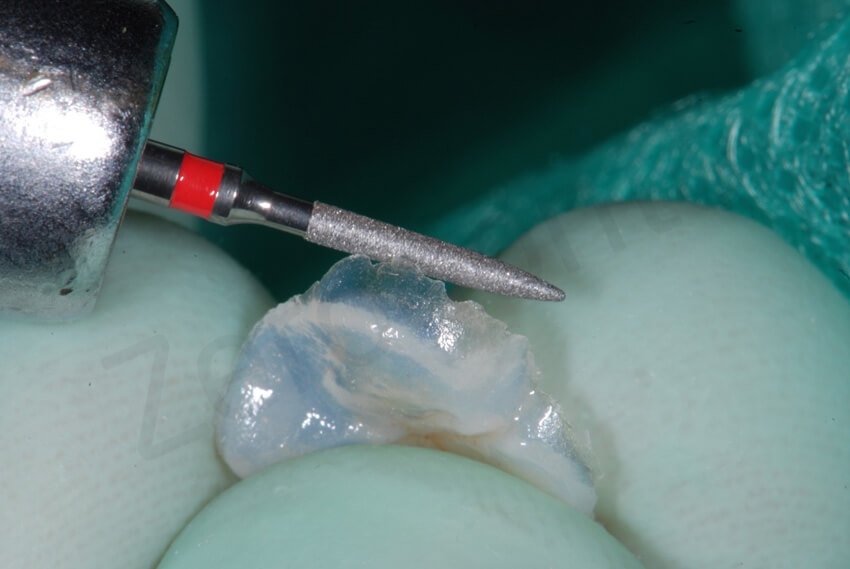
Irregular margins were smoothed with a diamond bur.


The first onlay was bonded on the second mandibular molar. The clinician still preferred to use an hybrid composite, even though the reduced thickness of the restoration. None of the restorations broke down during the delivering
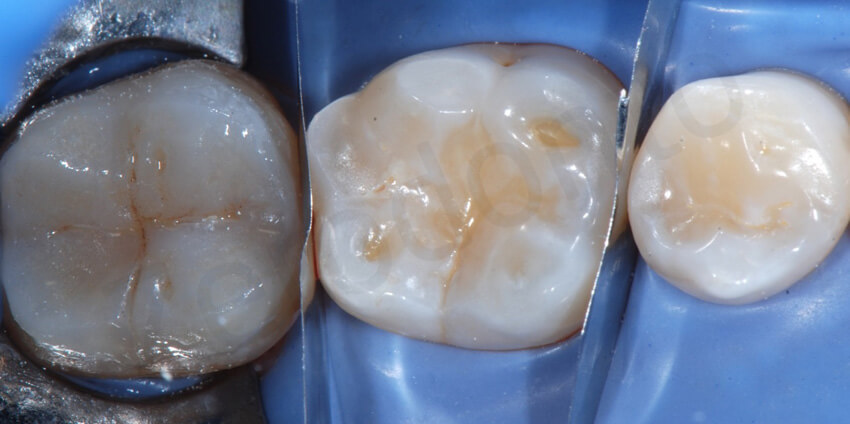
Concerned about fragility of the restorations, the clinician started bonding each onlay individually. In this picture after delivering the first onlay on the second molar, the metallic matrices were placed mesially and distally to the first molar and the tooth was etched with orthophosforic acid. Note after etching the amount of enamel present with a reduced thickness.
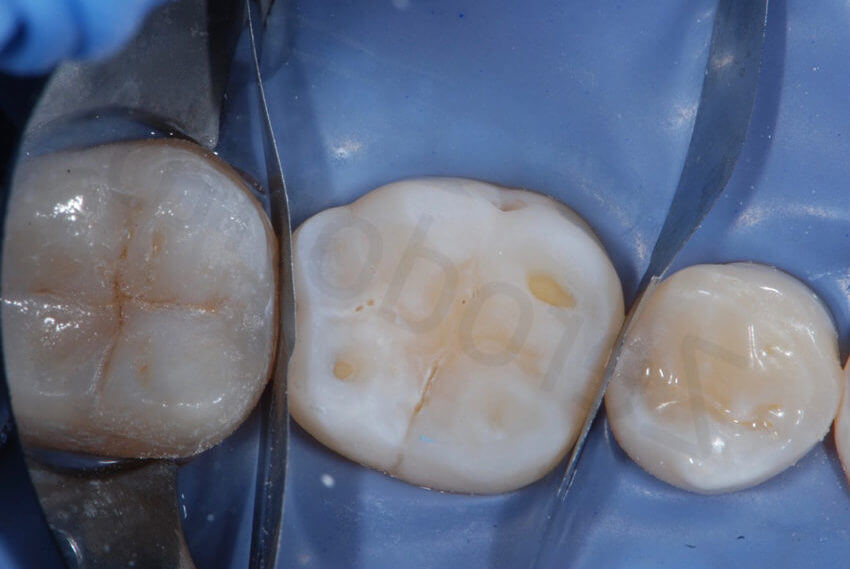

When an hybrid composite is used to bond (like in this patient) it is advisable to remove the excesses as much as possible before polymerization. Bonding with closed interproximal contacts points and metal matrices does not lead to more excesses if done correctly. As it is shown in this picture, at the removal of the metallic matrices, only minor excesses were still present.
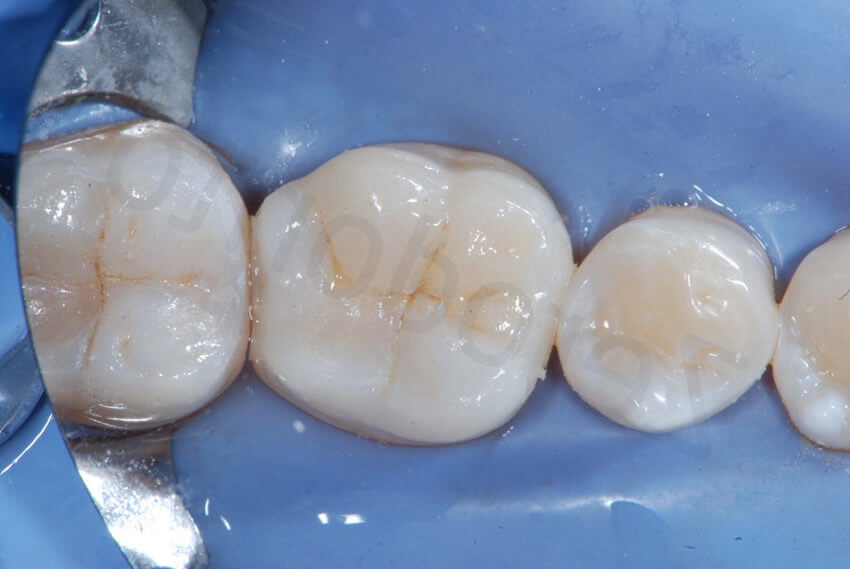
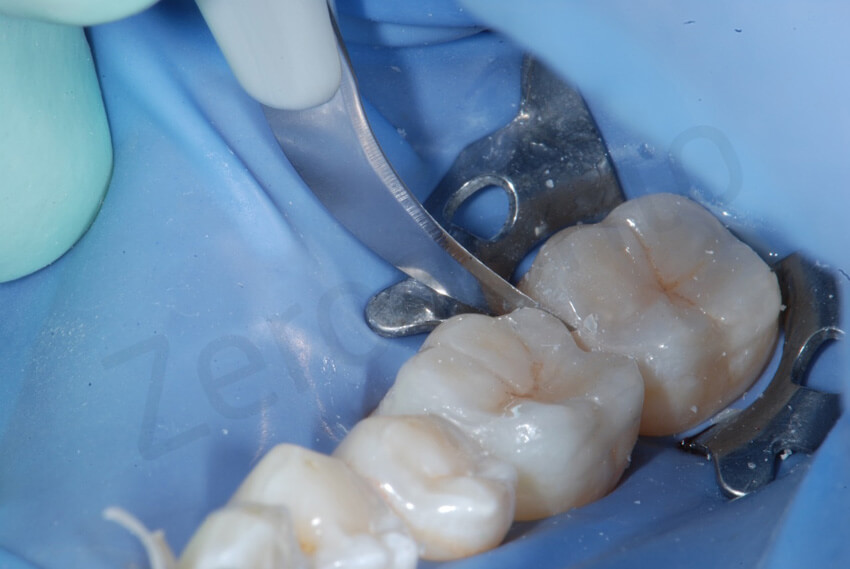
A scalpel may be used to remove the interproximal excesses.
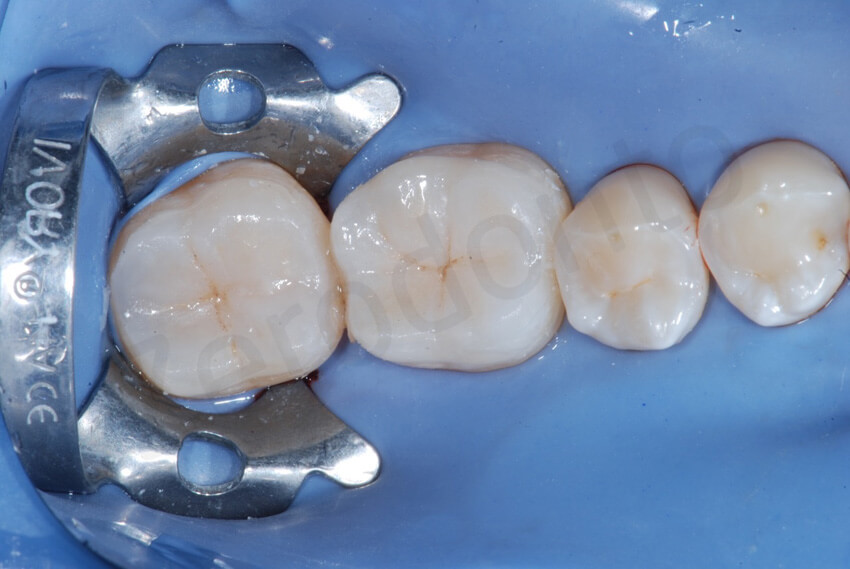

Occlusal view after the bonding of the two mandibular onlays in quadrant 4. Note the perfect esthetic integration of the restorations.
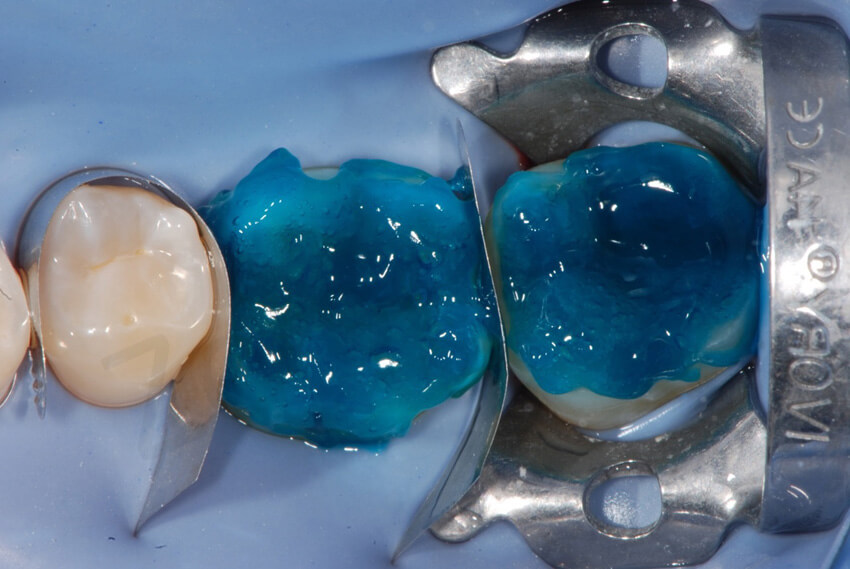
In the other mandibular quadrant, the onlays were bonded at the same time, since the restorations could have been positioned in place even without any interproximal interferences.

during the same visit, the other maxillary ceramic onlays were also delivered.

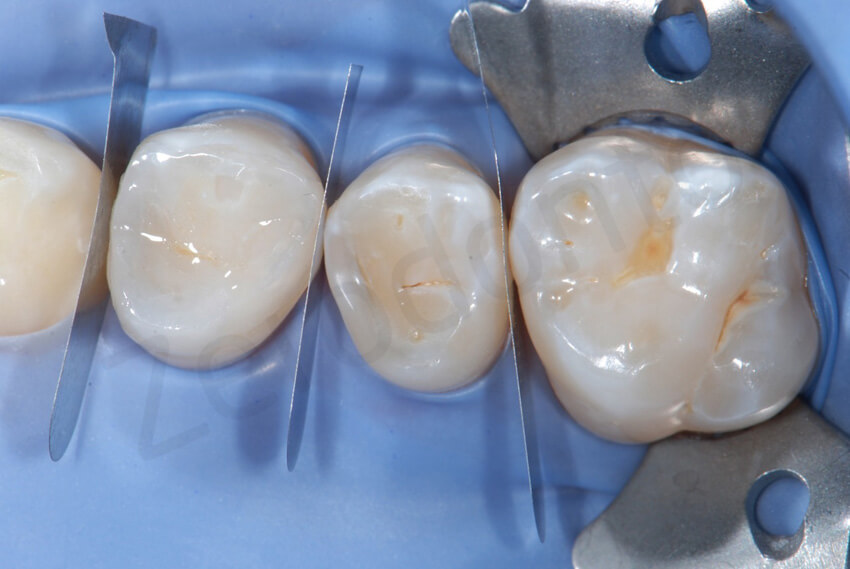
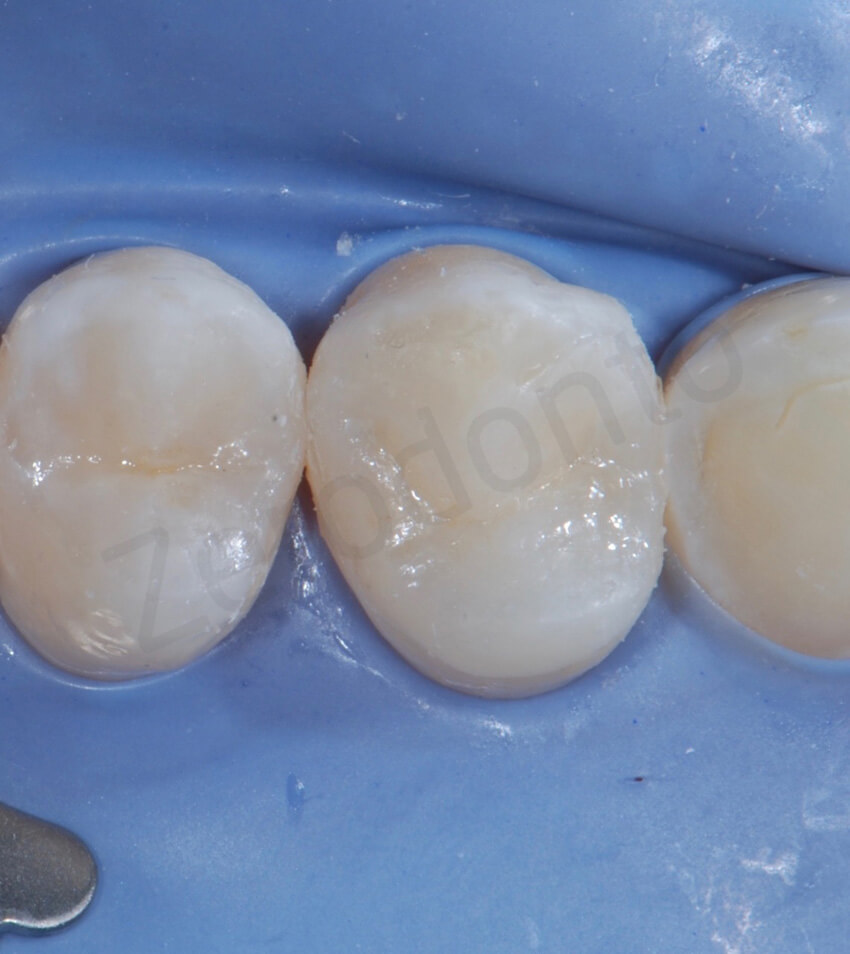
Try-in of the onlays in quadrant 2. The onlays blended so well with the rest of the dentition that it was very difficult to identify their margins. The remarkable esthetic outcome was related to the visibility of the colour of the underlying tooth structure through the restorations.

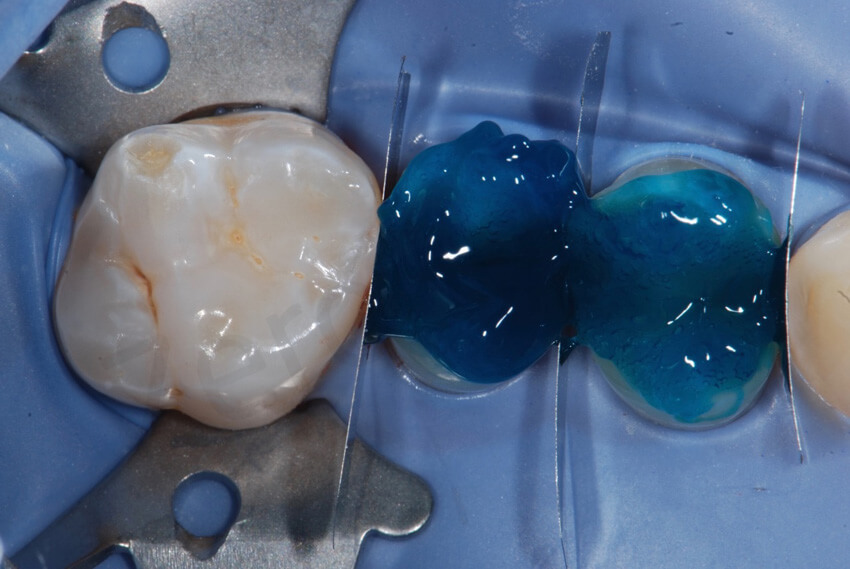
The two onlays were bonded on the premolars at the same time. Metal strips were used to keep the teeth apart and to protect the adjacent teeth during the adhesive procedures.
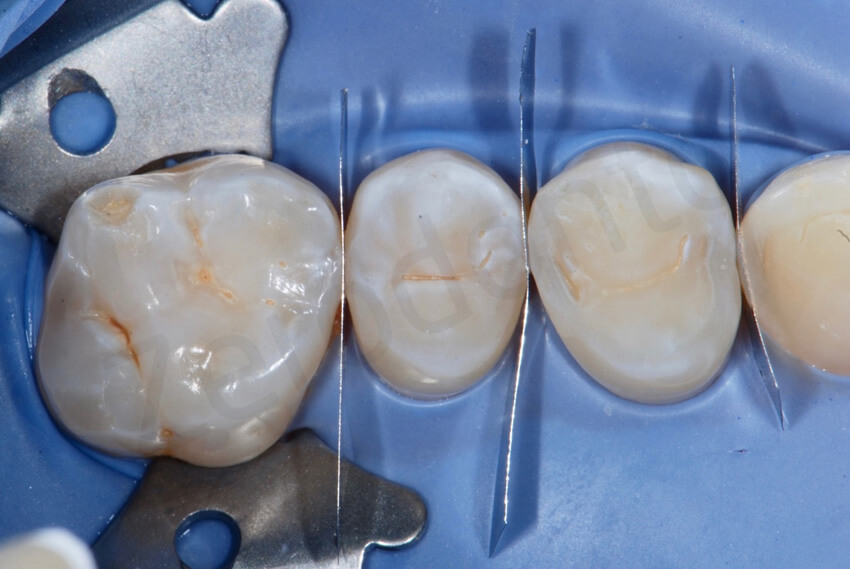
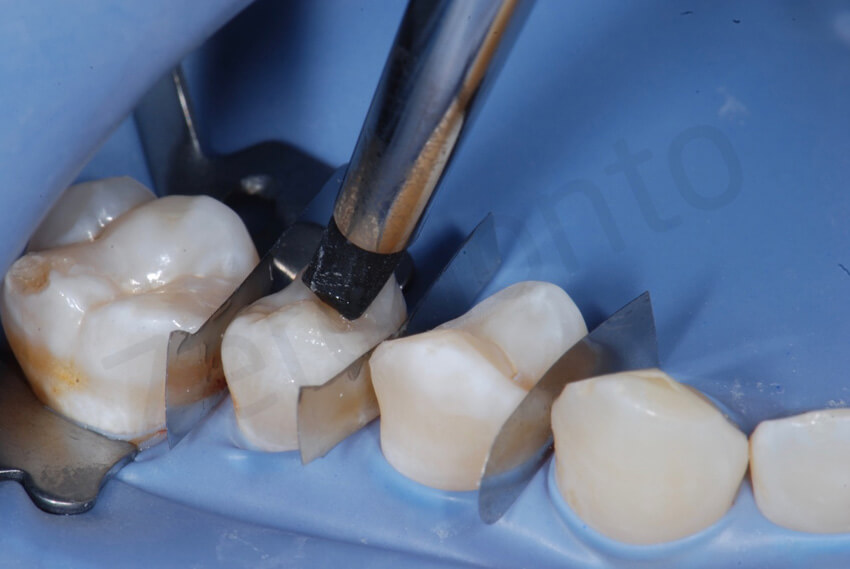
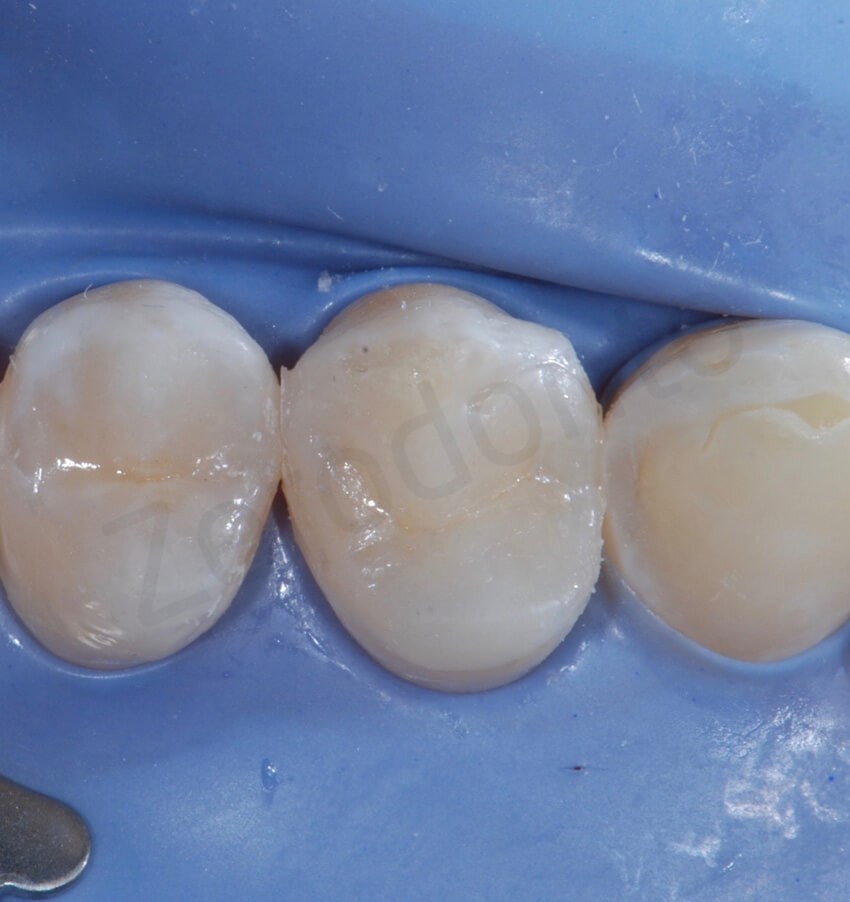
These pictures show the amount of interproximal excesses immediately after bonding at the removal of the metal matrices, and after the final cleaning.
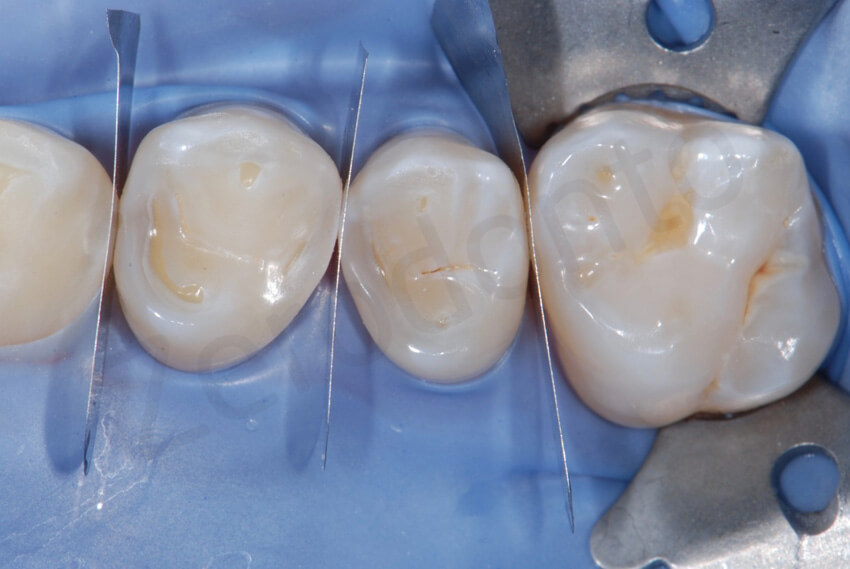
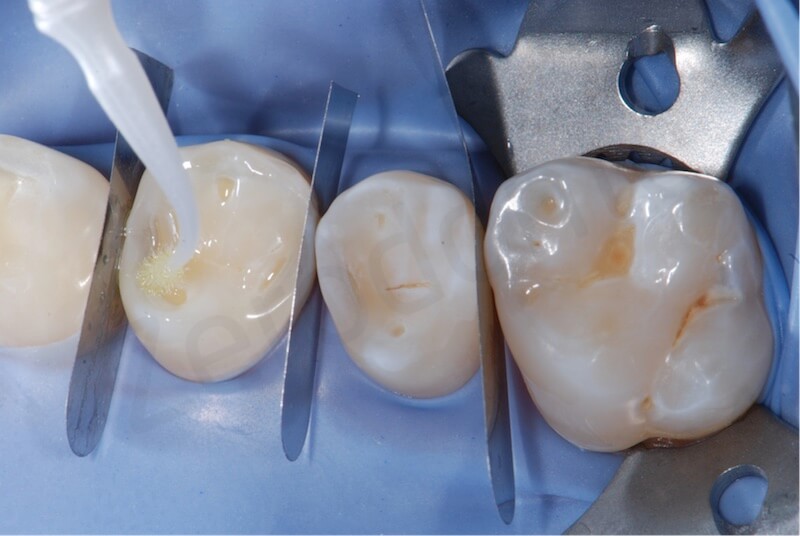
Adhesive steps. The minimal dentin exposure was treated with the primer of the Optibond FL just before delivering the restorations.


Final bonding of the 2 onlays on the premolars in quadrant 1.

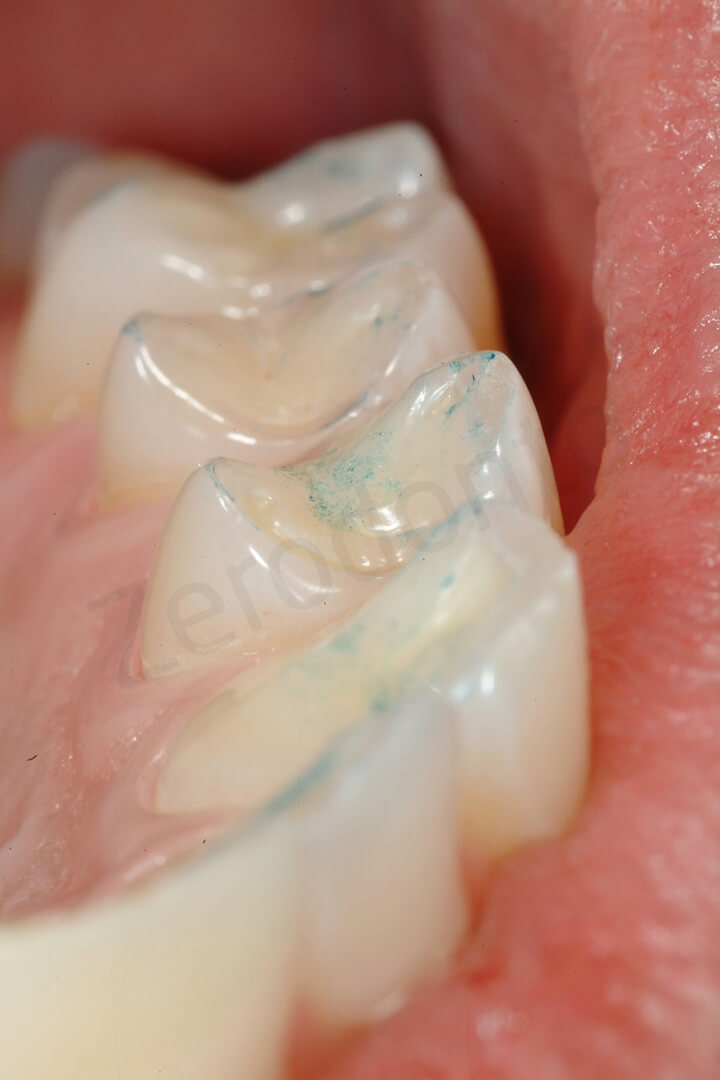
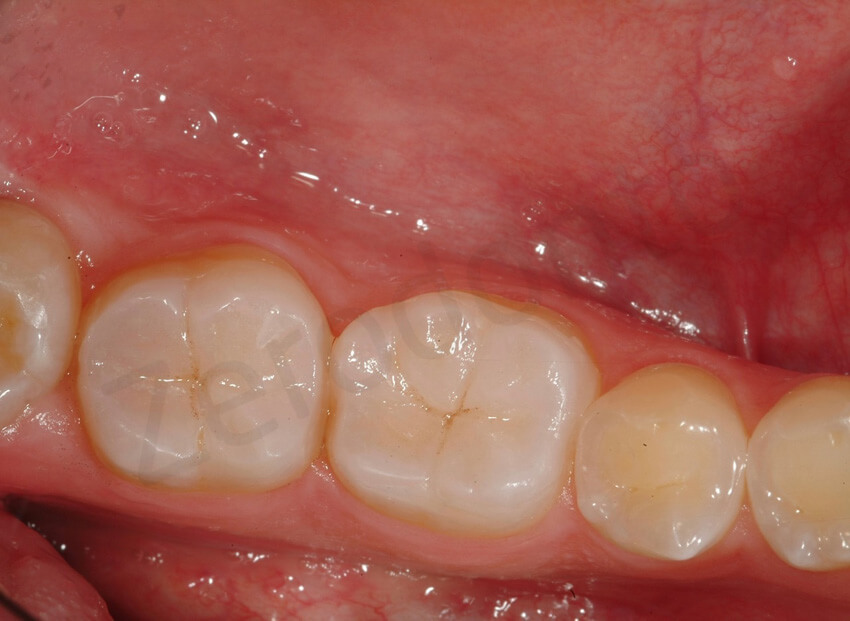
The concave profile of the maxillary premolars was transformed in convex with the delivering of the onlays.

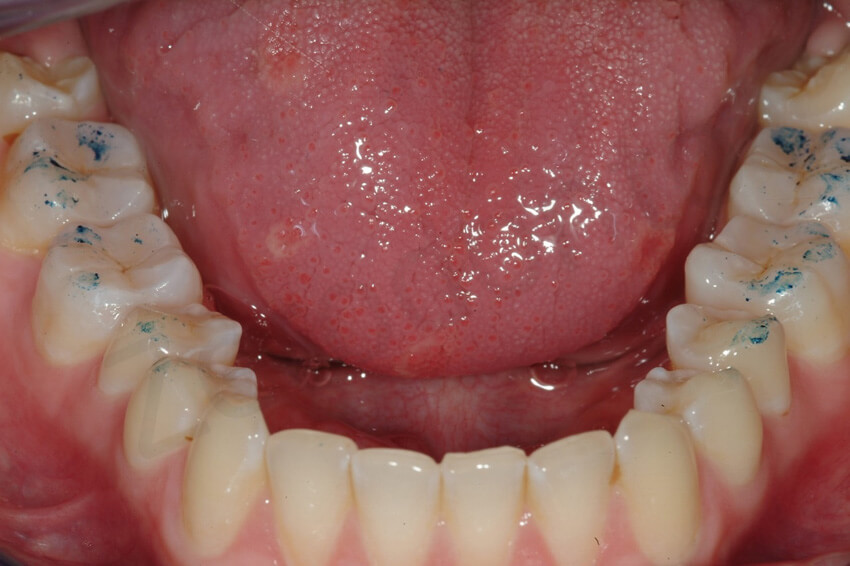
Occlusal contact points immediately after delivering the 8 ceramic onlays. Note the lack of anterior contact points (anterior open bite). As always recommended during the 2 step of the 3 STEP technique, the occlusion was evaluated with the patient NOT anesthetized
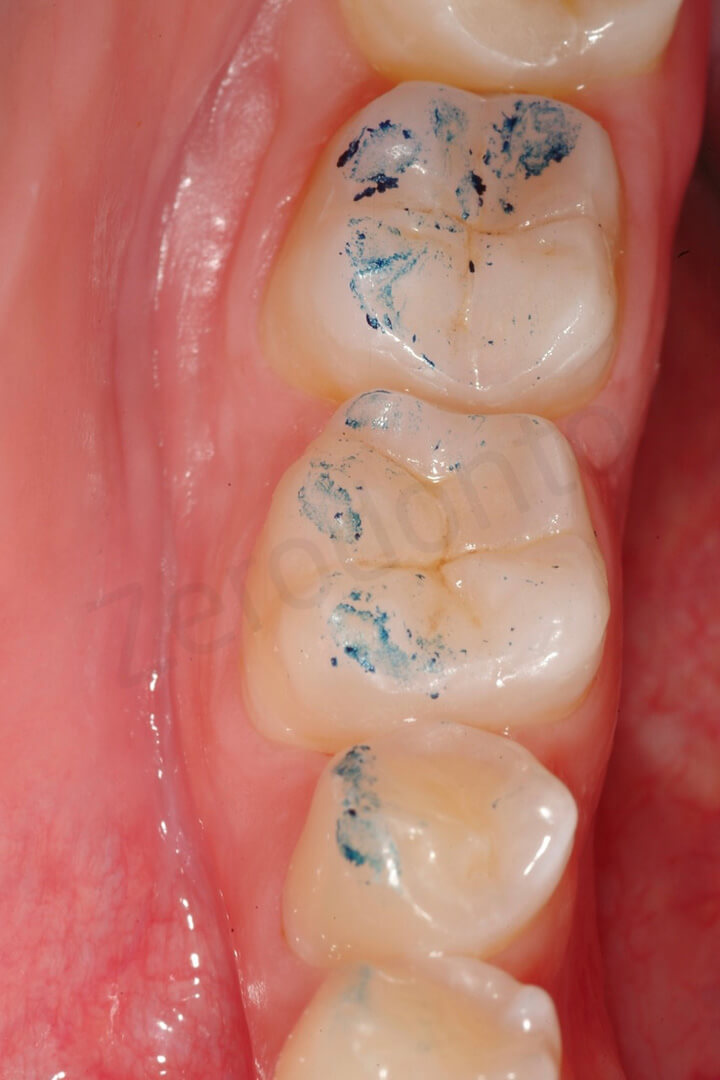
Occlusal contact points at the level of the mandibular arch. This treatment (final very thin ceramic onlays opposing not restored teeth) could have been a very risky therapeutic choice, since in case of major occlusal adjustments the clinician would have had a limited choice on how reducing the excessive contact points. Since touching the enamel of the antagonistic teeth was not an option, all the occlusal adjustments were carried on at the level of the thin onlays with high risk of damaging them. Luckily in this patient the occlusal adjustments were minor, due to the minimal increase of VDO.

After delivering of the 8 posterior onlays, an anterior open bite was created
ANTERIOR VENEERS
The patient’s new occlusion was controlled after 1 week to intercept occlusal interferences. The patient was comfortable, and no signs of temporomandibular joint disorders were detected.
1-week follow-up. Following the 3 STEP technique, after the increase of VDO and the new posterior support, the patient was scheduled for another appointment already after 1 week to control the occlusion and progress with the restoration of the anterior teeth.
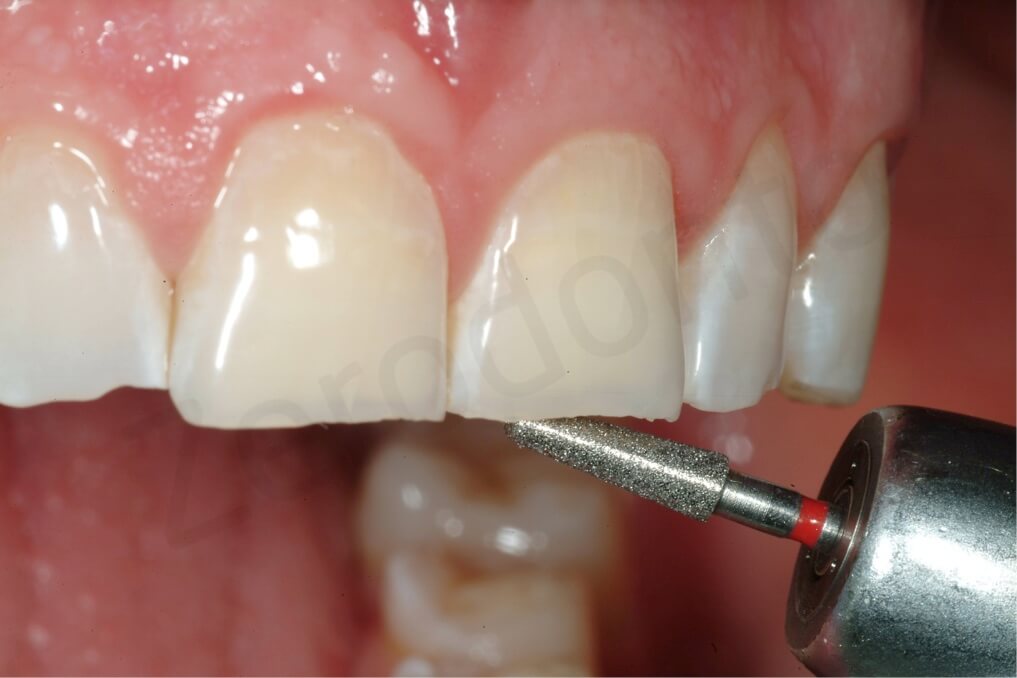
In the following appointment, the palatal aspect of the maxillary anterior teeth was prepared for the palatal veneers. All exposed dentin was immediately sealed without anesthesia. The palatal dentin was cleaned with non-fluoridated pumice, and the most superficial layer was removed with diamond burs. The exposed sclerotic dentin was etched with 37% phosphoric acid for 15 seconds and immediately sealed with three-step etch-and-rinse ethanol- and water-based adhesive (Optibond FL) and flowable composite resin (Tetric Flow T, Ivoclar Vivadent) just before the final impression was taken.5–9

In order to prepare the maxillary anterior teeth for the palatal veneers no tooth preparation was considered, except smoothening the unsupported enamel prisms of the incisal edges, and sealing the exposed dentin before the final impression.
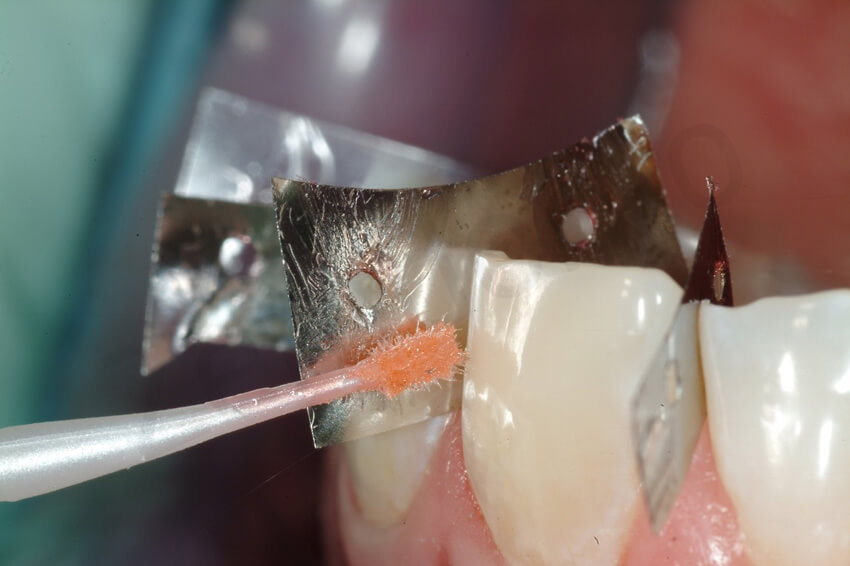
The final impression was taken with the interproximal contacts closed. To facilitate trimming of the dies, metallic matrix bands were placed in between the teeth. Access holes made with a rubber dam puncher were used to ensure that the strips were captured in the impression. The use of additional glue as shown in the picture is not necessary.
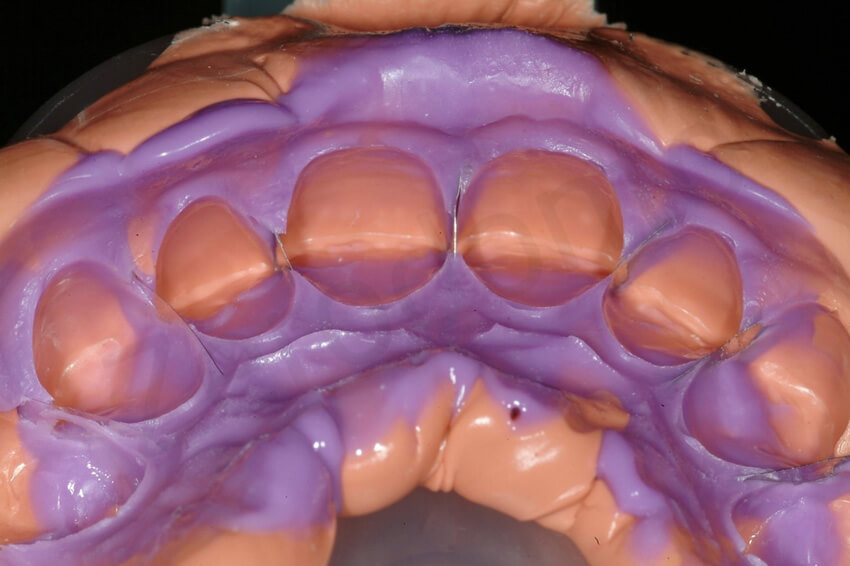
Finally, the irregular margins of the incisal edges were smoothed. No additional tooth preparation was necessary. The interproximal contacts between the maxillary anterior teeth were left closed, and the final impression was taken using metal strips in between the teeth, as for the posterior teeth. No provisional restorations were delivered.
It was decided to fabricate the palatal veneers in pressed lithium disilicate glass-ceramic (IPS e. max Press) for the maxillary lateral incisors and canines and in composite resin (Adoro, Ivoclar Vivadent) for the maxillary central incisors. The presence of composite resin on the palatal aspect would facilitate not only the bonding procedure with the future ceramic facial veneers (sandwich approach), but also the eventual creation of an access hole for future root canal treatment.
The same laboratory technique described for the thin occlusal ceramic onlays was adopted for the palatal veneers, with the exception of those for the maxillary central incisors. For the central incisors, a laboratory microfilled composite resin was used.
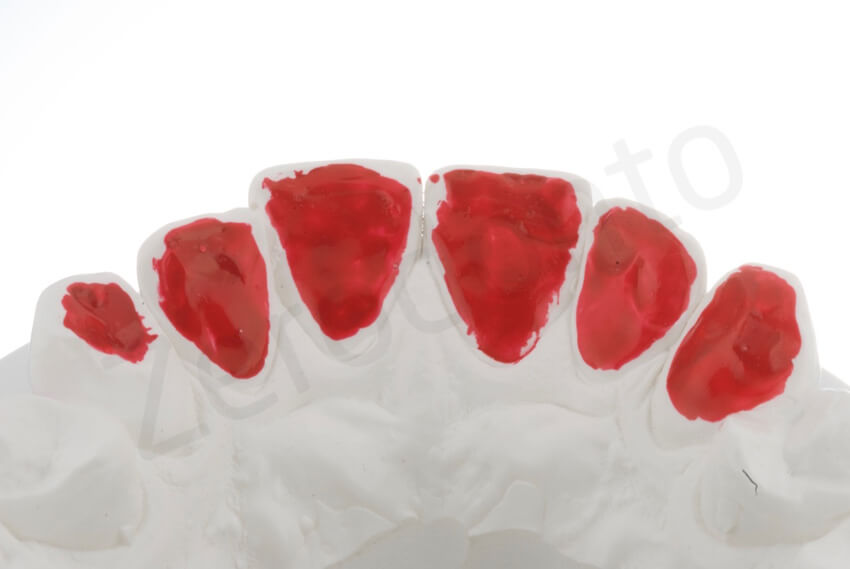
Die spacer was applied to the master cast before duplication of the working cast using the investiment material. Afterwards, the future shape of the palatal veneers was waxed to fabricate the pressed ceramic restorations.
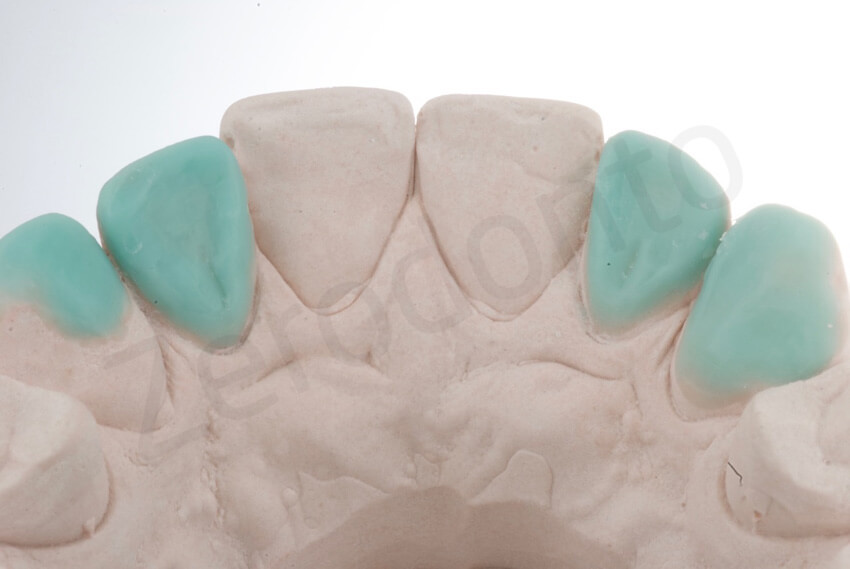
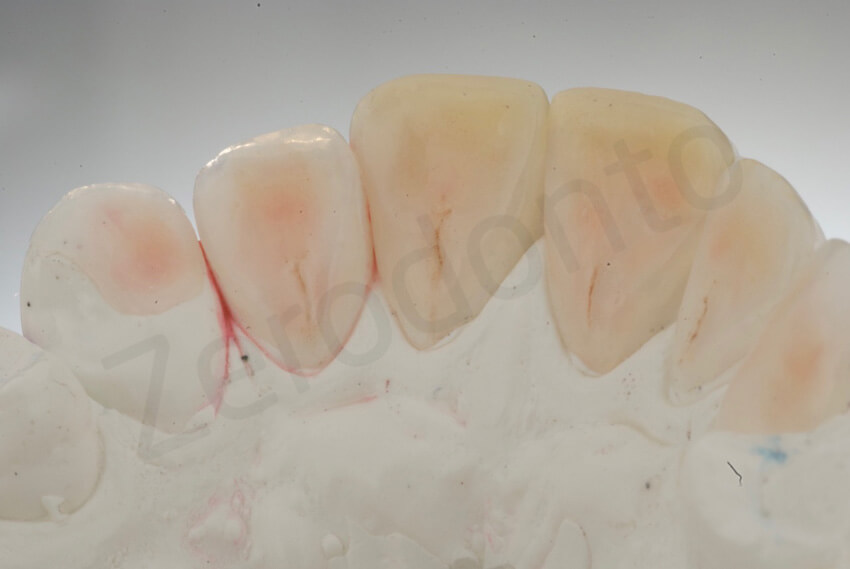
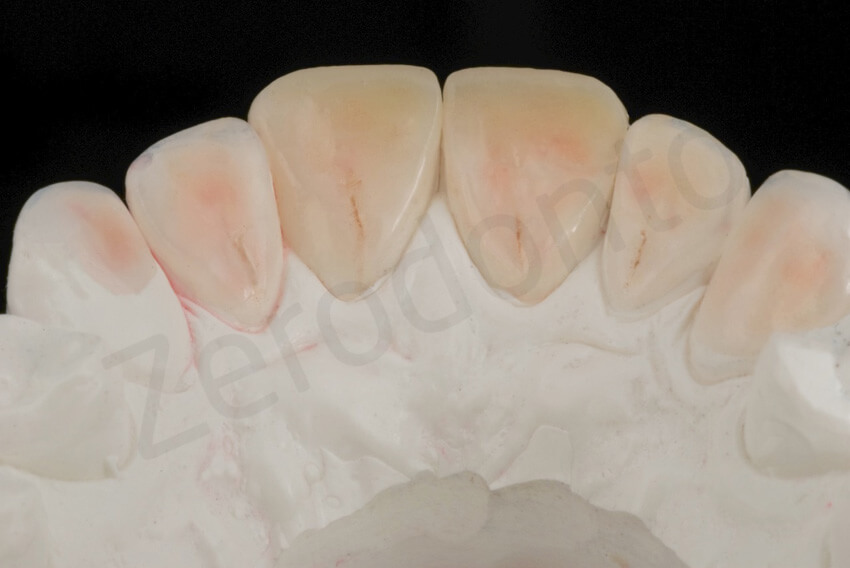
Palatal veneers on the master models. The two central incisors were restored with composite palatal veneers.
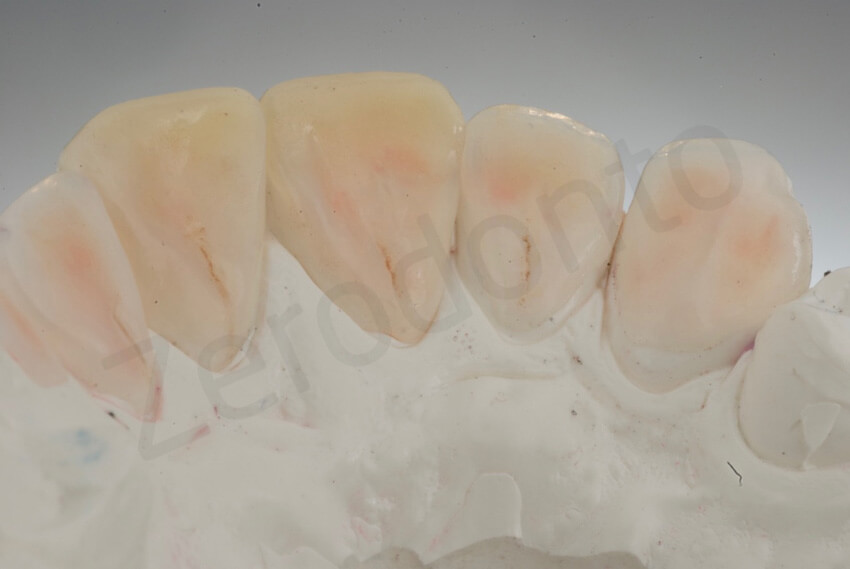
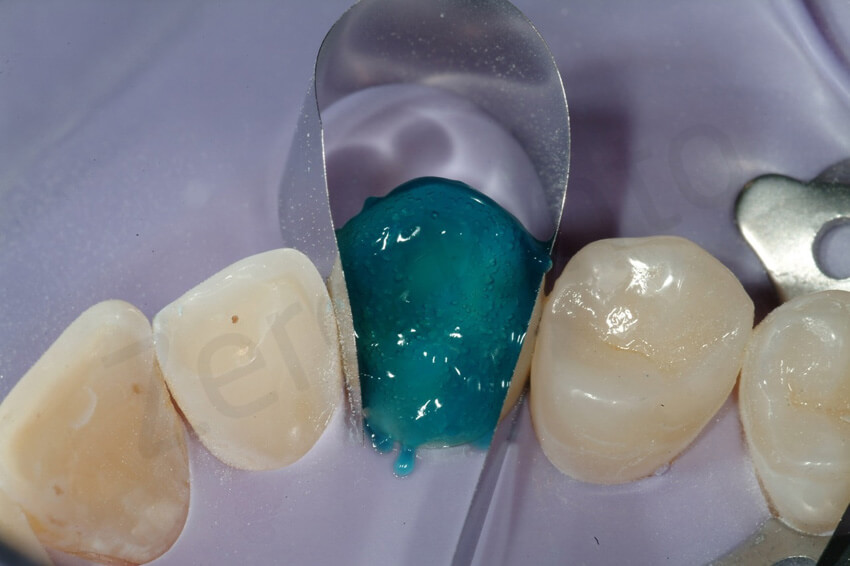
After 2 weeks, the six palatal ceramic veneers were bonded, one at a time, under rubber dam without anesthesia. A three-hour appointment was necessary. The sealed palatal dentin was tribochemically coated (Cojet, 3M ESPE, St Paul, Minnesota, USA), the surrounding enamel was etched with 37% phosphoric acid for 30 seconds, and the adhesive (Optibond FL) was applied to the enamel and dentin and left uncured.
The intaglio surfaces of the palatal composite resin veneers were also tribochemically coated. The four pressed ceramic palatal veneers were etched with hydrofluoric acid for 20 seconds.
All veneers were cleaned in alcohol and placed in an ultrasonic bath, followed by the application of three coats of silane (Monobond Plus). A coat of the adhesive resin was placed and left unpolymerized. Composite resin (Enamel plus) was heated and applied to the restorations before they were placed on the teeth and then light polymerized for 90 seconds for each surface.
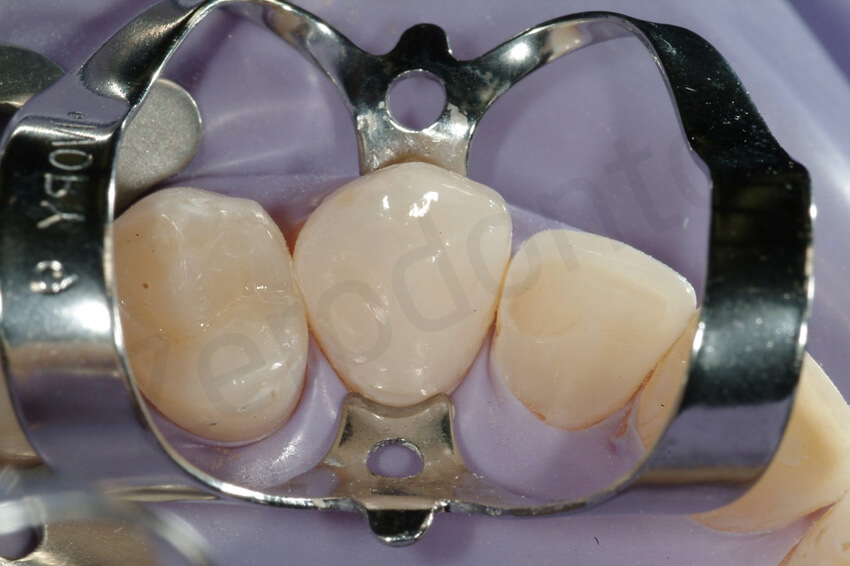
Try-in of the palatal veneers. After the rubber dam positioning, to better expose the cervical aspect of the teeth, a clasp was necessary for some of the teeth. Note the closed interproximal contacts.
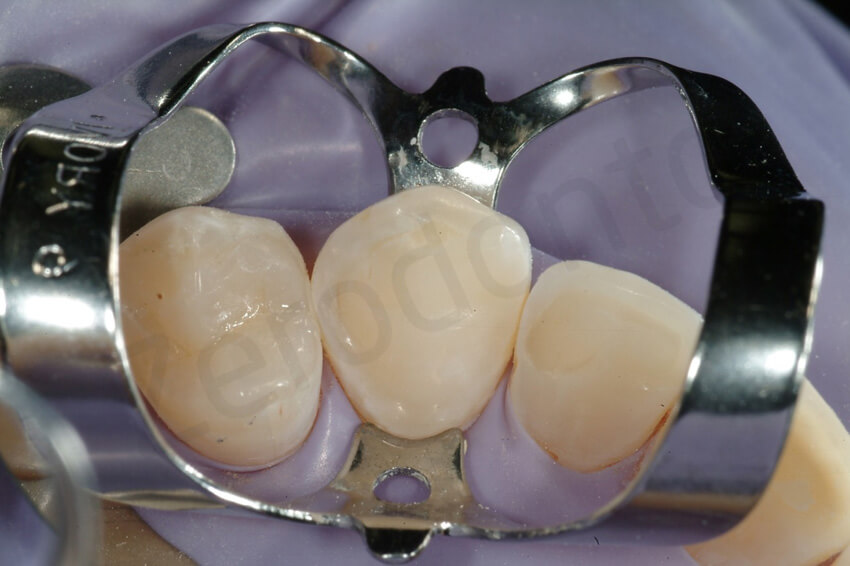
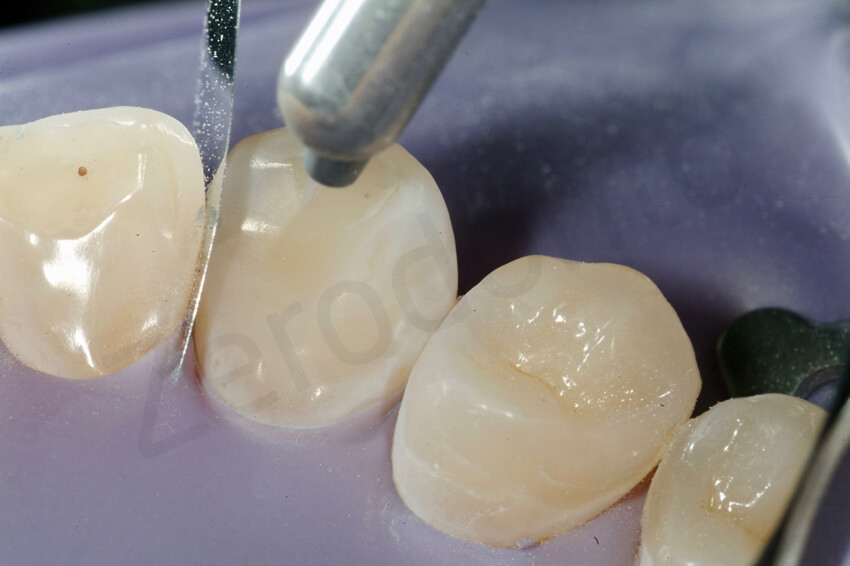
Since the exposed dentine had been sealed before the final impression, to reactivate the dentine, the surfaces were sandblasted. The enamel was then etched with orthophosforic acid.

Occlusal view of the final palatal veneers. The maxillary lateral incisors and canines were made with highly opalescent pressed ceramic (Impulse 1, IPS e.max Press), whereas the maxillary central incisors were made with composite resin (Adoro).
To complete the treatment, the next step was the restoration of the facial aspect of the maxillary central incisors. Unfortunately, the initial position of these teeth was very labial. To keep the tooth preparation to a minimum, the prospect of a slightly bulkier facial surface was discussed with the patient (ADDITIVE approach). Thanks to the preview provided by the mock-up on the central incisors, the patient agreed to the slightly thicker teeth. The option to restore the facial aspect of the lateral incisors was not considered due to the principle of minimal invasiveness. Unfortunately, minimal tooth preparation of the central incisors was inevitable due to their dark yellowish color. Facial veneers with a thickness of 1.0 mm were necessary to mask the underlying color. Because the teeth did not respond to the vitality test, no local anesthesia was necessary for the preparation.
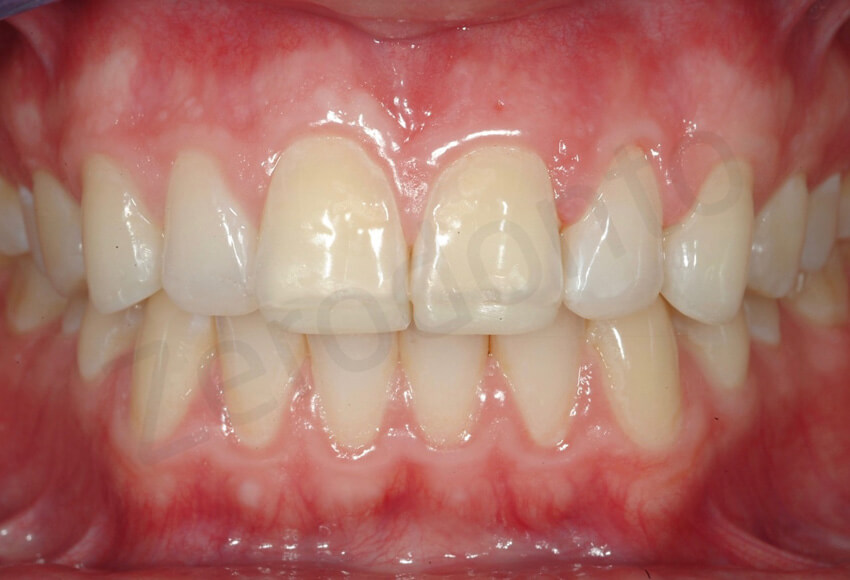
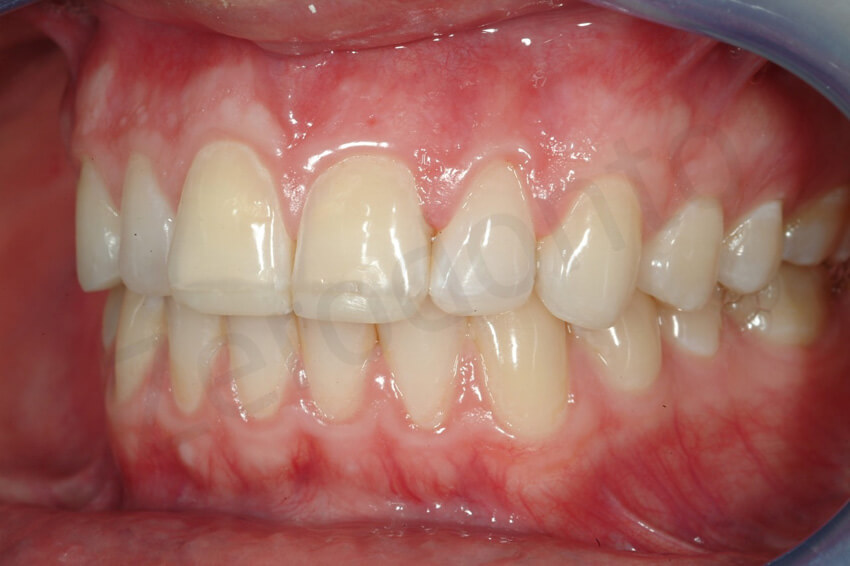
Frontal view after completion of the MODIFIED 3 STEP technique. The new edges of the lateral incisors were well blended, whereas the central incisors showed a highly translucent band at the interface with the palatal veneers. Due to the colour discrepancy, it was proposed to remove the length added by the composite resin restorations. However, the patient preferred to keep the teeth longer until the facial veneer deliver.
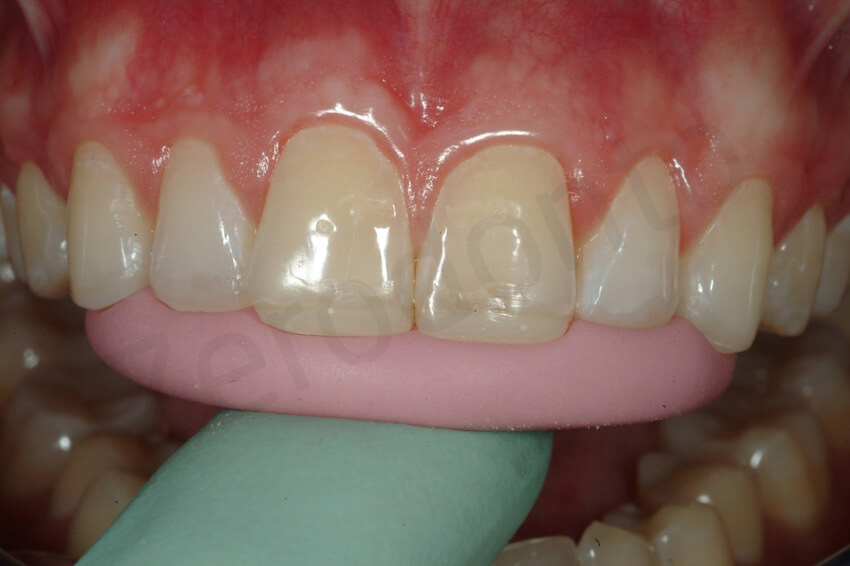
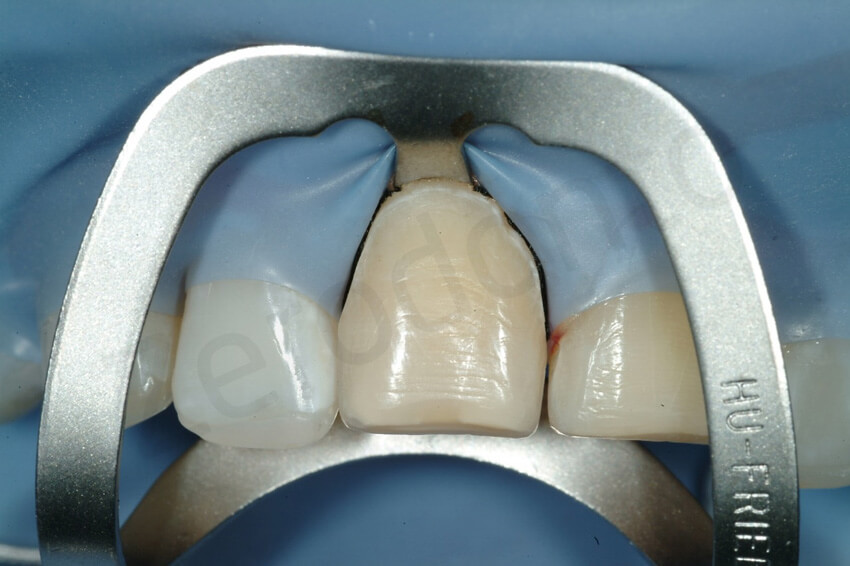
Facial veneer preparation. Try-in of the incisal reduction key. After the removal. The length added with the palatal veneers was completely removed and not additional shortening of the tooth was necessary.
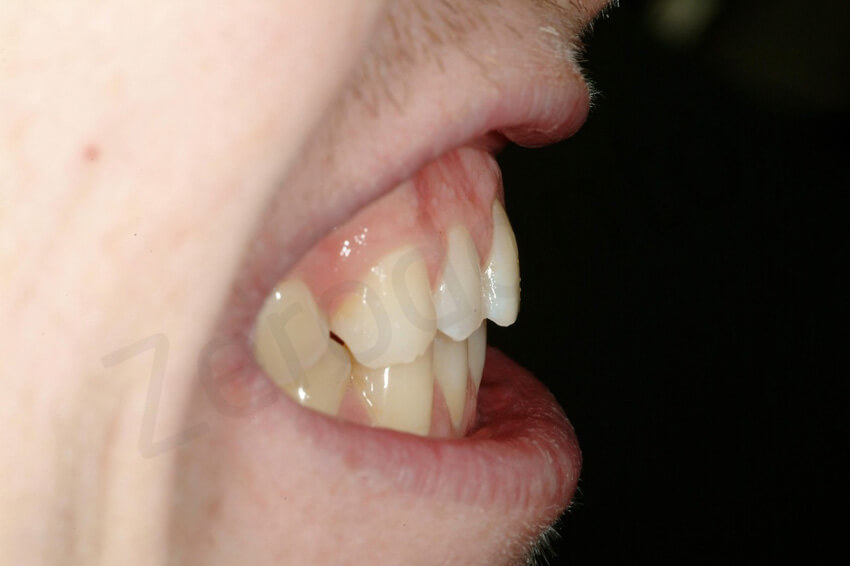
Due to the prominent facial inclination and the teeth, a minimal invasive procedure was necessary to provide the laboratory technician with the sufficient space to mask the dichromic surfaces without bulking the teeth excessively. The veneer preparation was confined to enamel. Remaining composite resin is still visible at the incisal surface. No dentin was exposed.
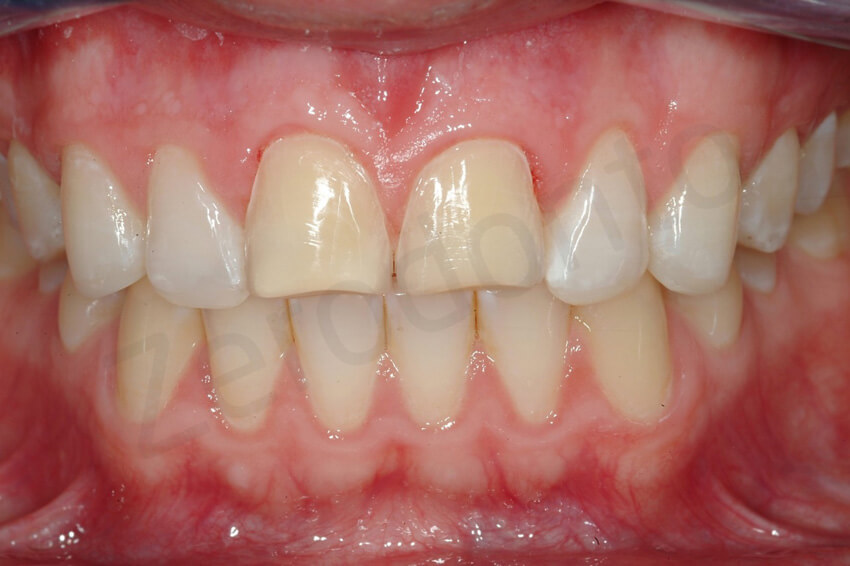
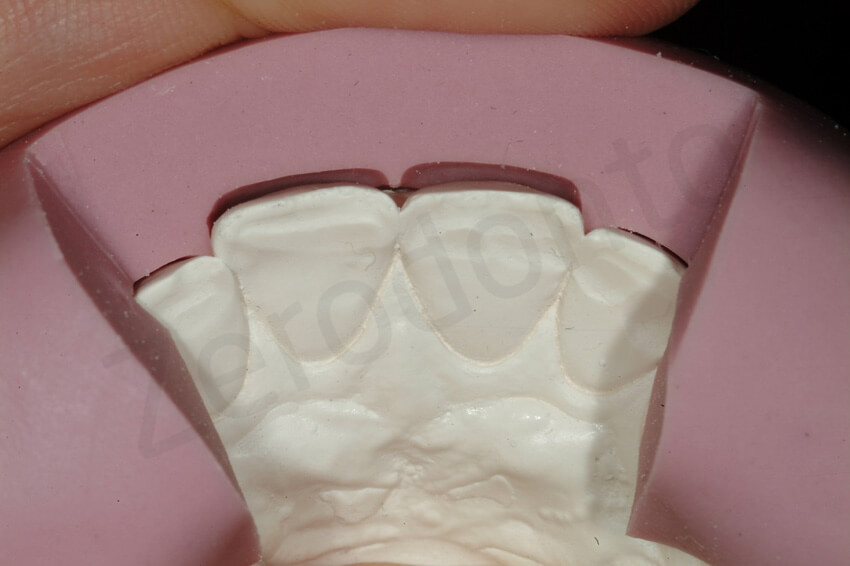
Facial reduction using a vestibular reduction key. Even thought an initial ADDITIVE mock-up was fabricated to confirm with the patient the slightly bulker aspect of the restoration, a very minimal preparation was still necessary, but no dentin was exposed.
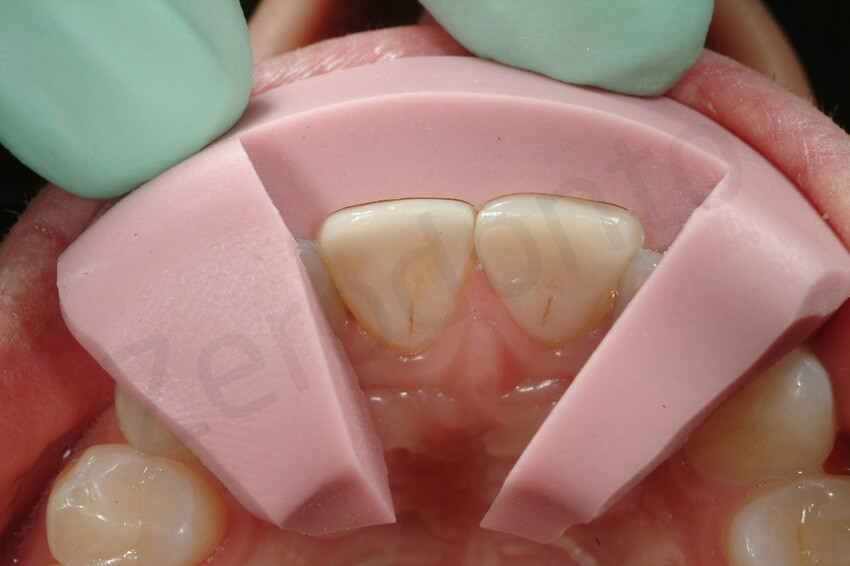
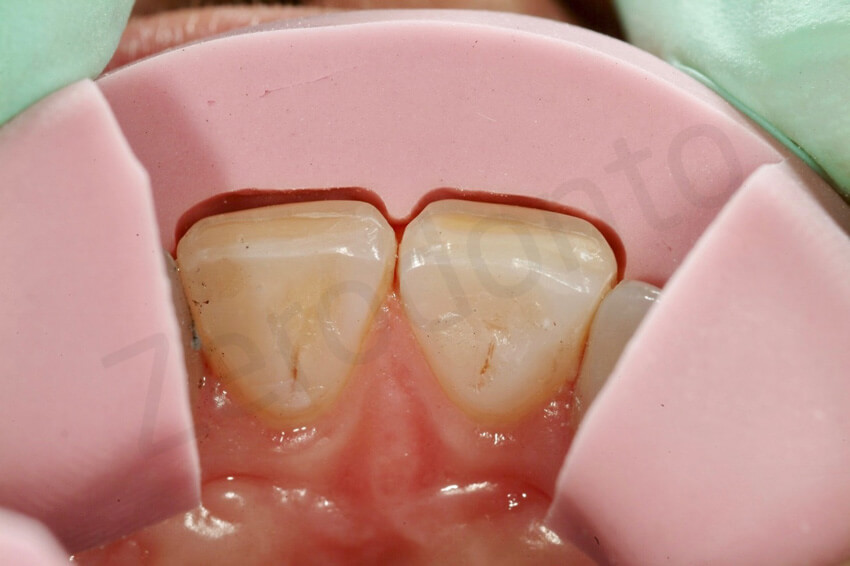
After the final impression, provisional restorations were fabricated directly in the mouth using a provisional composite resin material (Telio, Ivoclar Vivadent), and retention was achieved by the contraction of the product and the presence of minimal interproximal excess.
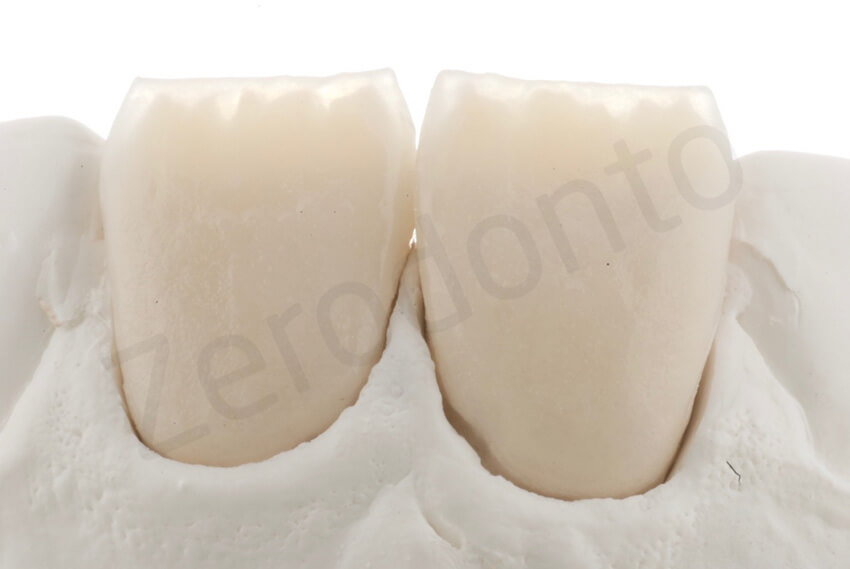
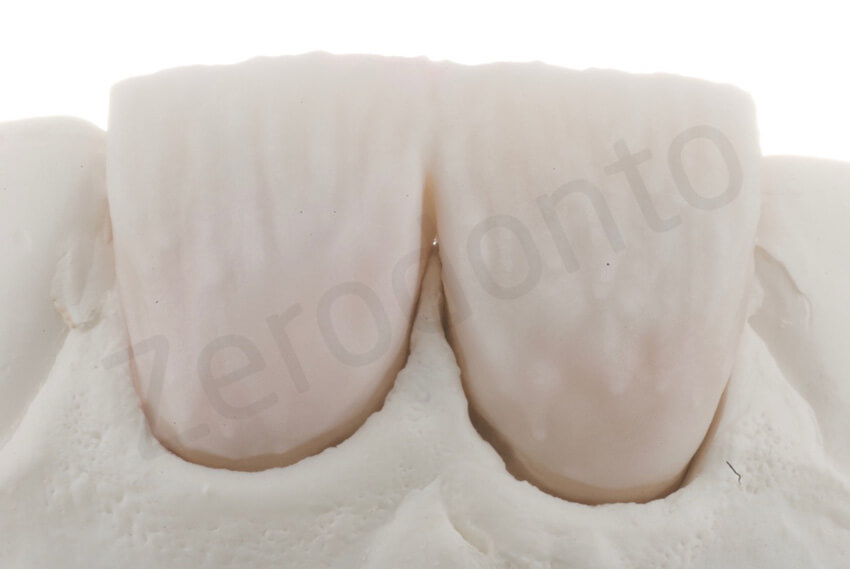
The labial veneers were fabricated using the refractory die technique and feldspathic porcelain. Ceramic layering was performed to better match the color and optical details of the adjacent anterior teeth. These highly translucent facial veneers blend easily with the underlying preparation.
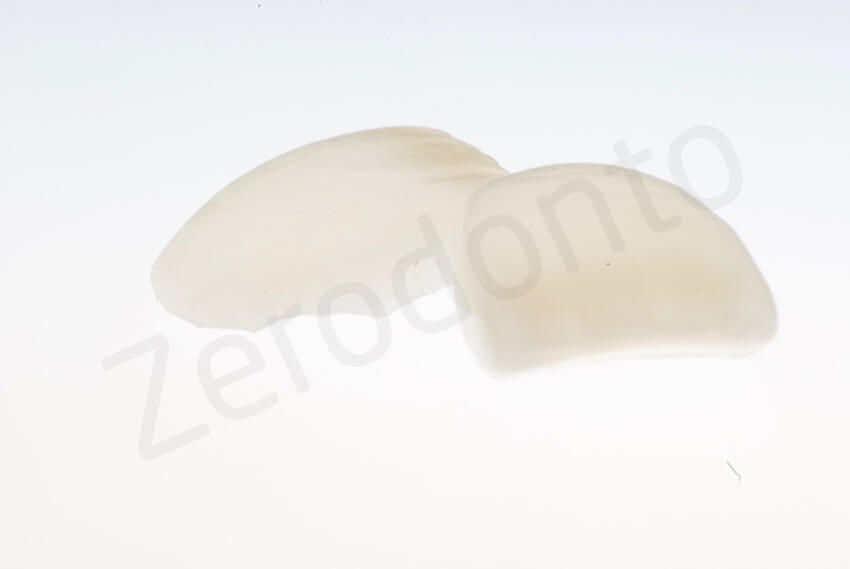
Feldspathic porcelain veneer build-up; extremely thin and highly translucent porcelain veneers
Bonding of the feldspathic ceramic veneers was carried out after 2 weeks, following the protocol developed by P. Magne.10–14 Final external bleaching provided a pleasing esthetic outcome. The patient was very satisfied with the overall treatment. In terms of biologic success, no tooth preparation was performed for this almost full-mouth rehabilitation except for the facial surfaces of the maxillary central incisors.
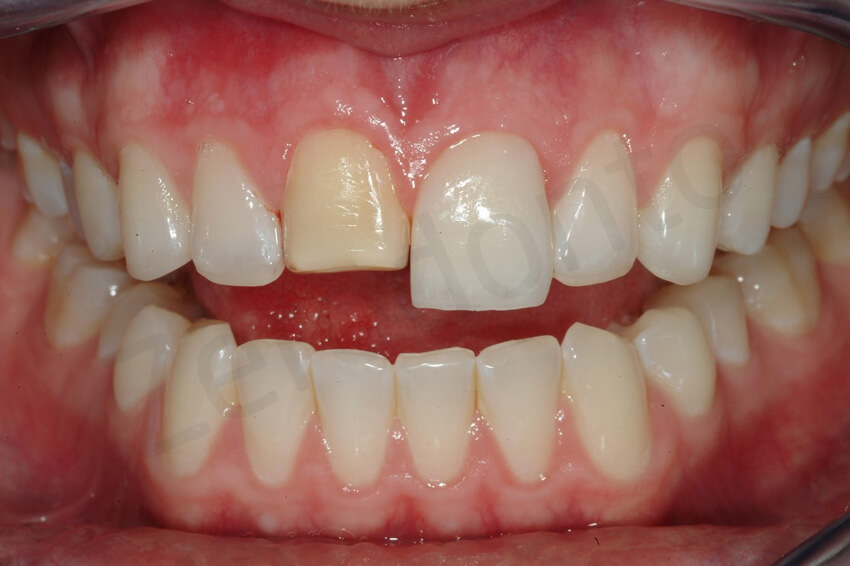
Facial ceramic try-in for shade control, before the rubber dam positioning.
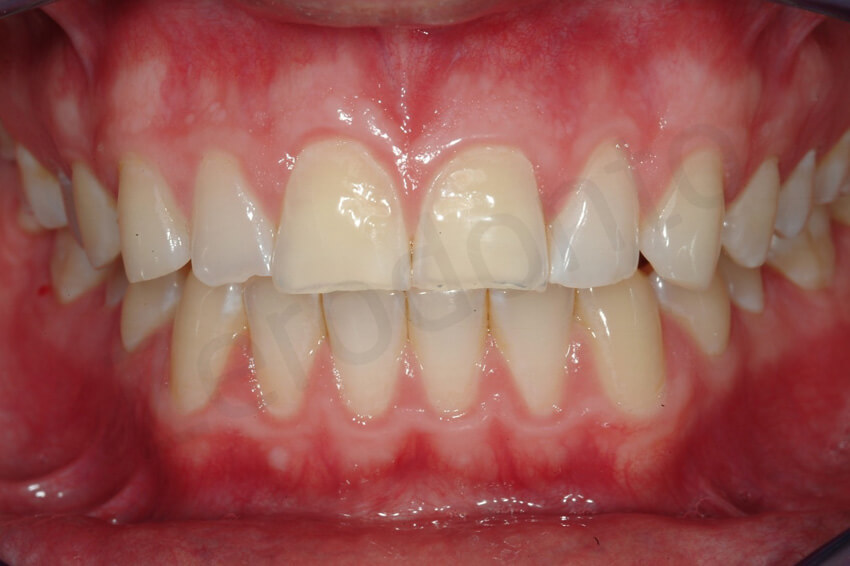
initial status and at the completion of the rehabilitation.
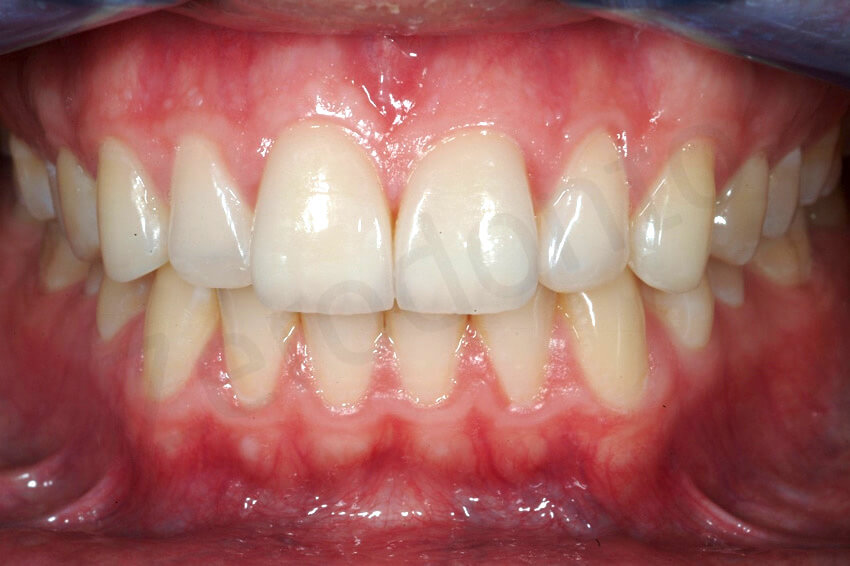
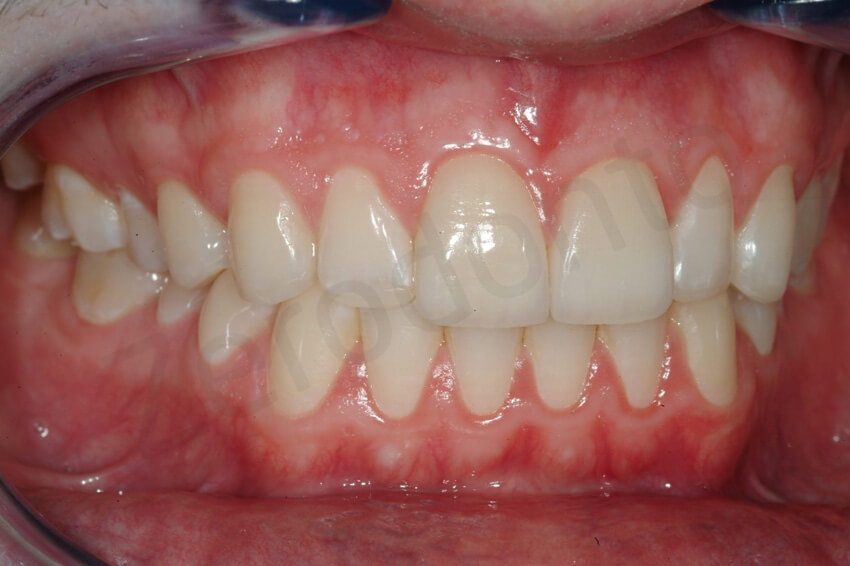
Final pictures taken with a simple ring flash.
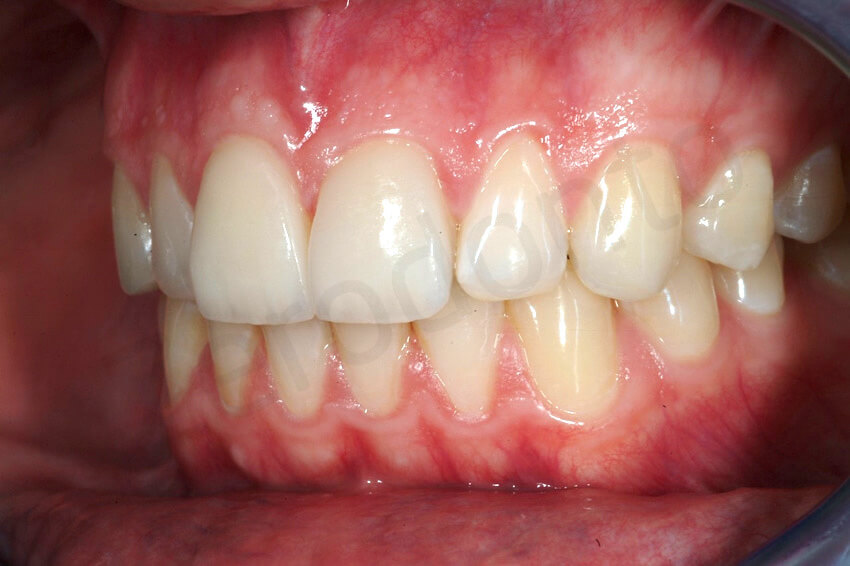
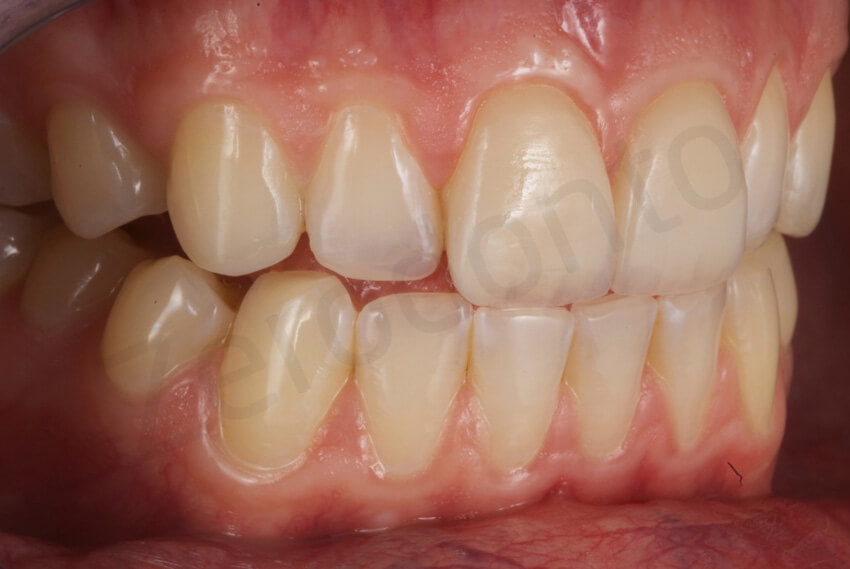
Final pictures taken with diffused light to enhance the details of the facial ceramic veneers.
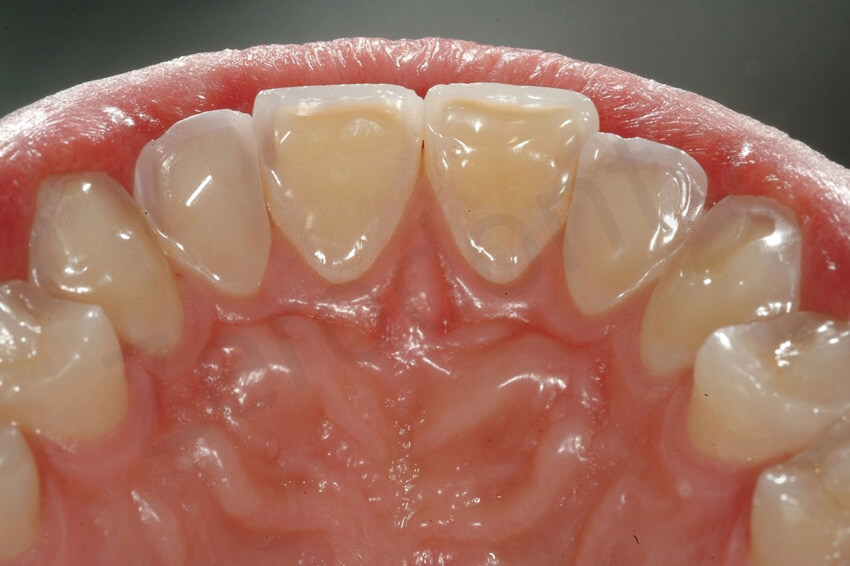
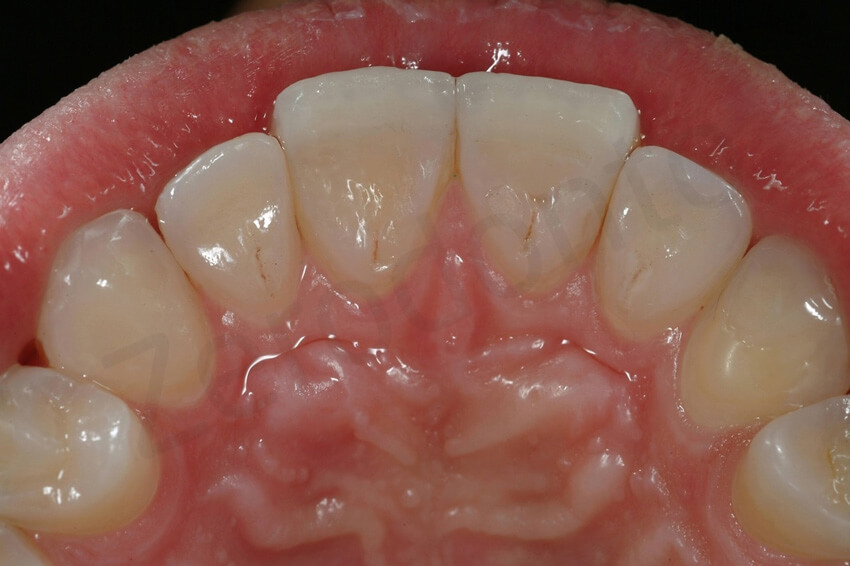
Initial status and final palatal view. Note the junction between the composite palatal veneers and the ceramic facial veneers at the level of the two central incisors.

Final smile.
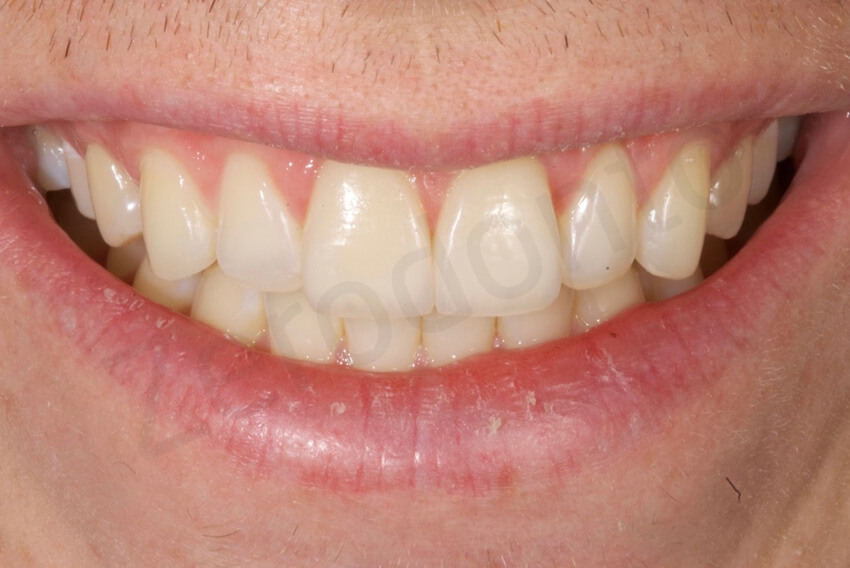
Initial smile and after the rehabilitation, where a gummy smile became evident.
The incisal edges of the maxillary anterior teeth were reinforced by the presence of the restorative materials, the exposed dentin was covered, and the thinner enamel was also reinforced. An occlusal guard was delivered to the patient to control his light para-functional habit, and a visit to a gastroenterologist was again recommended.
1-year follow-up. The patient presented with a marginal gingivitis, which was most probably aggravated by the mouth breathing habit of the patient.
initial status, after the posterior onlays and at the 1 year follow-up.
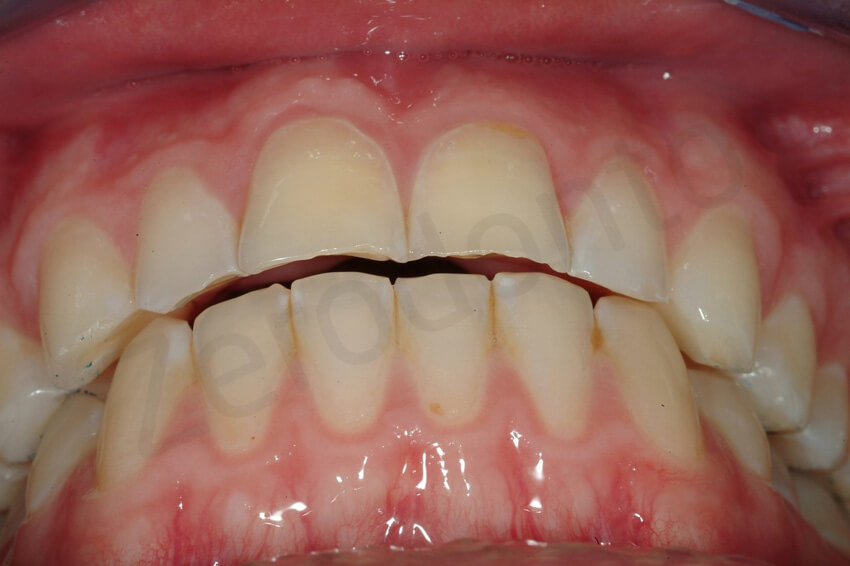
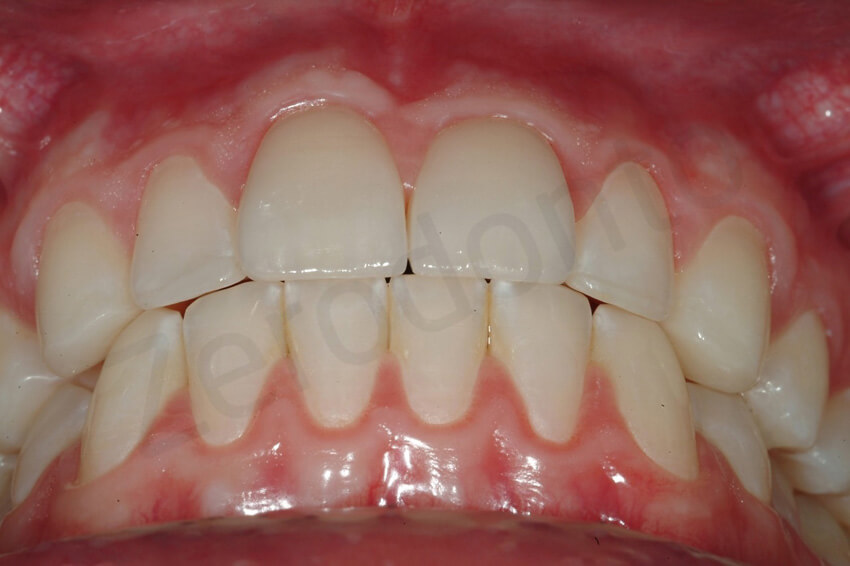
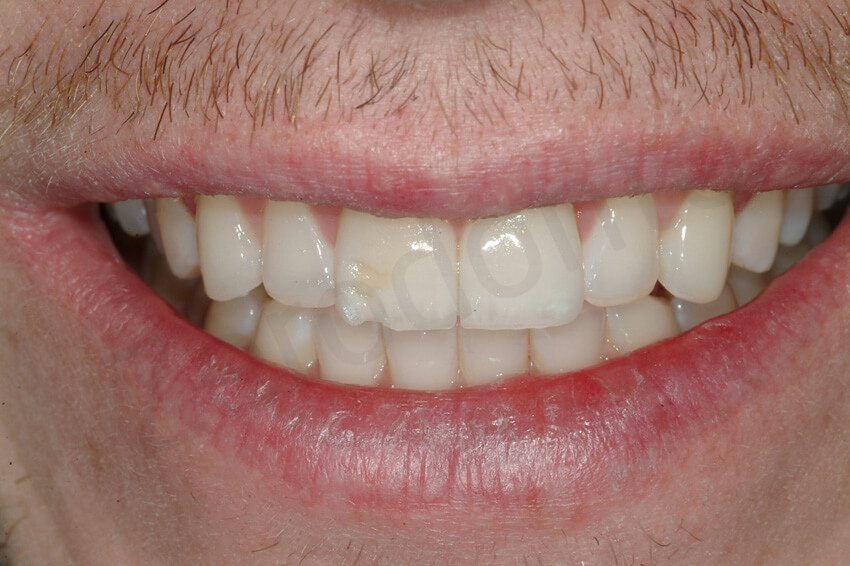
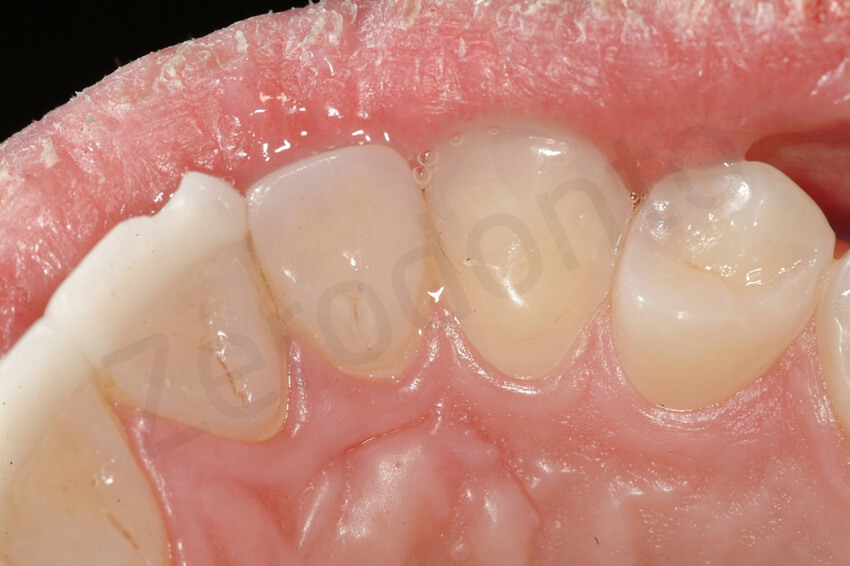
2-year follow-up. The patient presented with a fractured facial veneers due to a trauma on his central incisor. A direct composite repair was done to avoid the veneer’s removal.
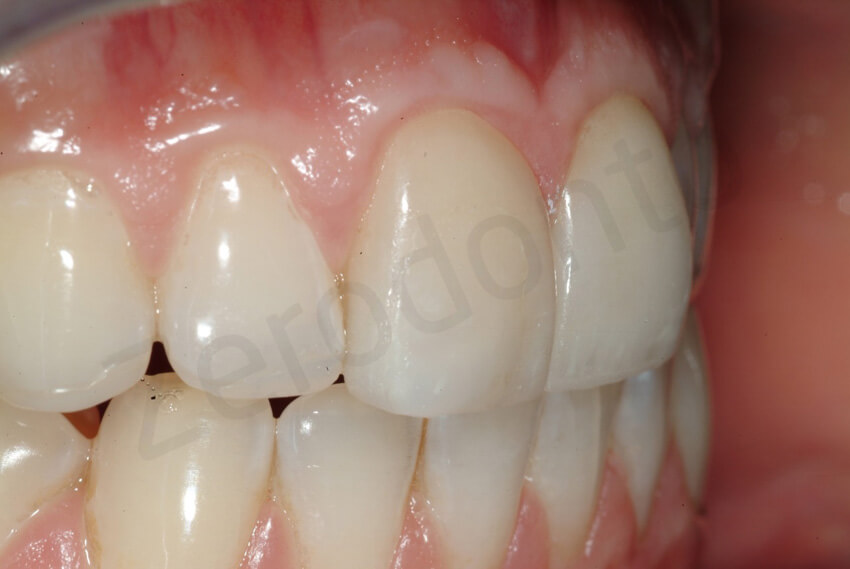
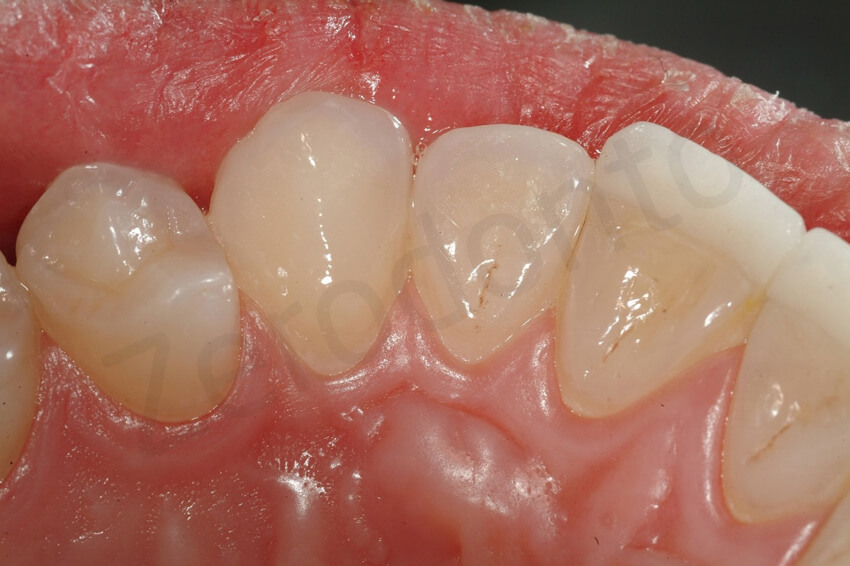
The palatal veneers were intact. The damage of the facial veneer was limited to its vestibular aspect.
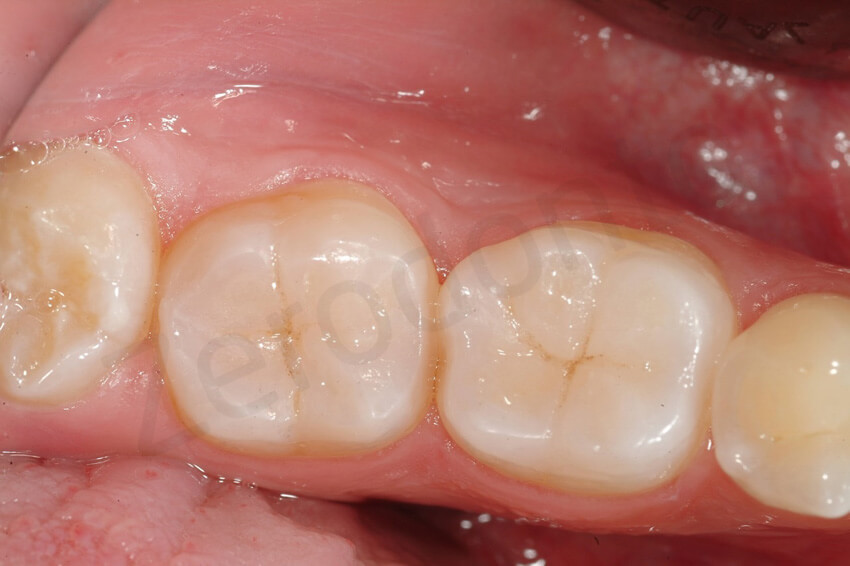
2-year follow-up. The posterior restorations were intact.
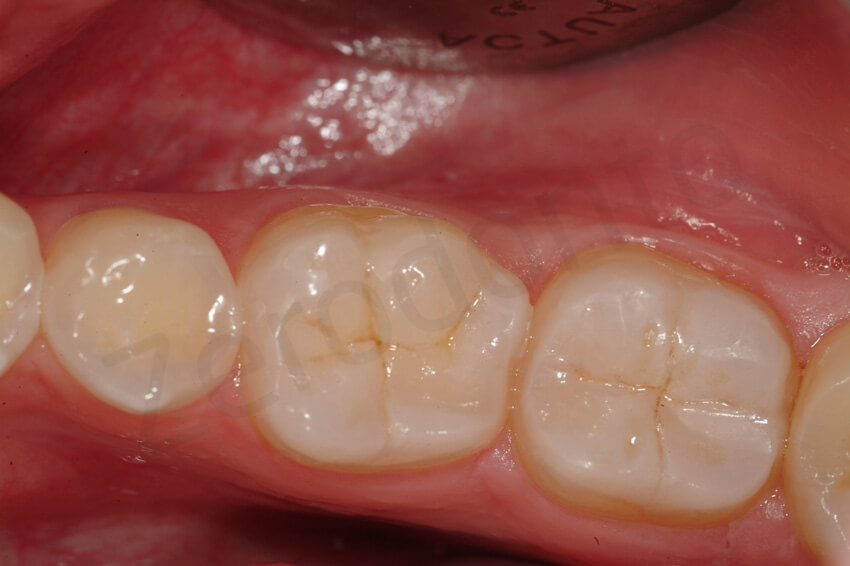
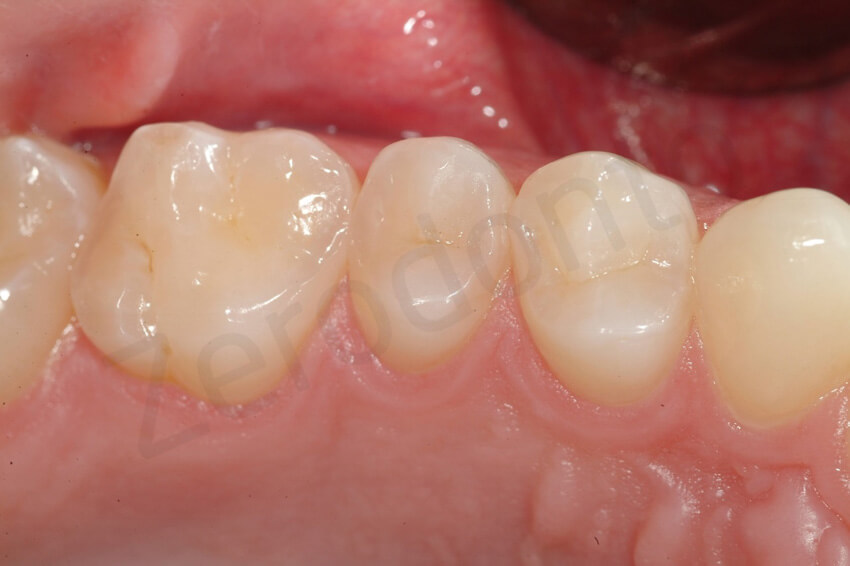
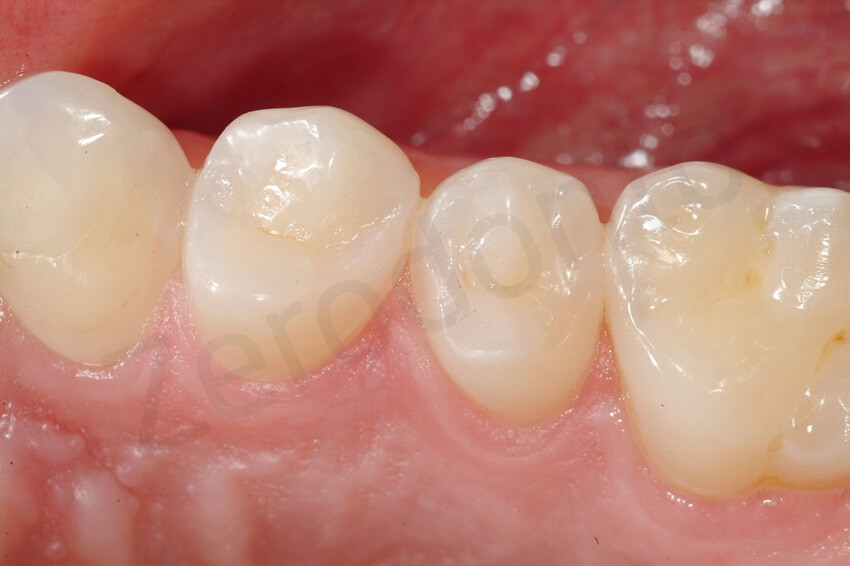
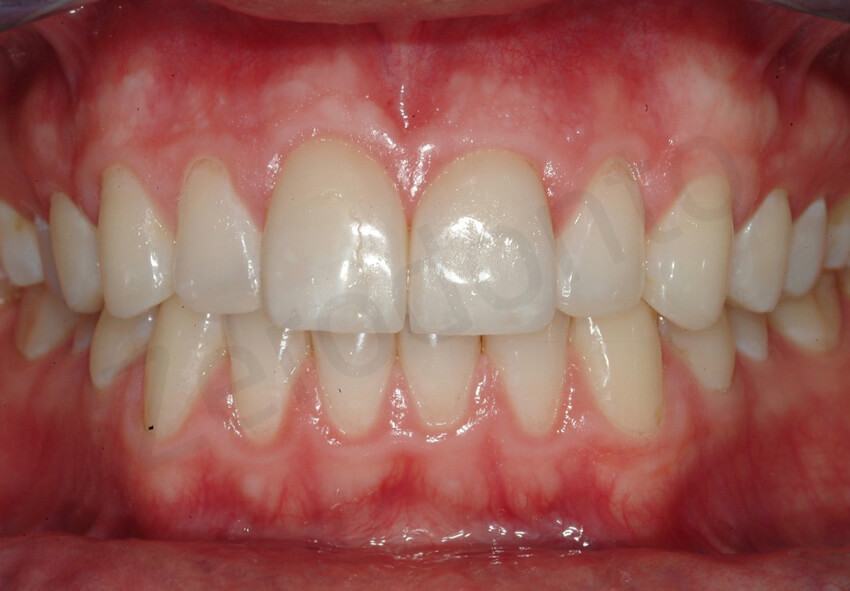
6-year follow-up. After 3 year the direct composite repair was still clinically acceptable. Note the slight deterioration of the margins of the composite, which was not noticeable by the patient.
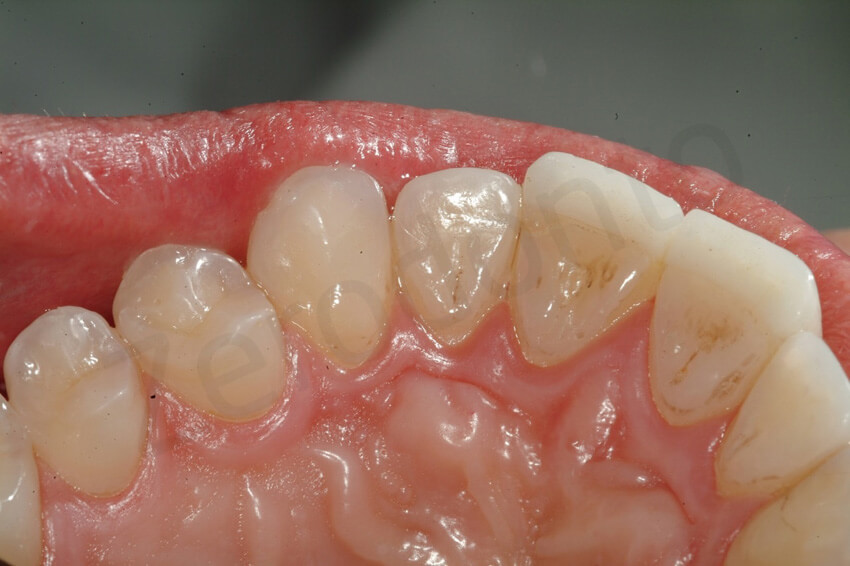
6-year follow-up. The maxillary restorations did not present sign of degradation at the level of the margins or other type of failure (e.g. fissure).
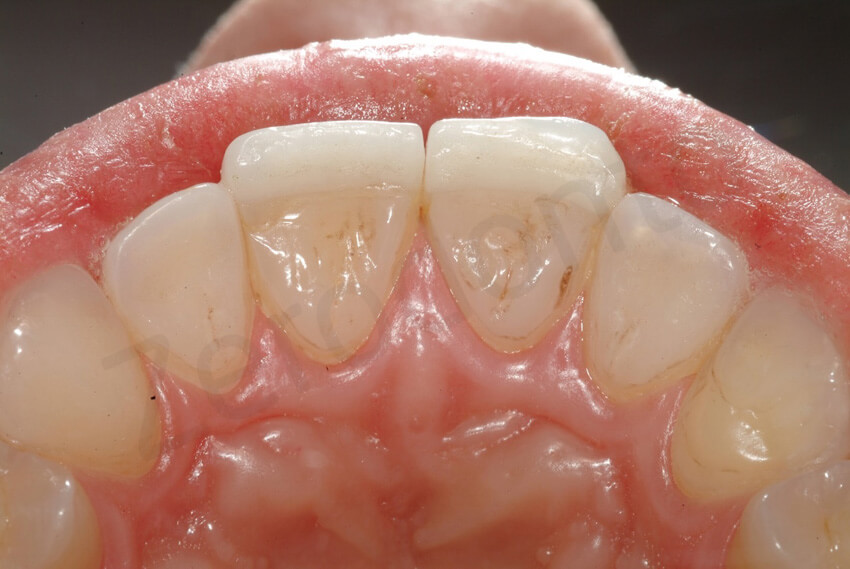
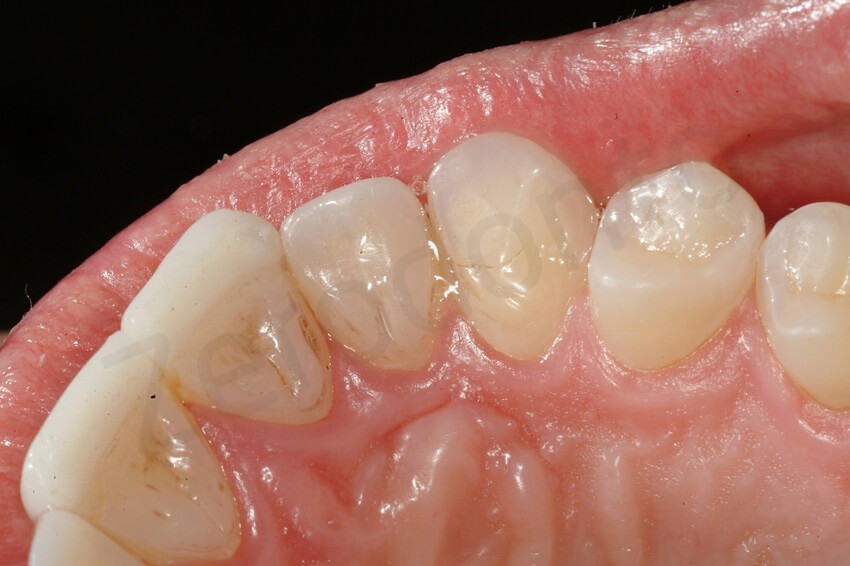
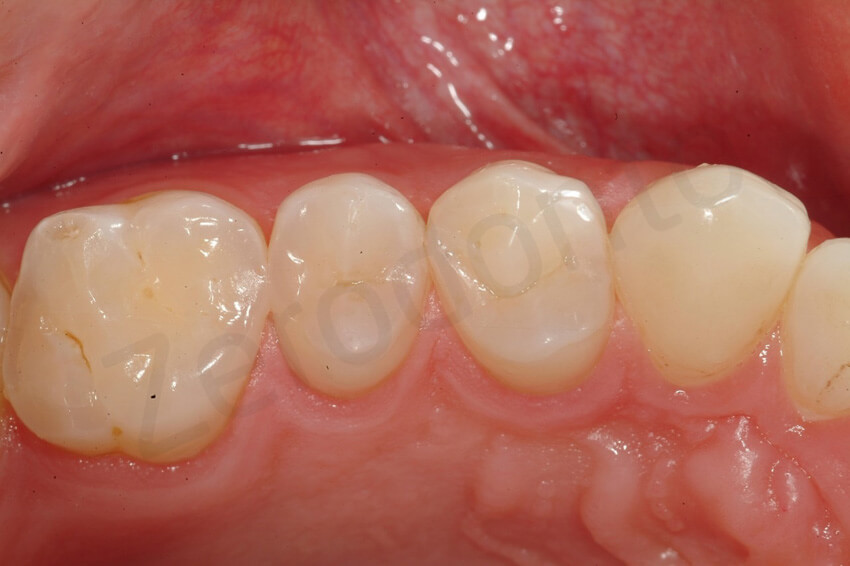
6-year follow-up
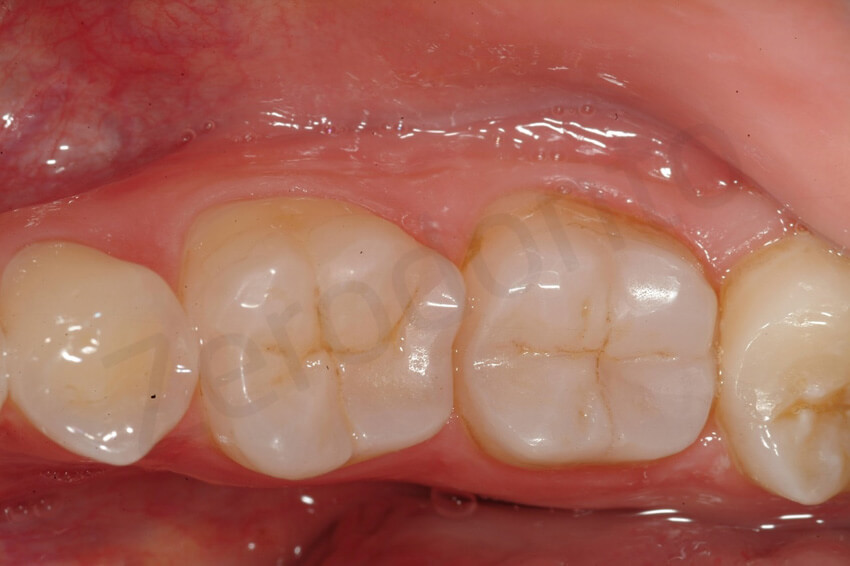
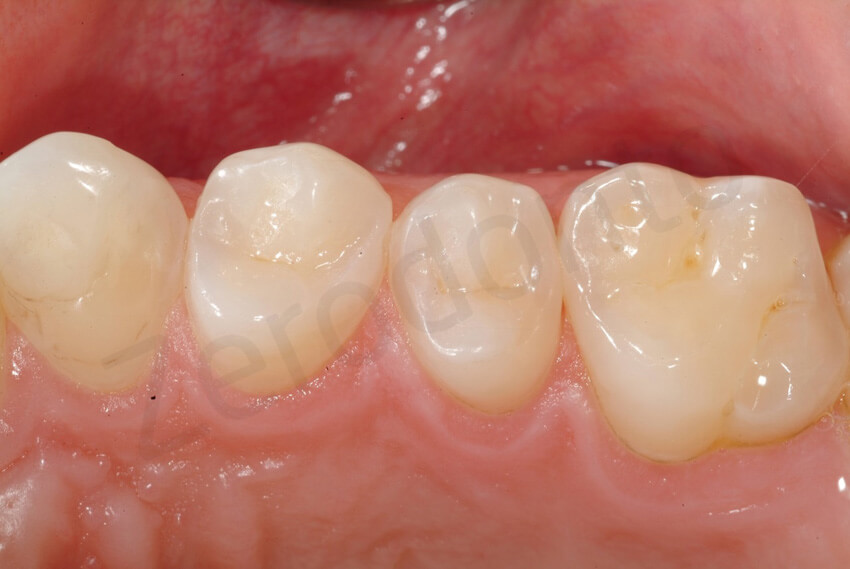
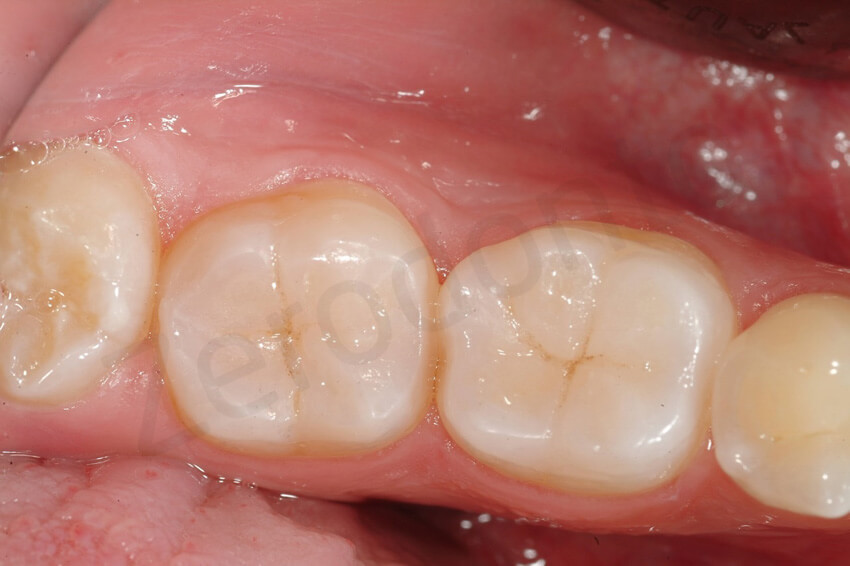
At the 6-year follow-up, non signs of degradation of the restorations were visible. The patient was very happy with the overall rehabilitation, since in 3 visits (MODIFIED 3 step technique) the damage related to the dental erosion had been repaired without any healthy tooth structure preparation.
CONCLUSION
This article presented a case report of a patient affected by initial dental erosion. Early intervention was performed due to the exposed dentin and risk of fracture of the anterior teeth. Only time will tell if this type of early and minimally if not invasive approach is the best solution for patients affected by initial dental erosion.
ACKNOLEDGEMENTS
The Italian version of this article exists just thank to the help of several people. The authors strongly thank (in alphabetical order) Fortunato Alfonsi, Ciro Bocchetti, Davide Foschi and Giuseppe Puma.
REFERENCES
- Vailati F, Belser UC. Classification and treatment of the anterior maxillary dentition affected by dental erosion: The ACE classification. Int J Periodontics Restorative Dent 2010; 30:559–571.
- Vailati F, Belser UC. Full-mouth adhesive rehabilitation of a se-verely eroded dentition: The three-step technique. Part 3. Eur J Esthet Dent 2008;3:236–257.
- Vailati F, Belser UC. Full-mouth adhesive rehabilitation of a se-verely eroded dentition: The three-step technique. Part 2. Eur J Esthet Dent 2008;3:128–146.
- Vailati F, Belser UC. Full-mouth adhesive rehabilitation of a se-verely eroded dentition: The three-step technique. Part 1. Eur J Esthet Dent 2008;3:30–44.
- Vailati F, Carciofo S. Treatment planning of adhesive additive rehabilitations: the progressive wax-up of the three-step technique. Int J Esthet Dent. Autumn 2016;11(3):356-77.
- Vailati F, Carciofo S. CAD/CAM monolithic restorations and full-mouth adhesive rehabilitation to restore a patient with a past history of bulimia: the modified three-step technique. Int J Esthet Dent. 2016 Spring;11(1):36-56.
- Bertschinger C, Paul SJ, Lüthy H, Schärer P. Dual application of dentin bonding agents: Effect on bond strength. Am J Dent 1996; 9:115–119.
- Paul SJ, Schärer P. The “Dual Bonding Technique”—A modi!ed method to improve adhesive luting procedures. Int J Periodon-tics Restorative Dent 1997;17:537–545.
- Magne P, So WS, Cascione D. Immediate dentin sealing sup-ports delayed restoration placement. J Prosthet Dent 2007;98: 166–174.
- Magne P, Kim TH, Cascione D, Donovan TE. Immediate dentin sealing improves bond strength of indirect restorations. J Pros-thet Dent 2005;94:511–519.
- Magne P. Immediate dentin sealing: A fundamental procedure for indirect bonded restorations. J Esthet Restor Dent 2005;17: 144–154.
- Belser UC, Magne P, Magne M. Ceramic laminate veneers: Con-tinuous evolution of indications. J Esthet Dent 1997;9:197–207.
- Magne P, Belser UC. Novel porcelain laminate preparation ap-proach driven by a diagnostic mock-up. J Esthet Restor Dent 2004;6:7–16.
- Magne P, Perroud R, Hodges JS, Belser UC. Clinical perfor-mance of novel-design porcelain veneers for the recovery of coronal volume and length. Int J Periodontics Restorative Dent 2000;20:440–457.
- Magne P, Douglas WH. Porcelain veneers: Dentin bonding op-timization and biomimetic recovery of the crown. Int J Prostho-dont 1999;12:111–121.
- Magne P, Douglas WH. Additive contour of porcelain veneers: A key element in enamel preservation, adhesion, and esthetics for aging dentition. J Adhes Dent 1999;1:81–92.

