SPACES OPEN THROUGH THE ACTIVE RETAINERS USE
In case of dental crowding an alignment can be made, with or without stripping, by using pre-activated retainers. Lingual orthodontics without attacks has been originally created by Dr. Aldo Macchi and Dr. Nunzio Cirulli and has also been successfully performed by other authors. This innovative technique is based on the use of retainers constituted by 5 interweaved wires of 0.0175 inches thick, shaped and activated in order to obtain the desired dental movements. Active retainers, similarly to the passive ones, are bonded on the lingual surface of the teeth. Therefore, there are invisible and they represent an ideal treatment for all patients that don’t favor the classic orthodontic therapy. Moreover, active retainers are very thin and more comfortable compared to the smaller lingual attacks. They don’t induce phonetic changes even in the first days of therapy. Thanks to all these characteristics, active retainers are actually more and more requested.
With the active retainers technique all malocclusion types may be solved: first class malocclusion with dental-basal discords, in excess or in fault, and II or III class more complex malocclusions for the latter, we also use other invisible devices such as micro screws).
Now, let’s see how it can be possible treating dental crowding with the use of active retainers. In case of a minimum dental crowding, with an inter-proximal surface overlap smaller than 0,5 mm, step folds are sufficient to develop the necessary power to align the arch. In case of a greater dental crowding it is necessary to increase wire elasticity by shaping the vertical folds in a “U” mode. Thus, charge/deflection relation is decreased, resulting in a bigger and more long-lasting activation.
In order to prepare the dental surface to the adhesion, teeth are first cleaned. Then, surfaces to be bonded are etched for 30sec and an adhesive is applied and polymerized for 20sec.
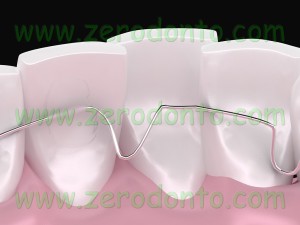
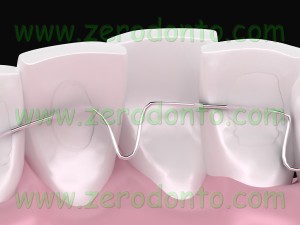
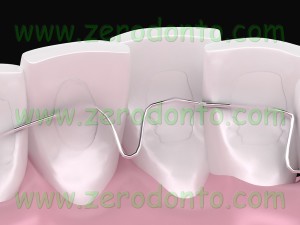
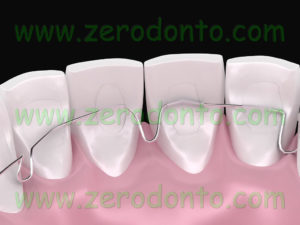
In the following figures we analyze some activations for opening spaces in case of crowding.
Figure 1: the pre-shaped retainer with U folds between n.31 and n.41 and between n.42 and n.43 is bonded on n.31. A very charged fluid composite is used.

Figure 2: by closing the handle of about 2 mm between n. 31 and 41 the retainer is bonded on n. 42. In this phase it is important to keep the vertical plan of the wire, checking with another utility tool (tweezers) that the wire doesn’t move up when the handle is closed. Attention must be paid, not to let fluid composite flow in the inter-dental space and at a gingival level in order to avoid periodontal problems. Obviously, the fluid composite must never be positioned at a handle level. To notice that retainer, after being bonded on n. 31 and 41, is more moved towards the lingual surface compared to n.41.

Figure 3: the retainer is pulled over through an utility tool at n. 41, moving it from a lingual to a vestibular way and it is bonded.

Figure 4: alignment is obtained when the handle creates a space through the expansion and n.41 is moved lingually.

In the following video we analyze a handle bonding sequence example to obtain the expansion and alignment.
RETAINER ASSEMBLING VIDEO
References
1.Macchi A, Cirulli N. “Fixed Active Retainer for Minor Anterior Tooth Movement”. Journal of Clinical Orthodontics, 2000.
2.Macchi A, Rania S, Cirulli . “Una proposta per la gestione di disallineamenti anteriori: il mantenitore attivo di contenzione (MAC)”. Mondo Ortodontico, 1999.
For further information:
zerodonto@gmail.com
tel. 0039 081 2451805

