The use of micro-screws in orthodontic anchorage is becoming more and more frequent in both vestibular and lingual techniques with brackets, and in more aesthetic and comfortable techniques without brackets.


Micro-screw insertion should be considered a surgical procedure as erroneous handling of the bone can easily lead to an inflammatory reaction around the screws and incorrect positioning can lead to their loosening.
Thus, in an attempt to make things clearer and to answer questions we have been asked by many of our colleagues, we can make a list of the problems that can be encountered and also share our experience in solving them.
The main problems which we can encounter when inserting a micro-screw are:
- Premature loosening of the micro-screw;
- An inflammatory reaction around the micro-screw with subsequent expulsion of the latter and the simultaneous loss of a small quantity of bone mass around the micro-screw;
- Micro-screw breakage;
- Periodontal damage when we “touch” the dental element with the micro-screw;
- Damage to anatomical structures close to the insertion site (vascular, neural and maxillary sinus);
- Decubitus ulcer on the alveolar mucosa and buccal mucosa, which often develops, above all, in the inferior dental arch.
1. Screw loosening
It is important to make some comments on this topic.
Nowadays, one can find osteointegrable micro-screws with a rough surface. After insertion of the screws, one must wait for osteointegration to occur before loading them. They are more difficult to remove.
Micro-screws with a smooth surface also exist, and these are mostly used by orthodontists. These screws do not osteointegrate and they become anchored to the bone through friction.
Let us begin by recounting something which is only the fruit of our experience. While it is true that in implantology the conical-shaped screw allows for a greater primary stability and thus an increased certainty of osteointegration, the same cannot be said for smooth, non-osteointegrable micro-screws. The smooth micro-screw is anchored via the friction that it has with the bone.
If we use a conical micro-screw, it can become completely unscrewed if turned just half way anticlockwise. On the other hand, a cylindrical micro-screw continues to rub along its path without losing stability even if it becomes slightly unscrewed. Thus, judging from our experience, the conical, non-osteointegrable screws should not be used.
Furthermore, if elastic bands are used, it is important to fasten them to the head with some composite fluid in order to prevent micro-screw loosening. This is because band oscillations, which can be produced when the patient speaks or eats, are transmitted to the micro-screw thereby loosening it. Infact, an oscillation of the band transmits a force to the micro-screw in a clockwise direction, and moments later another force in an anti-clockwise direction. As the force in the anti-clockwise direction is set against a lesser friction of the micro-screw, the screw tends to loosen. In order to prevent this from occurring, it is sufficient to fix the elastic band to the micro-screw using some fluid composite which keeps it in place.

In order to prevent micro-screw loosening, we recommend avoiding immediate loading. One should wait at least one week in order to allow optimal tissue integration of the screws.
2. Inflammatory reaction
There are two reasons why an inflammatory reaction may occur around the micro-screw.
If the reaction is immediate, it may be due to incorrect handing of the bone tissue or contamination of the surgical site.
If the reaction occurs later on, it may be due to micro movements of the micro-screw within the bone which trigger a foreign body response and seizure of the screw.
Only titanium and never stainless steel micro-screws should be employed due to titanium’s properties and its biocompatibility.

We use the following standard operating procedure:
- We wash the site with physiological solution in order to eliminate residues of chlorhexidine, as, even though it reduces the bacterial load, it should not be allowed to come into direct contact with the bone.
- If using cylindrical non self-tapping micro-screws, a pilot cutter must be used in order to make the starter hole. If using conical or cylindrical self-tapping micro-screws, the starter hole is made only if dealing with very dense bone such as the jawbone. This hole must be made with the appropriate drill, through the use of a reducer handpiece (for implants or for endodontics). It must be performed with a small number of rotations (500-700 turns a minute) with irrigation using a precooled sterile physiological solution. In addition, the hole must be made through the gum, and always through close-fitting gums, otherwise the mucosa would wrap around the drill causing damage to the soft tissues. The insertion of a micro-screw in loose gums would cause its incorporation within the soft tissues, thus making it necessary to make an incision in order to expose the micro-screw.
- If the pilot cutter is used, care should be taken so as not to overheat the bone. This can be done by making quick entry and exit movements. In addition, care should be taken so as not to make oscillatory movements. Also, the drill should not be positioned in the same place for a long time as it would make the hole too big, thereby reducing primary stability. The pilot cutter must be 0.2 – 0.3 mm smaller in diameter than the micro-screw. Once the hole has been made in the cortical bone it is necessary to irrigate the inside of the hole with a precooled physiological solution for at least ten seconds. The micro-screw can then be inserted without irrigation.

- The sterile micro-screw (we use the Spider Screws by Orteam kept in a sterile case) must be fastened with the appropriate driver manual or mechanic. It is screwed in without the use of irrigation with a physiological solution as such irrigation could transport saliva residues to the surgical site and contaminate the micro-screw during its insertion.
- The thread of the micro-screw must not be touched with gloves or with tweezers. It would be better to have sterile micro-screws which allow anchorage to the head with the use of the mounter device, without having o touch them.


If in daily practice the micro-screw were to touch the gloves or the drape sheet or if it should become contaminated in any way, it can be washed with physiological solutions and sterilized in small quartz balls. The next step would be to rinse the screw again with physiological solution, holding it with anatomical tweezers with titanium tips.
- The micro-screw should be loaded preferably after one week in order to avoid micro movements at the very early stages of healing, which would cause its expulsion.
- Once inserted, the micro-screw must not be subjected to micro movements and it must have sufficient primary stability.

3. Micro-screw Breakage
Micro-screw breakage occurs very rarely. This can happen above all when we have to screw them into very dense bone – type 1 or type 2 – without having previously made a starter hole with a cutter, particularly in the jawbone.
Incorrect or excessive loading of the micro-screw can also cause breakage, although it is much rarer.
In case of breakage, the micro-screw must be removed with tweezers or with the help of very fine bone cutters, or alternatively, using ultrasound ablation.
Turning the tip of the ablator on the damaged micro-screw in an anti-clockwise direction facilitates unscrewing.
4. Damage to the periodontal structure of the tooth.
Although recent studies have highlighted that if a micro-screw should cause damage to the periodontal structure there will nevertheless be a restitutio ad integrum of the periodontal ligament with complete recovery of the periodont, it is certainly an eventuality to be avoided. In such cases, contact would be made between the deep periodont of the tooth and the oral cavity, through the micro-screw.
One must therefore consider that the potential damage to the periodontal structure of the tooth also depends on the type of screw used. Self-tapping screws have sharper and more pointed blades and can create perforations in the dental element. The use of non self-tapping screws is safer. Screwing is halted if the latter encounter a dental element and the operator notes a sudden increase in resistance while screwing.
In order to avoid notching the periodont of a dental element, numerous techniques can be used which allow the correct positioning of the micro-screw with the help of endoral radiographs, labelling the chosen position for the micro-screw with radiopaque materials.
During positioning of the radiographic tube, it is important to bear in mind the direction of the rays. The tube must always be positioned along the axis of insertion of the micro-screw in order to obtain precise information on the structures encountered along this axis.
As part of our daily practice we use a circular piece of the leaded sheet (hence radiopaque) of a radiographic film.

A circular fragment is cut from the film using small scissors. The fragment is of the same size as the head of a micro-screw and it is placed in the position where the micro-screw is to be inserted. This fragment is kept in place by denture adhesives such as Corega or Kukident.


In this way we can label the radiography with the chosen position of the micro-screw until the correct position is found.


We use this technique because it is much faster and simpler compared to other techniques and at the same time, it is just as accurate as it allows the positioning of the marker device of the micro-screw close to the gums, thus avoiding problems such as overlaps and radiographic distortions.
.
5. Damage to anatomical structures close to the insertion site
When inserting micro-screws one must bear in mind the anatomical structures, such as the inferior alveolar nerve and the lingual artery, which lies in the alveolar mucosa going up to the inferior arch; the maxillary sinus, the greater palatine nerve and artery and the superior dental arch. A careful radiographic study and a good knowledge of anatomy helps prevent potential damage to these structures.
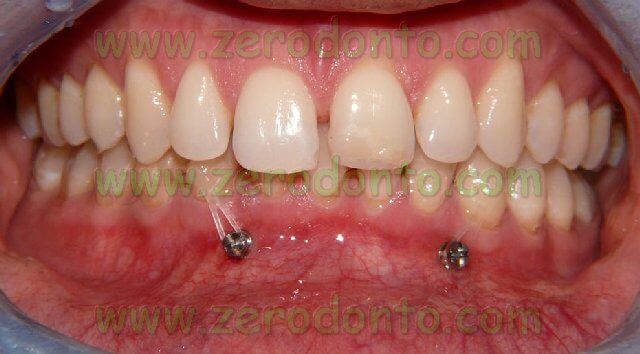
6. Decubitus ulcer of the alveolar mucosa and buccal mucosa.
This problem often occurs, above all, at the inferior dental arch and in cases where there is only a small amount of attached gum.
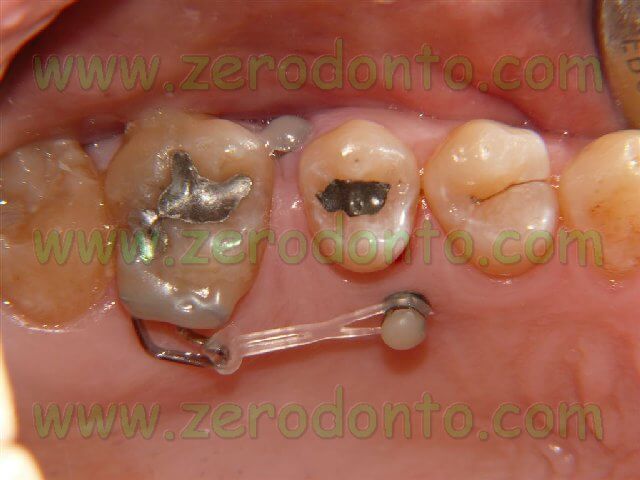
Bearing in mind that the screw should always be inserted in attached gums, we are often confronted with cases where, due to the scarcity of the gums, we are forced to insert the micro-screw behind the mucosal gum line. In this case (and we tend to do this routinely now) the micro-screw head is coronally inclined by 45°. In this way we can move it away from the alveolar mucosa, greatly reducing the patients’ pain.
By inclining the screw in this way we can place it closer to the crest so that it can be screwed into the superior alveolar side. In order to avoid the risk of sliding on the bone surface, which is inclined with respect to the axis of the micro-screw, it is advisable to make a starter hole with a cutter in these cases.


In our clinical practice, we have used other solutions which have greatly reduced the patients’ pain. In particular, we have seen that by covering the head of the screw with fluid composite or by applying gel mouthwash, pain is greatly reduced, and in many cases it is not even felt. The prescription of orthodontic wax over the head of the screw in order to protect from a decubitus ulcer is not much appreciated by the patients.

For further info:
zerodonto@gmail.com
tel. 0039 081 2451805
